Bootcamp Notes – Day 8 (Tues) – Get to Know CSS

Get to Know CSS
What is CSS? CSS stands for Cascading Style Sheets. A “Cascading” algorithm determines what CSS styles to apply to an HTML document.
CSS controls the visual design and layout of an HTML page such as: width, borders, colors, margins, fonts, font sizes, alignments, positioning, and much more.
HTML was never intended to be used for design at the start. The creators believed from the start that separation of concerns between a webpage’s content & structure vs. its style & layout. It took several years and many different competing implementations at first for years, but CSS became accepted as industry standard with World Wide Web Consortium (W3C)’s official recommendation in 1996. The W3C CSS Working Group (formed in 1997) oversees the CSS standards. The current implementation of CSS is CSS3.
CSS Syntax Terms
- CSS Ruleset/Rule
- Selector
- Declaration Block
- Declaration
- Property Name/Property
- Property Value/Value
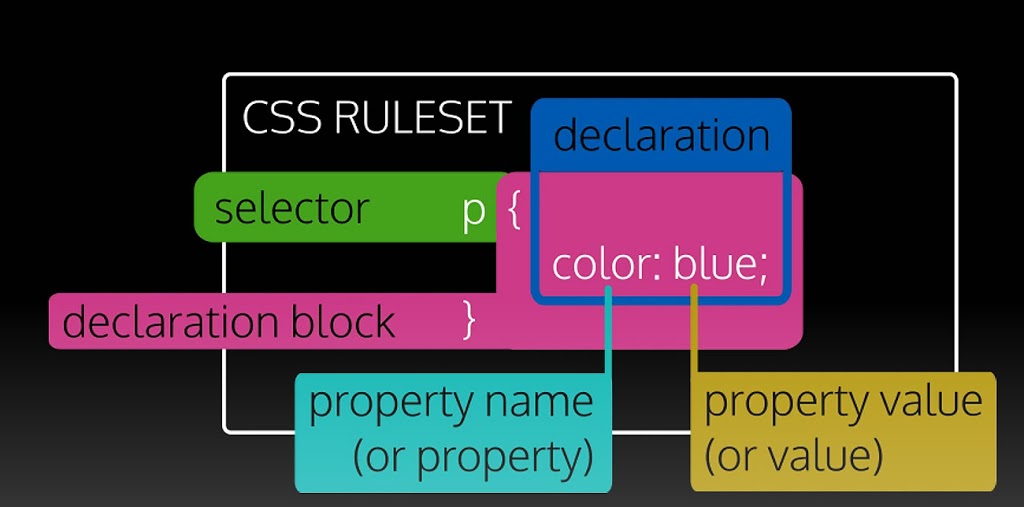
Below is an example of a CSS Ruleset or can be called also a CSS Rule. It contains a CSS selector, and a declaration block. In the example the selector is p (which is a paragraph element). A selector is a condition that specifies what part of an HTML document that the following ruleset will apply to. Any HTML element can be used as a CSS selector. The selector is followed by a space then { } braces. The {} braces comprise the declaration block. Inside the {} braces is one or more declarations. Each declarations should be on it’s own line. In this example is only one declaration, but you can have more! The CSS declaration is made of two parts: property name(property) and property value(value). The property and value are separated by a colon. Also, each declaration ends with a semicolon.
USING CSS
Three ways to add CSS to a webpage:
- External stylesheets
- Internal stylesheets
- Inline styles
Using CSS external stylesheets is the recommended way to use CSS. CSS rulesets are written inside text document with .css extension. In the HTML document, add <link> element inside <head>:
<link rel=”stylesheet” href=”css/styles.css”/>
For rel (relationship) attribute, always use “stylesheet“. For href attribute, provide path to external stylesheet document.
The stylesheet can be a local file, or a stylesheet (created by others) could be hosted elsewhere on the web often on a CDN (content delivery network). The popular bootstrap CSS for example has stylesheets hosted on CDN’s that we can link to from any webpage to use their styles. For example:
<link rel=”stylesheet” href=”https://maxcdn.bootstrapcdn.com/bootstrap/4.0.0/css/bootstrap.min.css” />
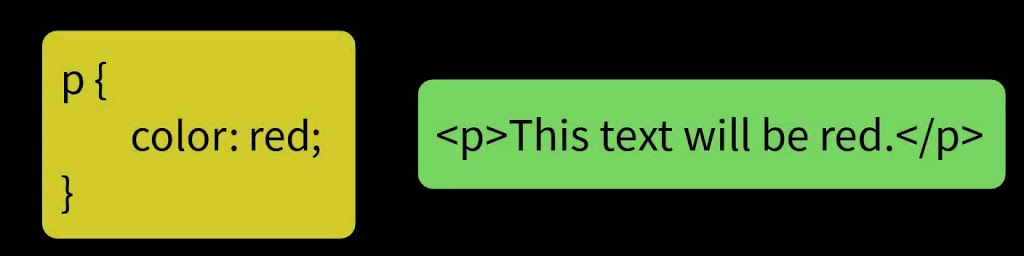
You could also do CSS internal stylesheets by using <style> element inside HTML document’s <head>. Write CSS rulesets inside the <style> element, for example below:
<style>
p {
color:red;
}
</style>
You can also do CSS inline styles. Use the style attribute in an HTML element to directly apply a style. Write CSS declarations inside the style attribute’s value. For example: <p style=”color: red;”>This text will be red.</p>
Avoid internal stylesheets and inline styles for two main reasons:
Harder to maintain/update/organize
They can only apply to a single webpage VS and external stylesheet can be applied to unlimited number of webpages. What if you had a site that was a 100 pages? What if you needed to change the header font on all those pages? It is far easier to make that one change on one stylesheet VS changing the style on a 100 pages!
Although internal stylesheets/inline styles can be useful during development for testing styles.
With CSS selectors, every CSS ruleset has a selector at the beginning. Three primary kinds of selectors are:
- element/type
- class
- id
This is CSS selector is an: element/type
This selector will target all paragraph elements in the linked HTML document.

Next we have a CSS class selector. Create a class selector with a period/full stop, followed by the class name. Name must not start with a number; should be lower case, no spaces, use hyphen to separate words. This selector example below targets all elements with a class attribute that contains the class name (not including the full stop). CSS relies heavily on class selectors; they are the most flexible and reusable.

Finally we come to the id selector. Create an id selector with a # followed by the id name. Name must not start with a number; should be lower case, no spaces, use a hyphen to separate words. This selector targets the element with an id attribute that matches the id name from the stylesheet (not including the #). Also, each id name can only be used once per HTML document. Use id selectors sparingly. Classes are preferred. Look at this example below. This selector will target copyright and change the font-size to 12px.

CLASS VS ID
You can set class or id attribute on any HTML element. The main difference between them is: classes can be applied to multiple elements; and id’s should be used as a unique identifier on only one element in the document.
Analogy you can use to remember: a driver’s license has a unique id#, and it can have multiple classes such as: class A, class B, class C, class D.
Beware, if you accidentally set the same id to more than one element in a document, the browser will not warn you and ignore all but the first element when you target that id, so be careful.
You can also set multiple classes on the same element. Then set both on same element to combine the rules, separate with a space. Look at example below:

Also note, you cannot do this with ids, id attribute can only hold one id. For example you could not do this:
<p id=”id1 id2″>..</p>
Additional Resources
- CSS-Tricks – A Look Back at the History of CSS
- CSS-Tricks – CSS Ruleset Terminology
- MDN – CSS Basics
- CSS Zen Garden – The Beauty of CSS Design
- W3Schools – How to add CSS
- MDN – <link>: The External Resource Link element
- MDN – How CSS is structured
- CSS Tricks – The Difference Between ID and Class
- W3Schools – How to add CSS
- MDN – <link>: The External Resource Link element
- MDN – How CSS is structured
- CSS Tricks – The Difference Between ID and Class
- W3Schools – Layout – Horizontal and Vertical Alignment