Bootcamp Notes – Day 2 (Tues) – Bootstrap: The Web Development Stack and Your Project to Git


The Web Development Stack and Your Project Git
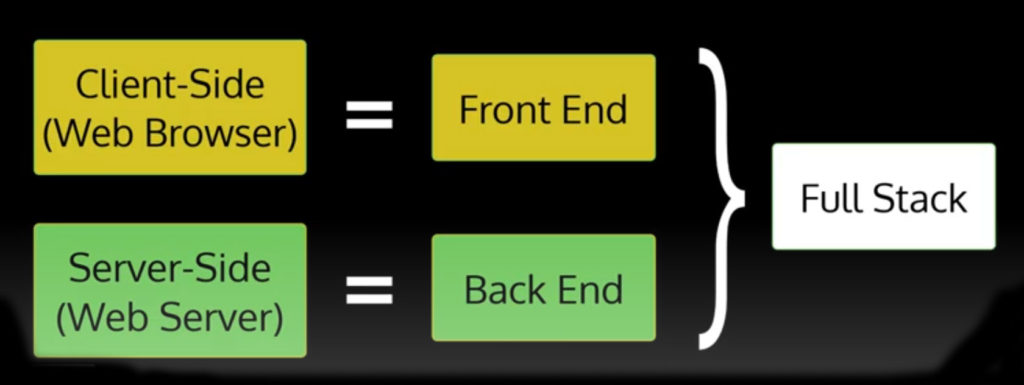
Front End vs. Back End vs. Full Stack web development
A full stack developer is someone who knows both sides! They will be familiar with the whole range!

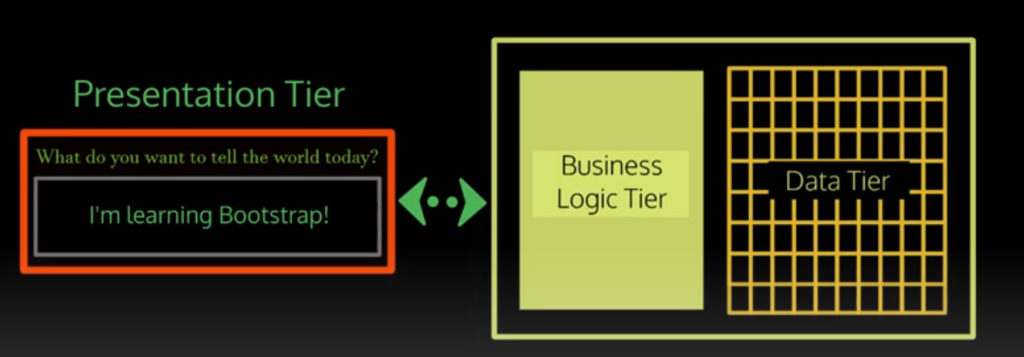
3-tier architecture model: the presentation tier, the business logic tier, and the data tier
presentation tier = Front End. Getting data to and from user
data tier = Back End. Storing & managing website data (Typically with database software such as: mongoDB, mysql
business logic tier = Back End, Code runs on server side. Intermediary between presentation & data tiers. This can be done with JavaScript using Node.js, PHP, or Ruby
This example below.
Introduction to Bootstrap & Front End UI Frameworks
What is a front end framework?
A front end framework or library is concerned with building the presentation layer of a website – the content & style. Bootstrap is one of the most well-known front-end UI (user interface) frameworks. It is mainly CSS-based, along with support from JavaScript.
Why use front end frameworks?
Is it possible to code every piece of of a website from scratch? Of course it is! But in many cases it would mean reinventing the wheel. You want to avoid reinventing the wheel; avoid issues with code consistency & maintainability. The bootstrap framework is a free open source collections of CSS and JavaScript files that contain classes and utilities that you can use in your project. It makes it easy to create responsive mobile first attractive web pages that can be further customized as much as you like. There are many other similar UI frameworks nowadays such as material UI, semantic UI, and pure. Bootstrap is the most widely used – works well & is used everywhere and has excellent documentation and helpful online community. It is an invaluable tool to add to your toolkit. Bootstrap is a great way to get introduced to the vocabulary of modern front-end development, by which we mean the conventional terms for common UI concepts: such as modal’s, accordion’s, carousels, breadcrumbs and more. Along with examples of how to create and use them. That shows you why UI engineers have found it to be useful enough to need to create over and over again. Even if you choose to later use a different framework or none at all, knowing these concepts and terms will still be useful to you. On the other hand, learning to use bootstrap should not be a substitute for learning to write CSS. Bootstrap makes it easy for you. It’s like a classic image of a duck that looks like it’s floating serenely on water, while it’s feet are kicking out of site. It is handling things for you such as CSS media, queries, flexbox and much more that you are able to use, without having to understand exactly how it works, and that can be detrimental in the long run. As a new developer, quickly learn about modern front-end development/common UI concepts such as modals, breadcrumbs and more.
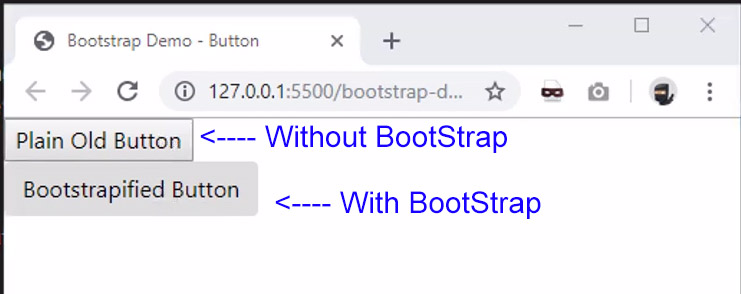
Bootstrap is a front-end UI framework based mainly in CSS with some JavaScript and you can use it to build responsive mobile first web page quickly. It can also help you learn about modern web development practices and concepts and you can easily look at the source code to see how it is built!
Bootstrap Project Setup
Note: Use this for a starting point for all new projects.
- On Windows 10
- Create working folder: Example: nucampsite
- Then right click folder: nucampsite and open with VS Code
- Then in VS Code open terminal and make sure it is set to bash.
- In the terminal type: npm init
- Then press enter for all the prompts.
- In the terminal type: ls (You will see package.json now)
- Next will install the dependencies for project. In the terminal type: npm install lite-server@2.5.4 –save-dev
- In the terminal type: npm install bootstrap@4.5.2
- In the terminal type: npm install jquery@3.5.1 popper.js@1.16.1
- In the terminal type: ls (You will now see a node_modules folder
- Now in VS Code click on the left side: package.json (Notice the devDependencies and dependencies we installed!)
- For this example on description will add our text: “This is a website for the fictional campsites review site Nucamp “,
- Now the next line down we change this: “main”: “index.js”, to this “main”: “index.html”,
- Now on scripts we add these two items in orange
"scripts": {"lite": "lite-server", "scss": "node-sass -o css/ css/","start": "npm run lite",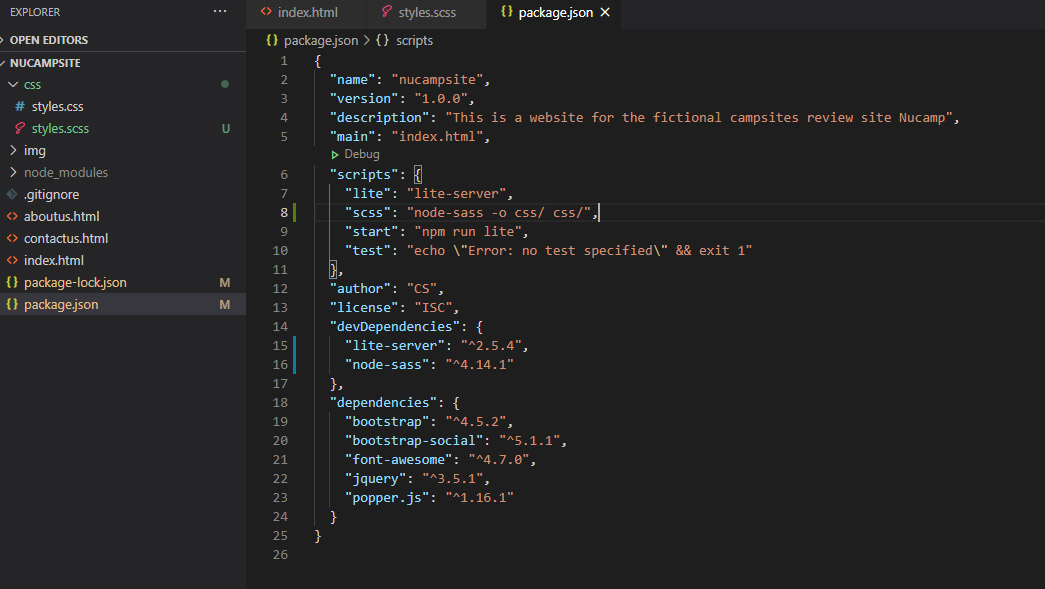
- Make sure to save!
- Now still in VS Code in our nucampsite folder. Create a: index.html file
- Now copy the template code over(supplied by NuCamp) onto index.html file.
- In the VS Code terminal type: pwd (which means print working directory) (Just check you are in the right folder before next step)
- In the VS Code terminal type: npm start (This will turn on your browser and then show our index.html page using lite-server)
- See your work displayed in browser!
- In the VS Code terminal type: Ctrl+c (To stop your project from running and return to the command prompt in your terminal
- In the terminal type to Install: font-awesome: npm install –save @fortawesome/fontawesome-free
- In the terminal type to Install: bootstrap-social: npm install bootstrap-social@5.1.1
These steps are towards the end of your project for deployment! If you are not ready at this stage go onto step: (A) Add Git (Local)!
- In the terminal type to Install: npm install –save-dev node-sass@4.14.1 (Installs SASS)
- Then follow the steps (Compile .scss to .css) on this page!
- Then Do (NPM Scripts – Part 1)
- Then Do (NPM Scripts – Part 2)
- Then Do (NPM Scripts – Part 3)
- If you have a web server like hostgator or something. You can use an FTP like Filezilla and upload the contents of your dist folder like I did.
(A) Add Git (Local)!
- From step 22 we continue on.
- Now in VS Code, we create a file called .gitignore inside our project folder and add this one line: node_modules (which will be ignored by Git, because they are available from NPM)
- In the VS Code terminal (Bash), we initialize a git repository with the command: git init
- In the VS Code terminal (Bash), add all new or changed files to the staging area, using the command: git add .
- In the VS Code terminal (Bash), this next command will commit the staged files to your local git repository: git commit -m “My First Bootstrap Project” (m stands for message)
(B) Add Remote Git!
- Make sure you have your Github account made first!
- In Github “Create a new repository”
- In Github copy your new repository URL: https://github.com/studentexample777/nucampsite.git
- In the VS Code terminal type: pwd (which means print working directory) (Just check you are in the right folder before next step)
- In the VS Code terminal type: git remote add origin https://github.com/studentexample777/nucampsite.git (To Link your local repository to your remote repository)(Only need to use this line once)
- In the VS Code terminal type: git push -u origin master (Pushing your committed code to the online repository)(Only need to use this line once)
- To push commits in the future, you will only need to use git push without the other arguments above.
Once A and B steps are done above just do these steps to push your work to Github
- In the VS Code terminal (Bash), add all new or changed files to the staging area, using the command: git add .
- In the VS Code terminal (Bash), commit the staged files to your local git repository: git commit -m “MessageNote” –> (-m message)
- In the VS Code terminal (Bash): git push (Push to Github)
Git Useful Commands:
- git –version (Shows version of git)
- git init (initialize a git repository)
- ls (List of files and folders)
- ls -a (List of files and folders and hidden)
- cd (change directory)
- cd.. (go up one folder level)
- git status (Status of commits and branches)
- git add nameOFfile (Will add files one by one to a staging area in local repository)
- git add . (Will add all files new or modified to a staging area in local repository)
- git commit -m “MessageNote” –> (-m message)
- git log –oneline (To see change log and see unique identifier(hash))(We can use the hash to go back to a previous commit)
- git checkout hashNumber nameOfFile (to go back to a previous version)
- git reset HEAD nameOfFile (To reset back to the head) and then do git checkout — nameOfFile
- pwd (which means print working directory) (Just check you are in the right folder before next step)
- npm start (This will turn on your browser and then show our index.html page using lite-server)
- Ctrl+c (To stop your project from running and return to the command prompt in your terminal)
- git remote add origin https://github.com/studentexample777/nucampsite.git (To Link your local repository to your remote repository)(Only need to use this line once)
- git push -u origin master (Pushing your committed code to the online repository)(Only need to use this line once)
- git push (The
git pushcommand is used to upload local repository content to a remote repository. Pushing is how you transfer commits from your local repository to a remote)
Cloning an online repository (Use this to take someone else’s repository and clone it to your own computer as local)
- Note the URL of your online remote Github repository, which you used in the git remote add command when you linked your git-test repository to it.
- We’re going to pretend that this is someone else’s online repository that you don’t yet have, and you want to clone it to your own computer as a local repository.
- We’ll need to go to a new folder for this.
- In your bash terminal, back out of the nucampsite folder with the command cd .. then use the command mkdir git-nameOfNewFolder to create a new folder.
- Use cd git-nameOfNewFolder to enter this folder.
- Inside this folder, type git status – you will see an error message that tells you this folder is not a Git repository. That is good – that is what we want. We don’t want to clone a repository into an existing repository, as that will cause errors.
- Remember that remote repository URL you were asked to note earlier? We’re going to use it now. Use this command to clone your remote repository to this folder:
git clone <replace this with your remote repository URL>
- The git clone command will download your remote repository to a folder with the same name as the repository. Also it will automatically link to the remote repository.
- Type ls to verify that the code from the remote repository (the index.html file) has been cloned. Type git status to verify that this folder is a local repository.

Additional Resources:
- What is a Full Stack developer?
- The Myth of the Full-stack Developer
- What is the 3-Tier Architecture?
- Bootstrap 4.5 Official Documentation – Getting Started
- W3Schools’ Bootstrap Guide
- StartBootstrap – Bootstrap Resources
- Most Popular Front-end Frameworks Compared
- Top 6 Best CSS Frameworks For 2019
- Building Twitter Bootstrap – An early article on the origins of Bootstrap by one of its creators
- Bootstrap – Getting Started
- Why Package.json? NPM Basics
- lite-server