Bootcamp Notes – Day 20 (Tues) – The Dom (Document Object Model) – Part 2 (Node Relationships)

The Dom (Document Object Model) – Node Relationships
So from the previous lessons we learned that DOM nodes can be described in parent/child/sibling relationships. This concept provides us with an interface we can use to reference nodes in relation to each other (in JavaScript as well as other programming languages such as: php, Java). Java and PHP also use these keywords and concepts to interact with the DOM. Let’s look at how we interact with the DOM.
Node Relationships
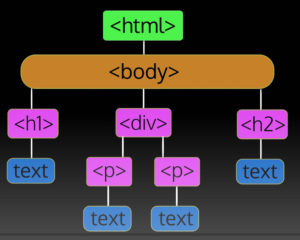
Here is a basic DOM tree structure. How do we access any of this with JavaScript? First, we need an entry point. There are various ways to get a reference to a DOM node in JavaScript.

For now ,to keep it simple, well use one simple way to always get a reference to the body node.
let node = document.body;
So we are declaring a variable name node, and it could be named anything, but here we are calling it node. Then restoring a reference to the body, which we get by using this code document.body. Document refers to the html document that’s running the code and .body points to to the node for the body element for that document. We can do this with the body node because there is only ever one valid body element in an html document. This would not work with other nodes like <div> since there is potentially more than one <div> in the document. So you can’t say document.div for example. Remember this code from earlier on: document.body.style.background …. We were able to change the background of the document! So we have our way in because all nodes are connected to all other nodes. It is possible for us to access all the other nodes in this document through this one. This is called traversing the DOM, meaning you can travel through the document via the node connections. In order to traverse the DOM you need to know about a few node properties.
.parentNode – gives the parent of a node
.firstChild & .lastChild – first and last child of a node
.nextSibling – very next sibling of a node
.previousSibling – immediate previous sibling of a node
.childNodes[…] – will give an iterable called a NodeList, containing all child nodes of a node – use bracket notation with the index to access each child in the list, e.g. .childNodes[0] for the frist child, .childNodes[1] for the second child, etc.
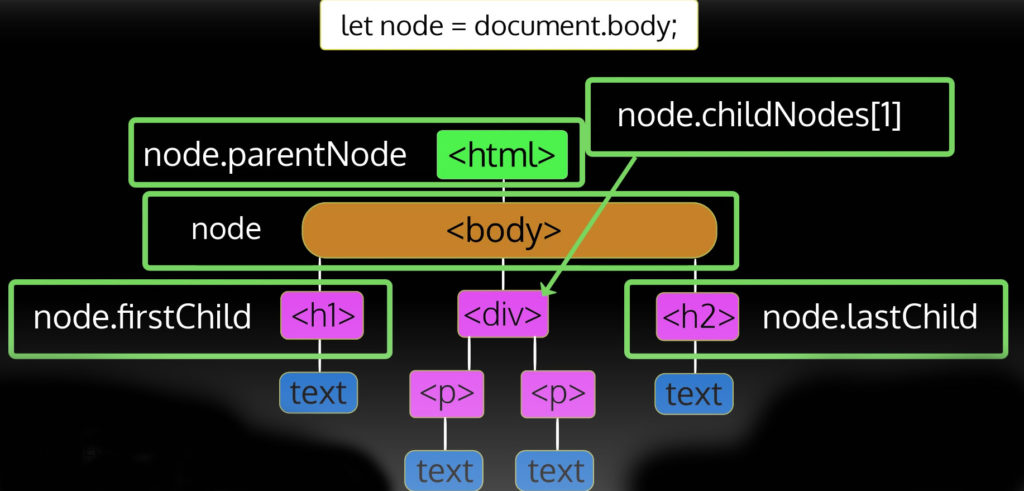
In the DOM example you see here below, once we use the JavaScript:
let node = document.body;
The variable node contains a reference to the body element. This means that the node.firstChild property points to the h1 element node. The node.childNodes[1] property would point to the div element node as that is the second child of body. We could use node.lastChild to get to the <h2> element. Also, node.parentNode would point to the html element the root node.

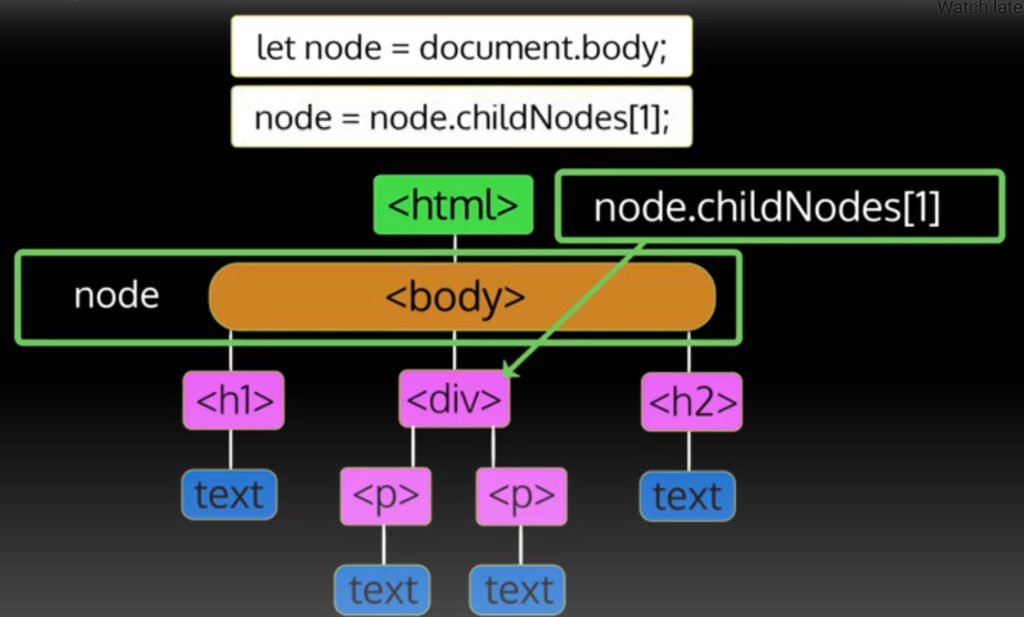
We can change the value of the node variable to point to one of the other element nodes. We could for example do this node: nodechildnodes[1] .
Now we could use node = node.childNodes[1]; Now the variable node is pointing at the div node.

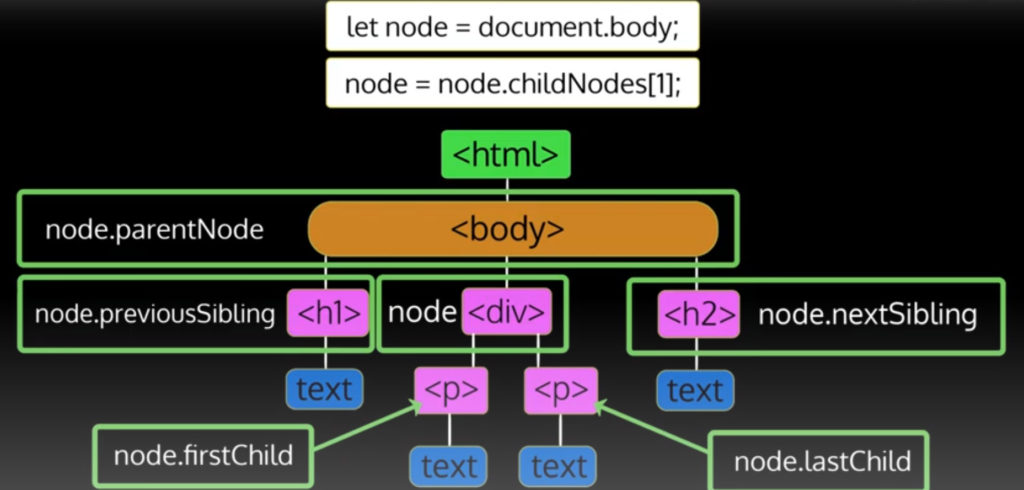
Now look below at next diagram, from there the previous sibling of this node is the <h1> node and the next sibling of this node is the <h2> node.
node.firstChild would be the the first <p> element. node.lastChild would be the second <p> element. node.parentNode would be the body element. So we could programmatically move around the DOM like this by using the parent sibling and child relationship properties to get to the various nodes.

Additional Resources:
- W3Schools – JavaScript HTML DOM Navigation
- JavaScript.info – Walking the DOM
- MDN – Node API
- DigitalOcean – Walking and Traversing the DOM with JavaScript


