Bootcamp Notes – Day 11 (Tues) – Bootstrap: Building and Deployment: NPM Scripts

Building and Deployment: NPM Scripts
In this section you will learn about getting your files ready for deployment to a web server. Will also learn how to use NPM scripts to automate the whole process. First let’s talk about the ways that we can optimize our project files and specifically what we are talking about is optimizing your files for speed. Making them smaller so they can be downloaded faster. Pages that don’t get a lot of traffic this step may not be so important but if you are working on more complex web pages or with higher traffic sites then you want to do everything you can to decrease the file sizes without sacrificing quality.
- Automation through NPM scripts
- Image Compression & Minification
Minification is the process of removing: spaces, tabs, line breaks, comments, etc to decrease file size. Those extra characters can really take up space over time. If you think about it, all of our code could just be on one line!
NPM can:
- Run Scripts
- Handle Build Tasks
- Ready Your Project for deployment
NPM Scripts – Part 1
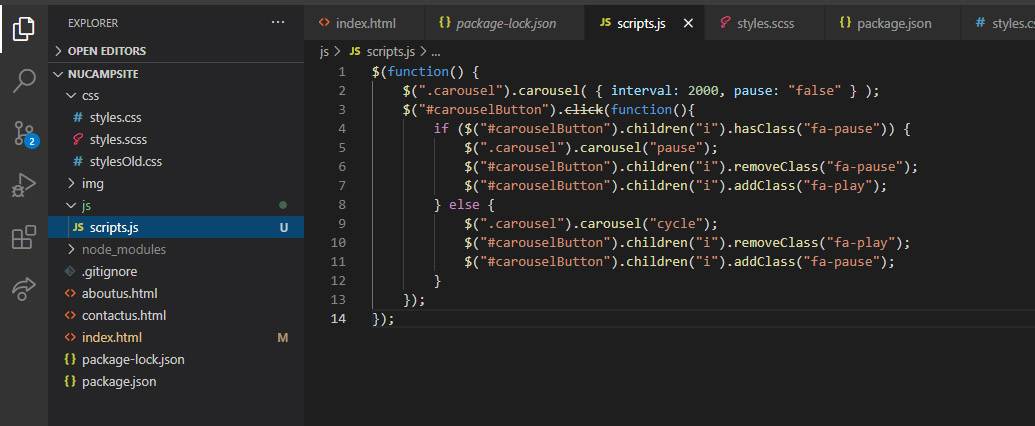
We will begin preparing for the process of building for deployment by moving any JavaScript out of the HTML files and into an external JavaScript file.
First we need to move our JavaScript over to a scripts.js file.

First, from your bash shell inside your project folder, install the NPM package onchange as a dev-dependency: npm install –save-dev onchange@7.0.0
Then install the package parallelshell with the following command, including the -E flag. The -E flag lets npm know that we want to install parallelshell at the exact 3.0.1 version this time and all times in the future. This is important here because the 3.0.2 version of parallelshell contains a bug that we wish to avoid.
npm install --save-dev -E parallelshell@3.0.1
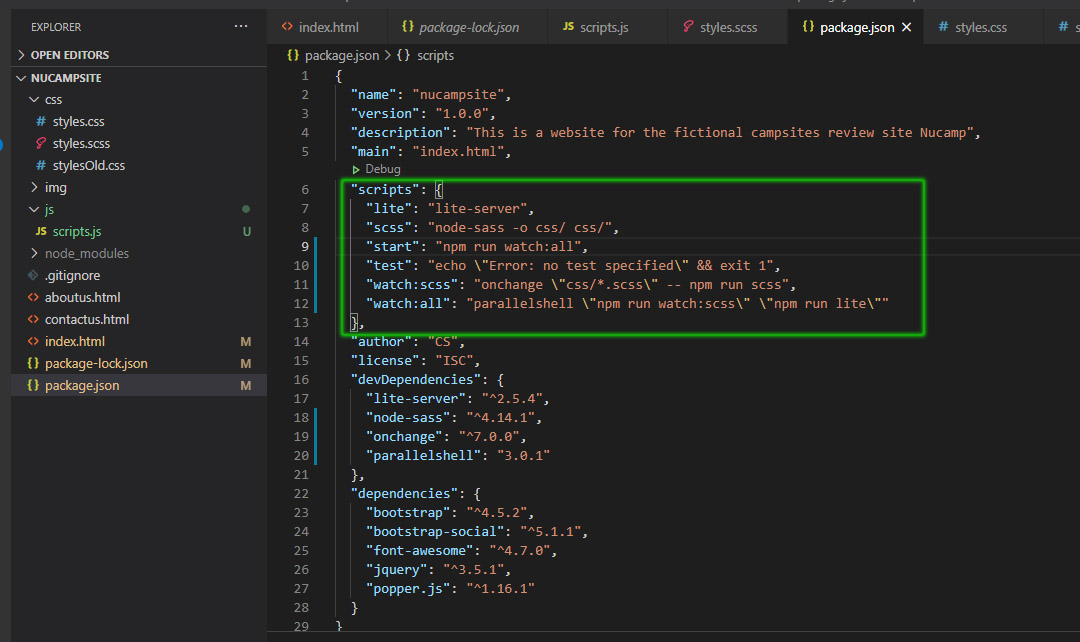
Add the following two scripts to the script object in package.json. The syntax will be slightly different based on your operating system:
macOS:
. . .
    "watch:scss": "onchange 'css/*.scss' -- npm run scss",
    "watch:all": "parallelshell 'npm run watch:scss' 'npm run lite'"
  },
. . .. . .
"watch:scss": "onchange \"css/*.scss\" -- npm run scss",
"watch:all": "parallelshell \"npm run watch:scss\" \"npm run lite\""
},
. . .
package.json- Update the start script as follows: “start”: “npm run watch:all”,
- Then, type the following at the prompt to start watching for changes to the Sass file, compile it to CSS, and run the lite server: npm start
- Now, whenever you make any changes to styles.scss file, it will automatically be compiled to the corresponding .css file.
- You can test this by making a small change to your styles.scss file, and you’ll be able to see the recompilation happen in real time.
NPM Scripts – Part 2
- Automate the process of building a distribution folder by writing NPM scripts, including:
- Storing copies of all Font-Awesome icon files
- Compress or minify images
- Minify and uglify code files
- Clean up the distribution folder
- Generate the distribution files with an NPM command
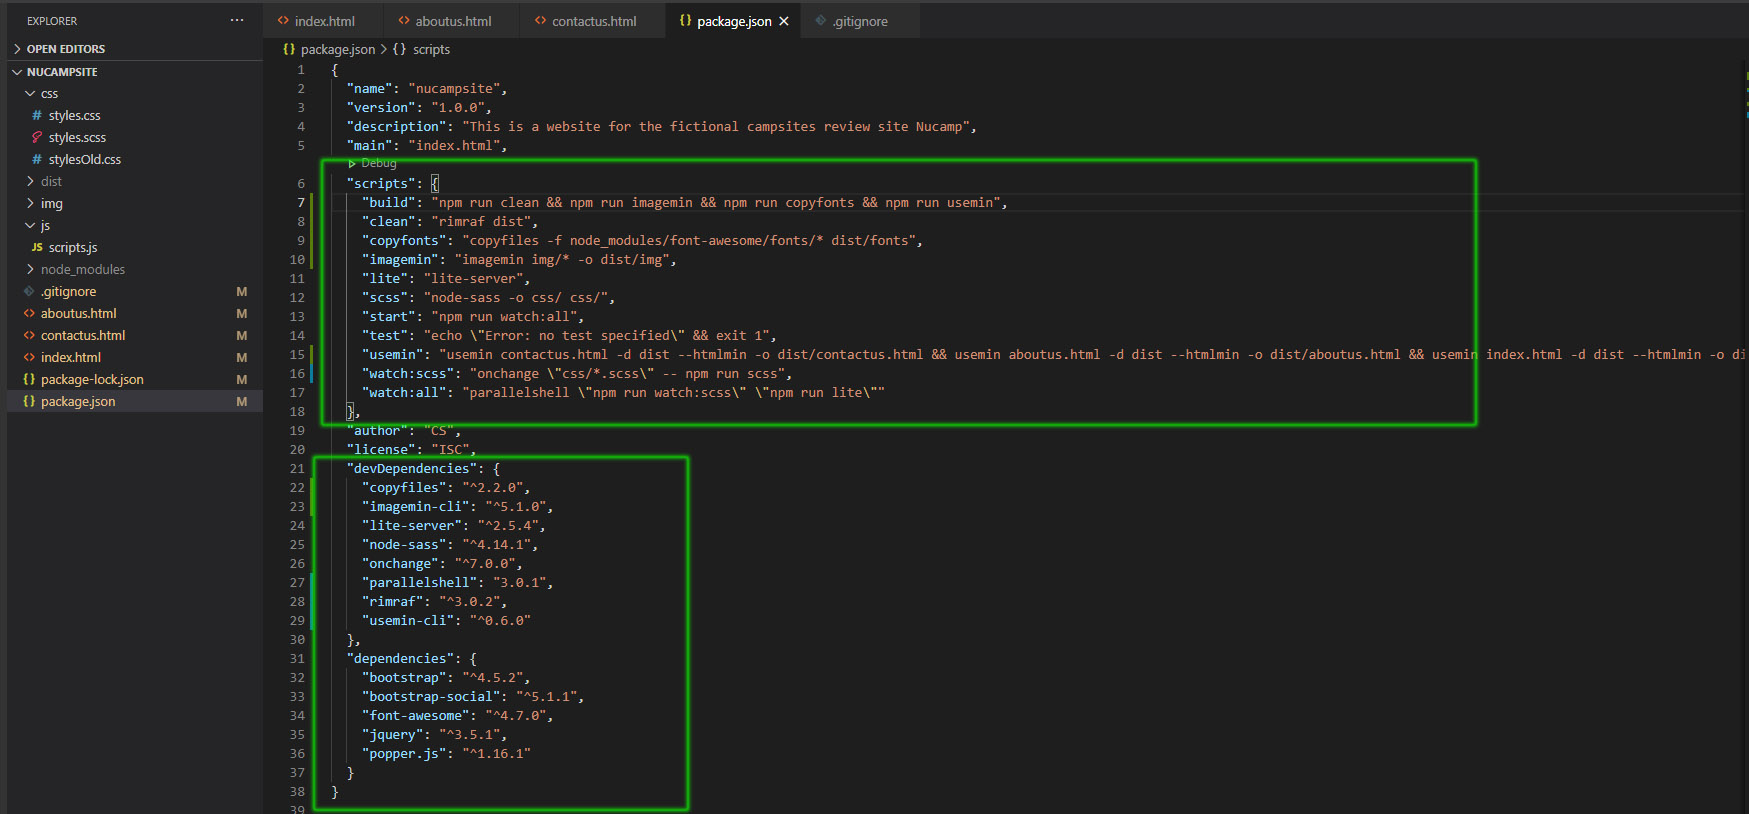
Your project uses Font-Awesome fonts. These need to be copied to the distribution folder.: npm install –save-dev copyfiles@2.2.0
Then add the following script in package.json within the scripts object:
"copyfonts": "copyfiles -f node_modules/font-awesome/fonts/* dist/fonts",
You can assume that all scripts you are asked to add in this section will be added to the scripts object in package.json. The order that they are added in does not technically matter; you may choose to alphabetize them, or order them by type, or not concern yourself with an order at all. Just make sure that they all have a comma at the end of each script, except for the final one.
Compress and Minify Images
We will use the imagemin-cli NPM module to compress images to a smaller size without loss of quality. Install the module as follows: npm install –save-dev imagemin-cli@5.1.0
Then add the following script:
"imagemin": "imagemin img/* -o dist/img",
Concatenate, minify, and uglify
Install the usemin-cli npm module as below: npm install –save-dev usemin-cli@0.6.0
This module will automatically install the usemin module, and the usemin module will automatically install a CSS minifier module named clean-css, a JavaScript minifier and uglifier module named uglify-js, and an HTML minification module named html-minifier.
Add the following script below. It will tell usemin to process the HTML files specified, and it will automatically also run the CSS and JavaScript minifying and uglifying processes on any linked .css/.js files:
"usemin": "usemin contactus.html -d dist --htmlmin -o dist/contactus.html && usemin aboutus.html -d dist --htmlmin -o dist/aboutus.html && usemin index.html -d dist --htmlmin -o dist/index.html",
Now open index.html and surround all the css links code in the <head> as follows, with the build:css and endbuild comments:
    <!-- build:css css/main.css -->
    <link rel="stylesheet" href="node_modules/bootstrap/dist/css/bootstrap.min.css" />
    <link rel="stylesheet" href="node_modules/font-awesome/css/font-awesome.min.css" />
    <link rel="stylesheet" href="node_modules/bootstrap-social/bootstrap-social.css" />
    <link rel="stylesheet" href="css/styles.css" />
    <!-- endbuild -->
    <link rel="stylesheet" href="https://fonts.googleapis.com/css?family=Lobster|Open+Sans" />
- Notice that we’ve pulled the Google fonts list out to after the endbuild comment, since it’s not a local file.
- Do the same in aboutus.html and contactus.html.
- Similarly, open index.html and surround the js script code as follows:
    <!-- build:js js/main.js -->
    <script src="node_modules/jquery/dist/jquery.slim.min.js"></script>
    <script src="node_modules/popper.js/dist/umd/popper.min.js"></script>
    <script src="node_modules/bootstrap/dist/js/bootstrap.min.js"></script>
    <script src="js/scripts.js"></script>
    <!-- endbuild -->
- Add this change to aboutus.html and contactus.html as well.
Automate Dist Folder Cleanup
Install the rimraf npm module by typing the following at the prompt:: npm install –save-dev rimraf@3.0.2
Then, set up the following script:
“clean”: “rimraf dist”,
This utility simply deletes the dist folder, if it exists, and all files in it, effectively “cleaning” it.
Build the distribution folder
Also add this script, which strings together commands to run a folder cleaning utility (which we’ll add later), to run the copyfonts script, and to run the usemin script.
“build”: “npm run clean && npm run imagemin && npm run copyfonts && npm run usemin”,
Finally, to build the distribution folder, type the following at the prompt: npm run build
- This will create the dist folder containing the files that are a self-contained version of your project.
- Take a moment to look around the contents of the dist folder and see what’s inside. Especially notice that all your local CSS and JavaScript files have been merged into a single file, and if you look inside them, you can see that they have been optimized for deployment.
- If you have a web server that hosts your website, you can now copy the contents of this folder to it and view your work online.
Note: There are many different workflows to ready your files for deployment. This is only one of them, so do not take it as canonical. In the real world, you will run into other methods such as using the module bundler Webpack, or task runners such as Grunt and Gulp.
Git
Open your .gitignore file in your editor and update it so that it reads as follows, preventing the “dist” folder from being added to the git repository:
Commit all the changes to your local repository and then push.
To see the Nucamp campsite working live on a web server go here to see it!
To see my Nucamp portfolio project go here to see!
If you have a web server like hostgator or something. You can use an FTP like Filezilla and upload the contents of your dist folder like I did.
NPM Scripts – Part 3
Instructions (Deploy your simple bootstrap site)
Prepare your files
To implement the site yourself, first download and unzip this folder to your computer (it can be anywhere, such as in the NucampFolder): ssss-bootstrap.zip
From inside the ssss-bootstrap folder in a terminal, enter: npm install
This command will generate the node_modules folder for this project.
Next, generate the dist folder: npm run build
This should create a folder named dist inside your ssss-bootstrap folder.
Note: This project does not include use of custom Sass, so it excludes node-sass, parallelshell, and onchange dependencies.
Deploy to Netlify
- Create or login to Netlify and go to the Sites tab.
- Drag and drop the dist folder into where it says “Drag and drop your site folder here”.
- You’re done! Click on the link generated to see it.
- Netlify will automatically generate a random subdomain for your site, such as https://blissful-sammet-e1a278.netlify.app — you can change this by clicking “Site Settings” then “Change Site Name”.
Manual deployment vs. continuous deployment
- This example showed a basic approach using drag-and-drop manual deployment of a pre-generated dist folder to a Netlify server.
- If you update a site locally then wish to update it on Netlify, you can manually deploy once again by running npm run build then drag-and-dropping the new dist folder in the “Deploys” tab for your site on Netlify.
- Netlify also offers what’s called a continuous deployment option that you can automate to retrieve your source code from Github and build it for you on their server. You may wish to explore this option on your own. See the link in the Additional Resources.
Netlify vs. Other Platforms
- Netlify is far from the only cloud platform that can host your Bootstrap site, but it does offer what is possibly the easiest deployment option. It may not be suitable for all of your projects. Others you may wish to research are Github Pages, Vercel, Heroku, AWS, DigitalOcean, Firebase, and more. Each has its own unique instructions for setup and deployment, as well as set of features and supported technologies.
Additional Resources:
- What Is Minification?
- Using NPM As A Build Tool
- CSS-Tricks: Website Deployment – Let Us Count The Ways
- W3Schools – HTML <script> src attribute
- NPM parallelshell module
- NPM onchange module
- NPM scripts
- NPM – copyfiles
- NPM – imagemin-cli
- NPM – usemin-cli
- NPM – uglify-js
- NPM – clean-css
- NPM – html-minifier
- NPM – rimraf
- Making Sense of Front End Build Tools
- Using NPM Build Scripts as a Build Tool
- Netlify – Deploy with Git


