Bootcamp Notes – Day 16 (Tues) – React: Week 5 – Client-Server Communication


Client-Server Communication
Networking Essentials
Communication Between Front End and Back End
It would be helpful at this point to go over some basics of networking especially about how the front end communicates with the back end. These days the back end of web applications are typically hosted on the servers of cloud platforms such as: AWS (Amazon Web Services), Heroku, DigitalOcean, Microsoft Azure and more!

Keep in mind, when your React app (from a browser) wants to communicate with its back end (or any server), keep in mind that there will be delays and potential errors, whether it’s fetching data from the server or uploading data to the server.
Aside from the normal delays associated with data moving through the network there could also be issues. The server may be down or there may be an outage in the internet. There might be problems with the data and so on. Your front-end application needs to be able to handle such issues and let the user know what’s happening.
So that’s something you’ve already begun to do in your recent exercises where you used Redux Thunk in your project to enable your action creator to show a loading component, then simulate a delay before adding the campsite’s data. You will be learning more about how to deal with asynchronous communication between the browser and the server. You will learn about the meaning of a restful APi and set up a restful development server. You will learn how to request resources from a web server using the promise-based fetch APi and more.
But first we will cover a few foundational concepts.
NETWORK PROTOCOLS
Networking is a vast topic and there is all different kinds of networking and actually even saying networking essentials here is a bit misleading because we are only going to be talking about networking between web browsers and web servers. We will mainly discuss the way that web browsers and web servers talk to each other through a network protocol called HTTP.
First off what is a network protocol?
A network protocol is a set of rules for how two networked systems will talk to each other.
The rules define what kind of data will be exchanged, how the data will be formatted, how the systems will respond to certain types of request, etc.
Without such rules, computers would not be able to communicate with each other.
There are all kinds of networking protocols such as: TCP, UDP, FTP, SMTP and more, operating at different network layers ranging from the physical layer (wires, circuits) to the application layer (dealing more with user interface concerns).
Right now we will just focus on HTTP, which is an application layer protocol.
HTTP (HyperText Transfer Protocol)
HTTP is the foundation of data communication on the web. It is considered an application layer protocol.
Every time you load a new page from the web, your browser makes an HTTP request to a server. The server responds to the request via HTTP response.
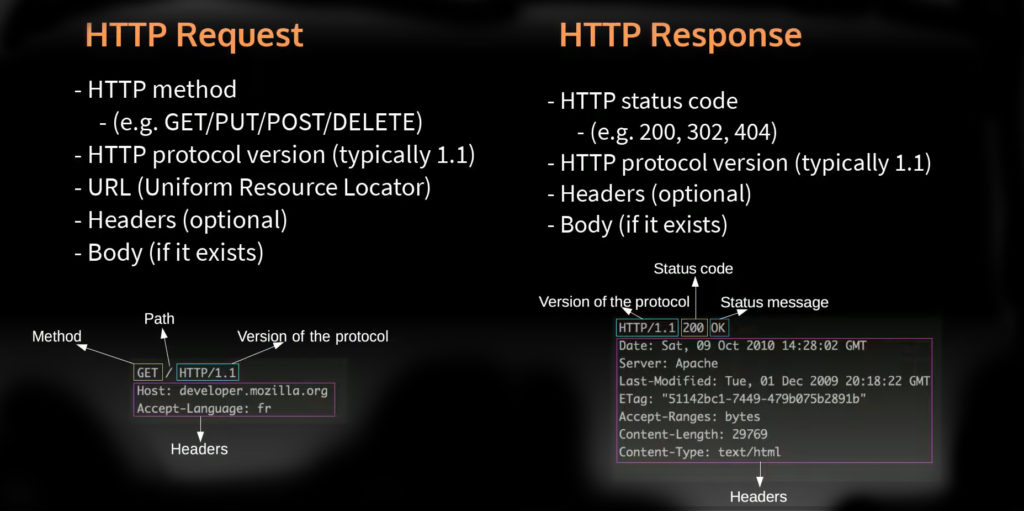
An HTTP request always supplies an HTTP method. HTTP methods are sometimes called HTTP actions or HTTP verbs. They are the different types of requests that a client can make, whether the client wants to get something or post something or delete something. Both the request and the response will always supply the HTTP protocol version they are working with, which will typically be 1.1 . There is a HTTP version 2.0 but it is not in common use yet. The request will apply a target, which will typically be a URL. Then it will typically have headers that contain more data about the request, similar to the head element in an HTML file. Then the request may or may not have a body, which would contain data for the request if needed. For example, a GET request would not have a body, but a POST request would. Then the response will always have a status code, which can range from 100 to 599.
You can easily find lists of HTTP status codes and their meanings online.
Your are probably familiar with the 404 status code, which means the requested resource was not found. Or 403 which is forbidden. Or 500 which is internal server error. The status codes in the 400 and 500 ranges are all going to be error codes. The ones in 100 range are informational status ranges. The 200 range means request was successful. The 300 range mean the request was redirected.
The HTTP response will typically also have optional headers and it may or may not have a body as well.
TRANSFERRING DATA: XML vs JSON
Let us say your website is a static site like the one that you built in the Bootstrap course. Then every time a user goes to a new page in the website, the browser will make HTTP requests to the server for all the assets for that new page: the HTML, CSS, Javascript, image files and so on.
Static, multipage sites: Every new webpage requires all resources to be loaded from server.
You have learned that in a single page application like in React. It works differently. The HTML, CSS and JavaScript files are typically downloaded at the beginning in one large download, then when the user goes to a different view. The client is only asking the server for the data for that particular view such as the campsite’s data.
Your React single-page app downloads most files to browser when website first loads, then every new view /”page” downloads data for that view, such as campsites data.
On the web the two most common ways that text data is formatted are JSON and XML.
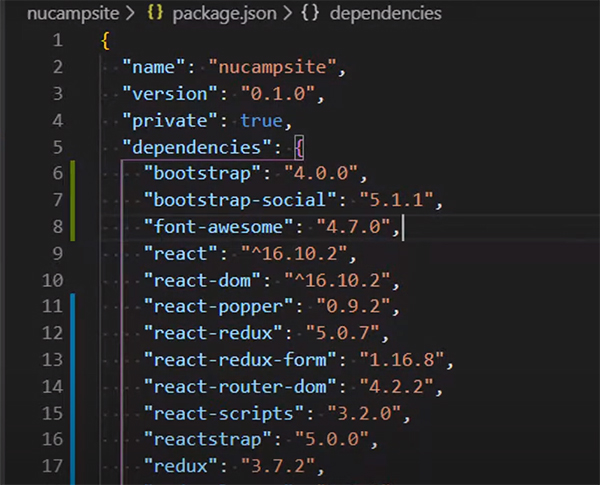
You are familiar with JSON a little bit already from using the package.json file. You can see that its format closely resembles that of JavaScript objects and that makes sense since JSON stands for JavaScript Object Notation.
JSON – JavaScript Object Notation
JSON syntax is not exactly the same as a JavaScript object, but very close – so it’s very easy to convert JSON to and from JS objects.
JSON file format specifically used to encode data for transferring over networks, and is easy for JavaScript and databases to parse.
JSON is a newer file format. Before JSON was XML (extensible Markup Language) which is still widely used today. XML syntax is similar to HTML, but is not read by the browser. Like JSON, it is used to store and transfer text data.
XML is typically used with protocol named SOAP and JSON is used with Restful web services.
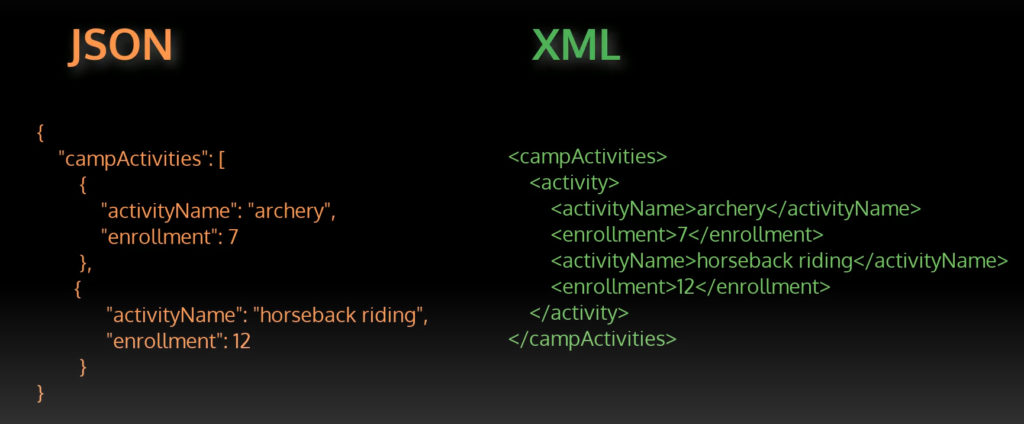
As you can see from this example. JSON looks a lot like JavaScript Objects and XML looks a lot like HTML, with start and end tags. JSON is preferred these days not only because it converts well to JavaScript objects, but also because it’s a lot more concise. As you can see, it does not require end tags. So there is a lot less typing. The biggest difference in JSON is the property names in JSON must be in double quotes, such as for camp activities and activityName, whereas quotes are optional for property names in Javascript objects
Introduction to REST
REST – Representational State Transfer
REST is a software architectural style that defines a set of constraints for creating Web services that can communicate with clients.
Web Services – resources available over the Web.
Two basic types of Web Services:
- SOAP web services
- RESTful web services
SOAP – Simple Object Access Protocol
The SOAP way of building web services is the older approach. It uses the WSDL (Web Services Description Language) to specify how two endpoints in a network communicate with each other. SOAP typically depends on XML for its messaging format, whereas REST is more flexible.
REST – can use XML, HTML, plain text, or JSON for its messaging format.
SOAP web services were the de facto standard, now REST has become more widely used. REST is simpler and easier to implement.
SOAP is a protocol with strictly defined rules; REST describes an approach and does not lay out specifications.
6 DEFINING CONSTRAINTS OF REST
Their are 6 DEFINING CONSTRAINTS OF REST, web services that conform to these constraints are called RESTFUL.
- Client-Server Separation: The client and server can be implemented from each other, as long as the interface between them stays consistent. This division of UI and data storage concerns improves the flexibility and scalability of both sides, and they are able to evolve independently of each other.
- Statelessness: The server does not store any information about the client’s state after the communication is complete. The client is responsible for tracking its own state through the front-end application state, cookies, etc.
- Uniform Interface: Resources that are exposed by the server must have a single URI (Uniform Resources Identifier). This is done with a directory-like style, as you have seen with the routes you’ve created with react-router, eg http://localhost:3000/directory/1.
- Cacheable: Clients can cache responses, and server responses will contain information about how to cache them, or if they should be cached at all.
- Layered System: There can be many layers between the client and the server. The client will not necessarily know if it’s dealing directly with the end server or from an intermediary server that has cached the data that’s being requested.
- Code On Demand: This is the only optional constraint. Servers may temporarily extend the functionality of client-side code by transferring executable code, such as JavaScript.
So these are the constraints that define a RESTful web service.
THE 9 HTTP METHODS (VERBS)
RESTful web services are built upon the HTTP protocol and will use the HTTP methods known as (VERBS). Their are 9 of them!
- POST – create a new resource on the server (Create)
- GET – request a resource from the server (Read)
- PUT – update a resource on the server (Update)
- DELETE – delete a resource on the server (Delete)
- HEAD
- CONNECT
- OPTIONS
- TRACE
- CATCH
POST, GET, PUT, DELETE are analogous to CRUD operations from database programming: Create/Read/Update/Delete
GET, PUT and DELETE are considered Idempotence (is concept in mathematics and computer science): When an operation can be repeated multiple times and does not change it operand more than once, if at all.
An example of Idempotence would be multiplying by zero.
So one thing to be aware of, what operation is Idempotence (can be repeated without consequences) and which ones you have to be more careful not to repeat.
Resources and Representations
A resource on a server is any data that can be requested by a client – a name from a database, a stock price, a weather, report, an image or HTML file etc
Resources are made available at unique URi, and a client can request each resource specifically by its URi.
The server responds to a GET request for a resource by sending a representation of that resource, typically as JSON or XML.
Or the client will send a POST or PUT request by sending a JSON/XML representation in its request body, and the server will create a resource from it.
For example the client may send a GET request for information about a stock from a servers database. That information is stored in that particular database format. But the server will take that information and encode it into a format that is useful for the client, which cannot read the database format. Most of the time it will be in the form of JSON or XML format. Then that JSON or XML data is a representation of the resource and that representation is what actually gets sent in the servers response. Or a client might send a POST request to the server and that request would include a body of a representation of some data in JSON or XML form. The server would take that representation and use it to create a new resource. So the client and the server do not send resources to each other, they send representations of resources which are then converted to resources. That’s why we call representational state transfer.
Exercise: Json-Server
We will install and set up a RESTful development server called json-server that can serve JSON data as well as static content.
Create a file called db.json and then copy and paste all of the text from here!
Set up server folders and files
- In your NucampFolder directory (not inside the nucampsite folder), create a new folder named json-server, and move inside this folder.
- Inside this folder, create another new folder named public.
- Copy the images folder from your nucampsites/public/assets folder to the json-server/public folder, including all the images inside it.
- Move db.json created above and move it inside the json-server folder.
- At the end, this is how your files and folders should be configured:
NucampFolder (folder)
|---json-server (folder inside NucampFolder)
    |---public (folder inside json-server folder)
        |---images (folder inside public folder)
            |---(all the image files such as bootstrap-logo.png, chrome-river.jpg, etc, inside images folder)
    |---db.json (file inside json-server folder)
- Double check that your folder and file structure is correct, because otherwise your React app will not be able to retrieve these resources.
Install json-server
- The NPM package json-server provides a simple way to set up a RESTful development server for testing. It can also serve up static content from its public folder.
- Now go ahead and open a bash terminal in the json-server folder you just created.
- Install json-server globally by typing the following from your bash terminal, in any folder: yarn global add json-server
- This will install json-server so that it can be started from the command line on your computer.
Start and test the server
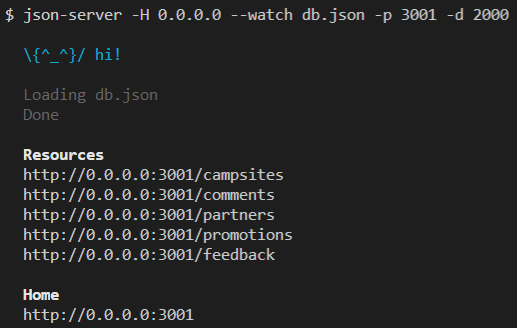
- Move to the json-server folder in your bash terminal and type the following at the command prompt to start the server: json-server -H 0.0.0.0 –watch db.json -p 3001 -d 2000
- Note: The -H sets the host. In this case we are using 0.0.0.0 to make the server listen on all local ip addresses for requests. So that we can be sure that request from the React app will go through. This –watch flag makes the json server keep a watch on the db.json file and reload the data anytime that it’s modified. This -p 3001 flag specifies that we want the server to run on port 3001 . The default port number for json server is 3000 but that’s the same default port number that our React application runs on, so we have to override the default here. Then -d 2000 number is to simulate a delay of 2000 milliseconds. This simulates communicating with a server over the internet.
- This should start up a server at port number 3001 on your machine, and it will respond to server requests with a simulated delay of 2000 milliseconds.
- Make sure that your terminal looks like this, with the campsites, comments, partners, promotions, and feedback resources showing:
-
- If json-server starts but does not show these same resources, that means you either do not have db.json in the json-server folder, or you did not start json-server from inside the json-server folder.
- The data from this server can be accessed by typing the following addresses into your browser address bar:
http://localhost:3001/campsites
http://localhost:3001/partners
http://localhost:3001/promotions
http://localhost:3001/comments
http://localhost:3001/feedback
- Type these addresses into the browser address to see the JSON data being served. This data is obtained from the db.json file. In your bash terminal, observe the logs from json-server that say what requests it has received and the status code of the response, such as 200 for a successful GET request.
- The json-server also provides a static web server. Any resources that you put in a folder named public in the json-server folder above will be served at the following address:
http://localhost:3001/
- If you go to the address above, in your terminal you should be able to see a GET request that resulted in a 404 status code because there is no resource available there.
- Try requesting a specific resource. For example, to request the logo.png image, type this into your browser’s address bar:
http://localhost:3001/images/logo.png
- This should show you the logo image, and in the bash terminal, you should see a successful status code.
- Shut down the server by typing Ctrl-c in the bash terminal.
- Remember, you can use the Up arrow in the bash terminal to bring up recent commands. Keep pressing up to go through your command history. This will be helpful when you need to run json-server again for the future exercises. It is also a good idea to copy down the command somewhere you can easily access it. You will need it for not only the rest of this course, but for most of the React Native course.
- Always make sure that you run the command to start json-server from inside the json-server folder. Your React app will not be able to retrieve resources otherwise.
- Take a look at the db.json file in VS Code and observe its structure – a single object with multiple properties that are arrays of objects.
Additional Resources:
- HTTP Statuses
- MDN – An Overview of HTTP
- MDN – JSON
- MDN – XML Introduction
- Codecademy – HTTP Requests
- Network Layers
- Lifewire – The Basic Types of Network Protocols Explained
- JSON.org
- RESTfulAPI.net – What Is REST?
- Guru99 – Web Service Architecture
- Guru99 – SOAP vs REST
- Public RESTful API examples – Twitter / WordPress / Google Maps
- Difference between URL and URI
- REST – Resources and Representations
- W3Schools – SOAP
- Github – Json-Server
- MDN – JSON
- Egghead.io – Creating Demo APIs with json-server