Bootcamp Notes – Day 5 (Tues) – React: Components


React: Components
Introduction to React Components
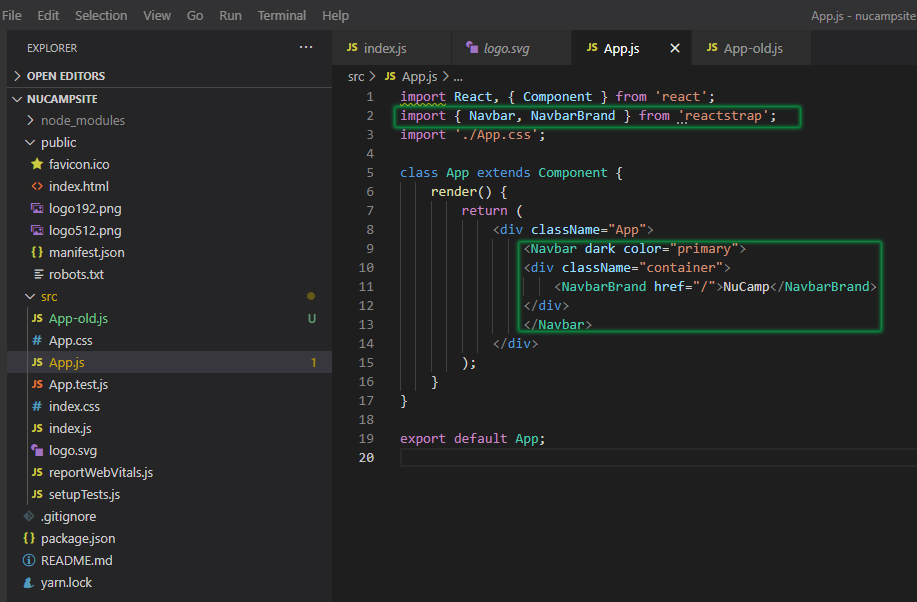
What are React Components? To begin answering that question let’s review what you already know about React Components. You used a couple in the previous lesson taken from the react strap library: navbar and navbar brand.

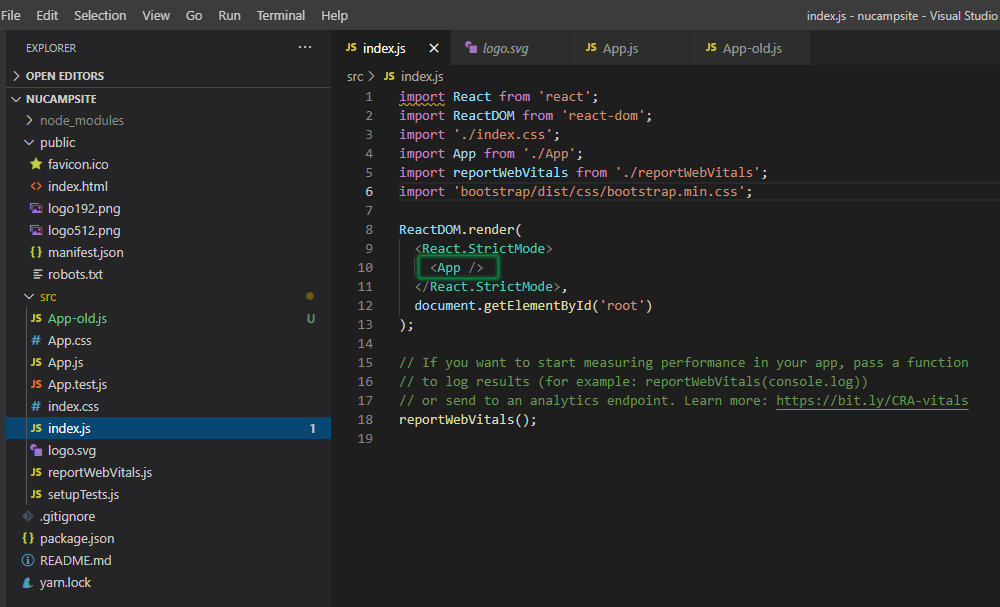
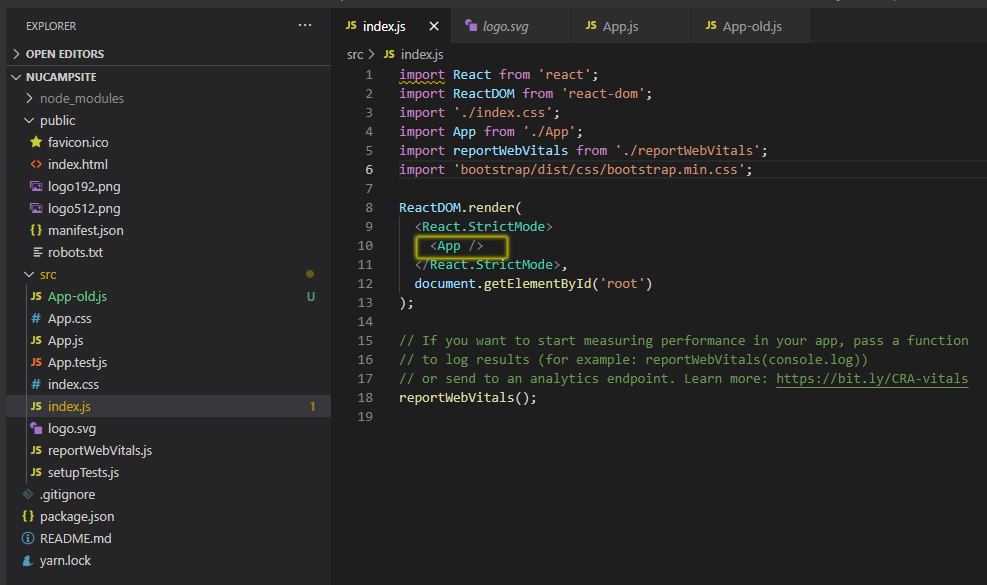
You also saw the app component being used inside in index.js. See example below. Remember you can tell when a react component is being used or rendered by two things. It is inside <App /> angle brackets like a JSX or HTML tag and the first letter is capitalized. That is very important. It must be capitalized.
When you are conceptualizing React components it may be helpful to think of it as analogous to a function.
Think of React Components as similar to functions – repeatable blocks of code.
Like a function, you define a React Component with one syntax then call it with another syntax.
For example, you can write the definition for a JavaScript function like this, using a function declaration:
function sayHi(name) {
console.log(`Hi ${name}!`);
}
That function definition by itself does not do anything until you call it somewhere else in the code with the syntax for a function call, like this.
sayHi(‘Bob’);
So you see there’s a function definition and a function call? Right? They are two different things. With a React component, there’s also a way to define a component and there is a way to call the component.
Like functions, React Components are also defined in one way, then used/called when needed in another way.
But with components, we say “render” the component instead of calling it – because components are units of UI to be rendered to the user’s view.
Functions and React Components both use reusable blocks of code, but a React component’s purpose is to eventually render a part of the UI in the browser. So it is like a specific kind of function.
How to Define React Components
Two ways:
- Functional Component
- Class Component – Ex: (Using app)
Class Components
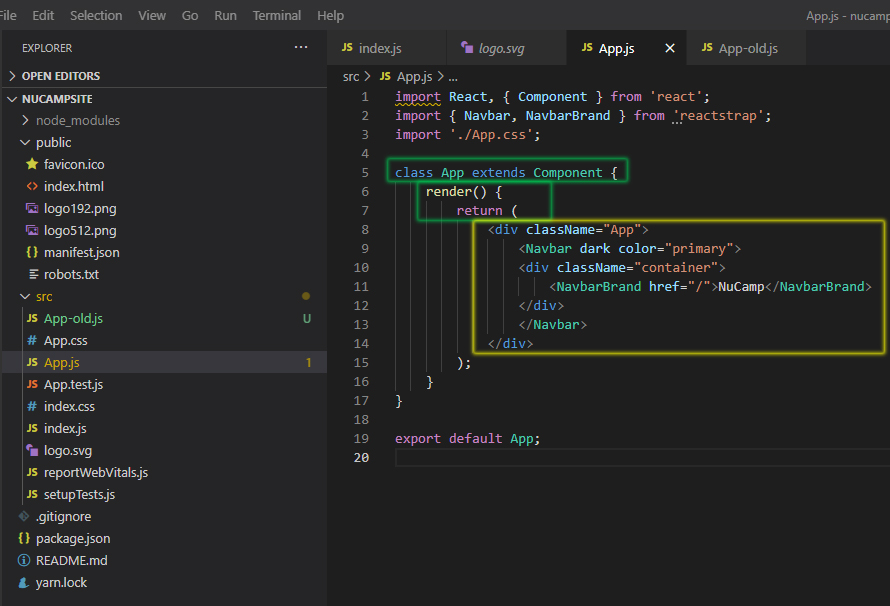
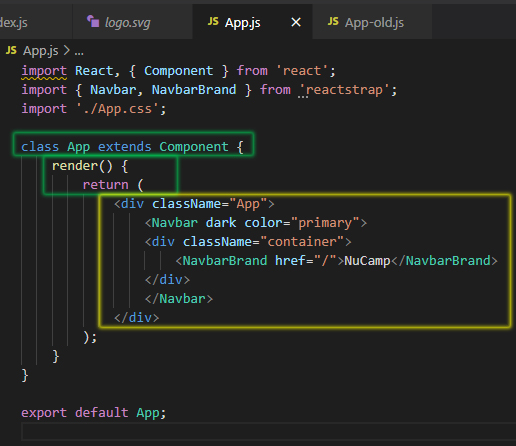
To create a class component you use the class keyword then the component name, which must be capitalized then extends Component. Extends is the JavaScript keyword that creates child classes from parent classes. Component is a class that is imported from the React library. So we are basically created a child class. Then inside the curly braces. a React component will always have a return statement. For a class component that return statement must exist inside a special method named render, which takes no arguments. If there’s more than one line in the return statement, it is a good idea to wrap them all in parentheses. Inside that return statement, the component must return a single React element, typically using JSX. But wait you say, in this example below, this app component is returning a <div> and navBar and another <div>. How does that make sense. That’s not just one! Look at it like this. There is only one element being returned here, the outer <div> that wraps around everything. It has a bunch of children inside it but at this top level, there is only one element and that is what really matters! Now, if you had any other element say another <div> outside it would not work.
Rendering Components
Okay, so we have seen a little bit about how components are defined. We have only looked at class components for now, we will look at functional components later.
To Render a component, you write it like an HTML tag, but capitalized. Now these Navbar and NavbarBrand components that you imported are being rendered here with both a start and an end tag. Other components will be rendered using a self-closing tag and you have seen that with the app component.
So the App component is being defined here in app.js then you look in index.js we can see where the app component is being rendered right here and the app component is self-closing.
All of the custom components that you will be writing in this course are going to be rendered with a self-closing tag like this.
RECAP
- Use the class keyword, along with extends Component, to define a class component.
- Component names must be capitalized and contain a return statement – for class components, the return must be wrapped in a render() method.
- That return must contain a single React element – which can have other elements and components nested inside it.
- Redner a component like HTML tag, with the first letter capitalized, typically (not always) self-closing.
Why Use Components?
What are components good for and why do we use them?
- Components are reusable pieces of code like functions, but with a specific purpose – rendering different parts of the UI.
- Easily compose the user interface in a modular way.
The app component is kind of an exception to that, it’s the wrapper component that goes around everything. But all the other components you will be using, you’ll see that they are all creating different parts of the UI, so that they can be moved around and used over and over again in a modular way to render the view that the user ultimately sees on their screen.
So components are similar to Bootstrap components but written in JavaScript, can make your own custom components or bring in third party component libraries.
Just look here at list of popular libraries!
React Components Part 1
- Go to the public folder inside your React project folder (3-React/nucampsite/public).
- Create a new folder there named assets.
- Download the images.zip file (provided by school), then unzip the file inside the assets folder, so that you end up with a folder named images there.
- Go to the src folder inside your React project folder (3-React/nucampsite/src).
- Create a new folder there named components.
- In VS Code, create a new file in the components folder and name it DirectoryComponent.js.
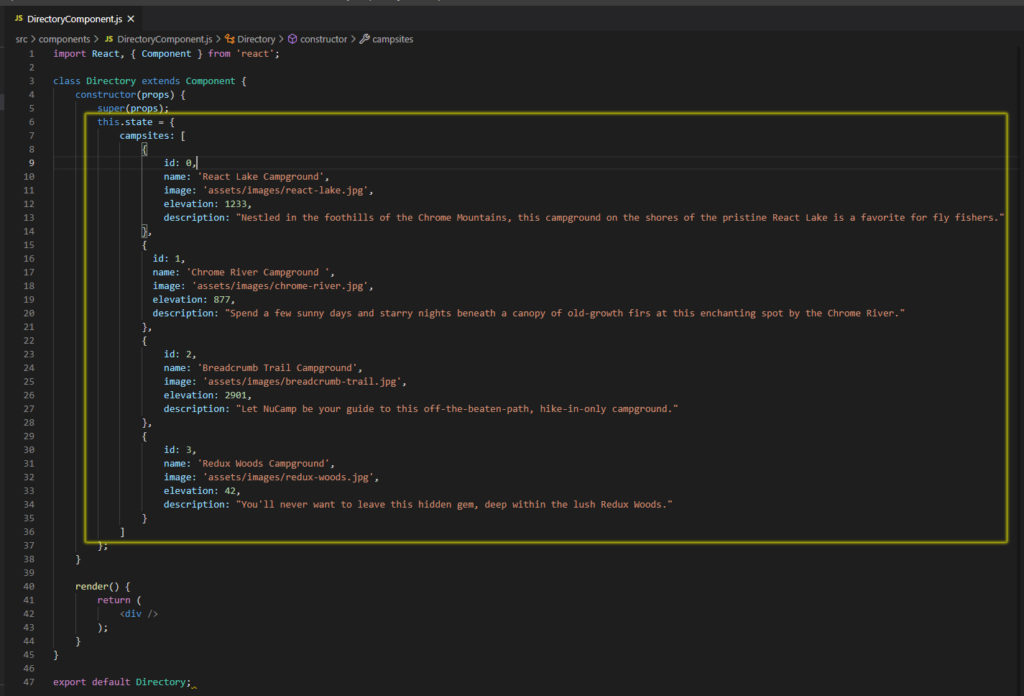
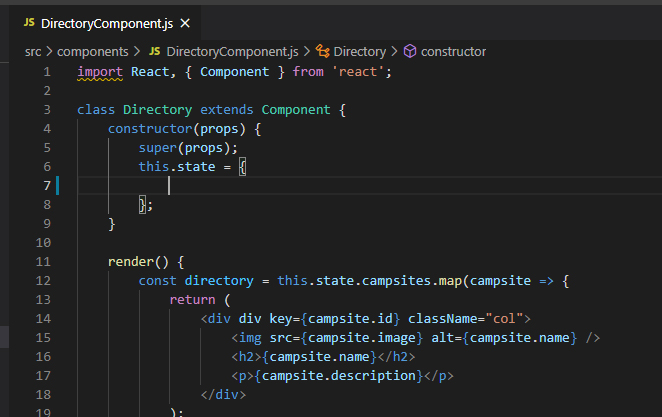
- Add the following code to DirectoryComponent.js:
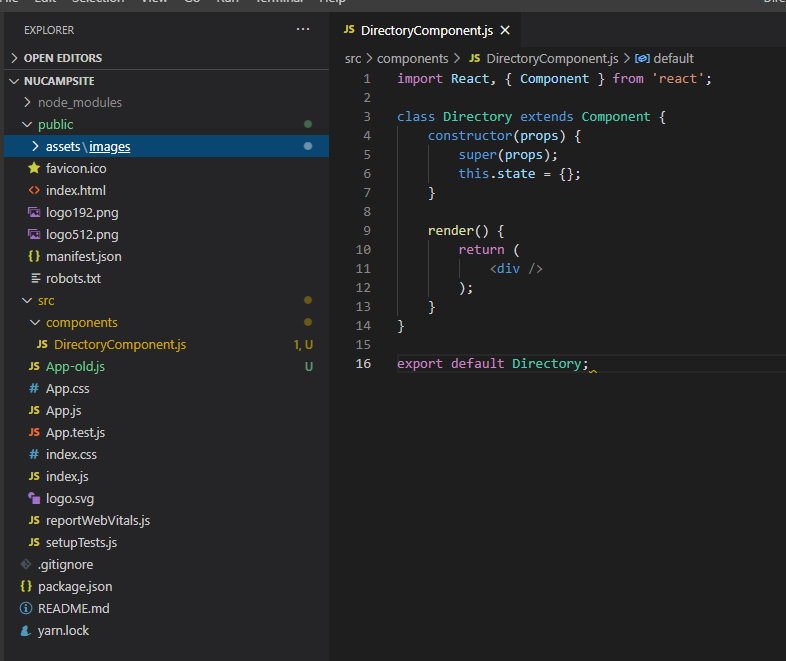
On line 1 of our code (above example) , we will first import React. We will bring in the default react import then we will also bring in named import called { Component }.
Next starting on line 3, we will create our first new class component – class Directory extends Component { } This means that we are making use of JavaScript class inheritance to create a child class from the component parent class.
Inside lines 3 and 7, we will make a constructor. In the class component that you saw before in app.js there was no constructor method. So a constructor is not required for a class component except in certain cases. Now the only argument that we’re going to pass into this constructor method is a special argument named (props). Props is an important keyword in React and will discuss more later. For now, just know that whenever you create a class component in React that has a constructor method, you must include this argument named props, which is short for properties.
inside lines 5 and 6, we have to super(props); which if you recall means that we don’t have to say this.props = props in this constructor because that’s going to happen inside the base component in the parent class. Every time that you make a React class component with a constructor method, you will use this super props line as the very first line of the constructor method. That is required by React. The last thing we are going to do inside this constructor is set up a property named state, that gets defined right inside the constructor. We are not passing this in it gets defined right here. The state property is a special property in React and it always needs to hold an object. So for now, we will just make an outer wrapping here of an object. Every React component must return a React Element
Inside lines 9 to 13. In a class component you need to wrap your return statement inside a special method called render. The constructor is sometimes required and sometimes not.
Line 16 we will write the export statement, which is not required for component per say, but it’s kind of useless without being exported.
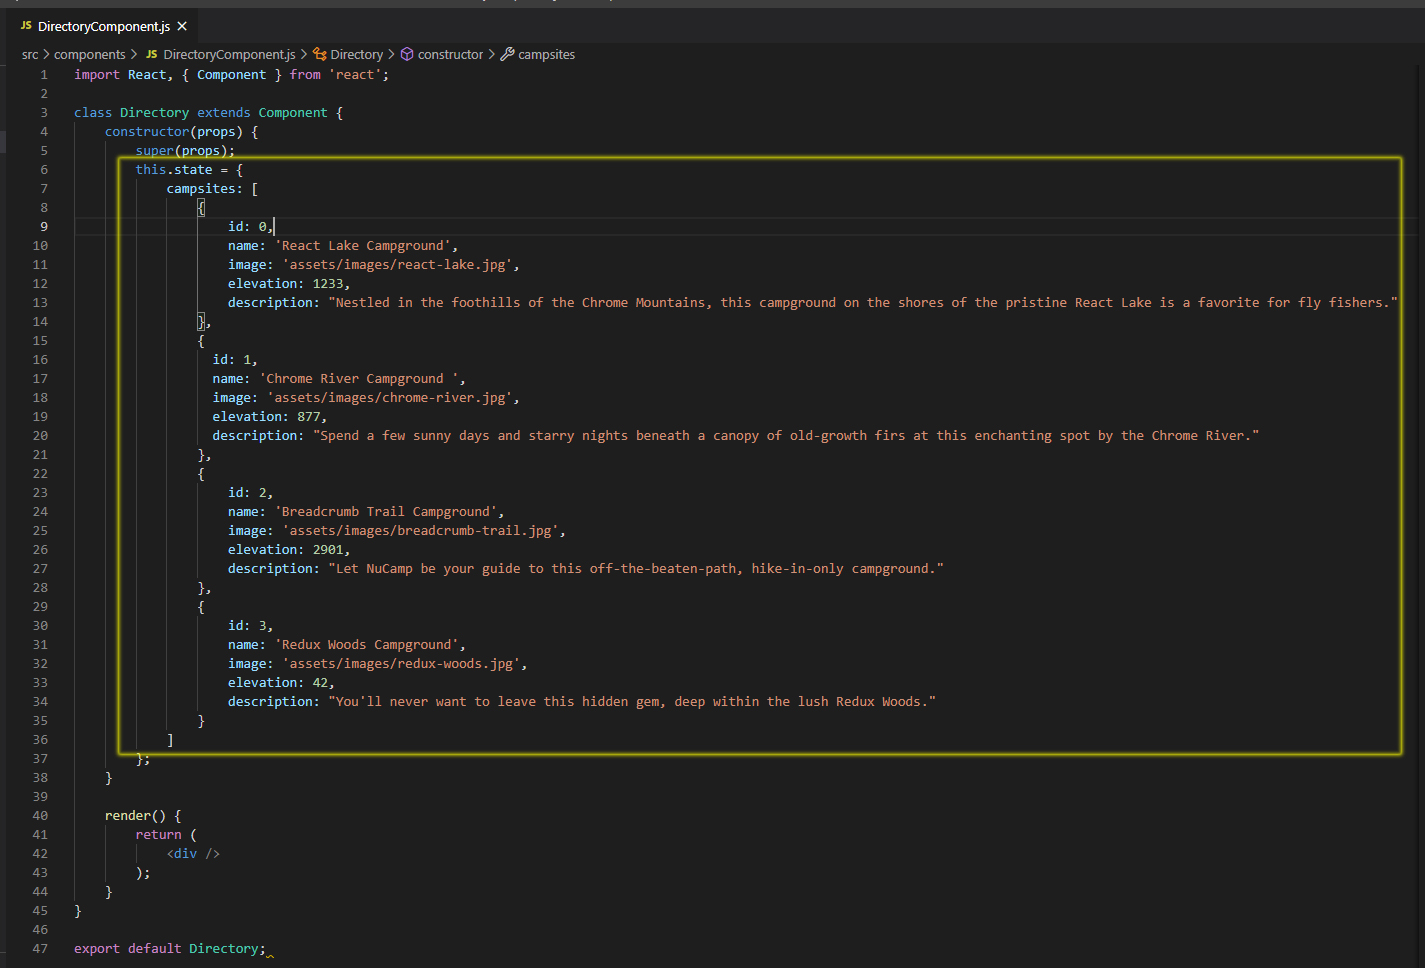
Now back to line 6 will add an array of objects:
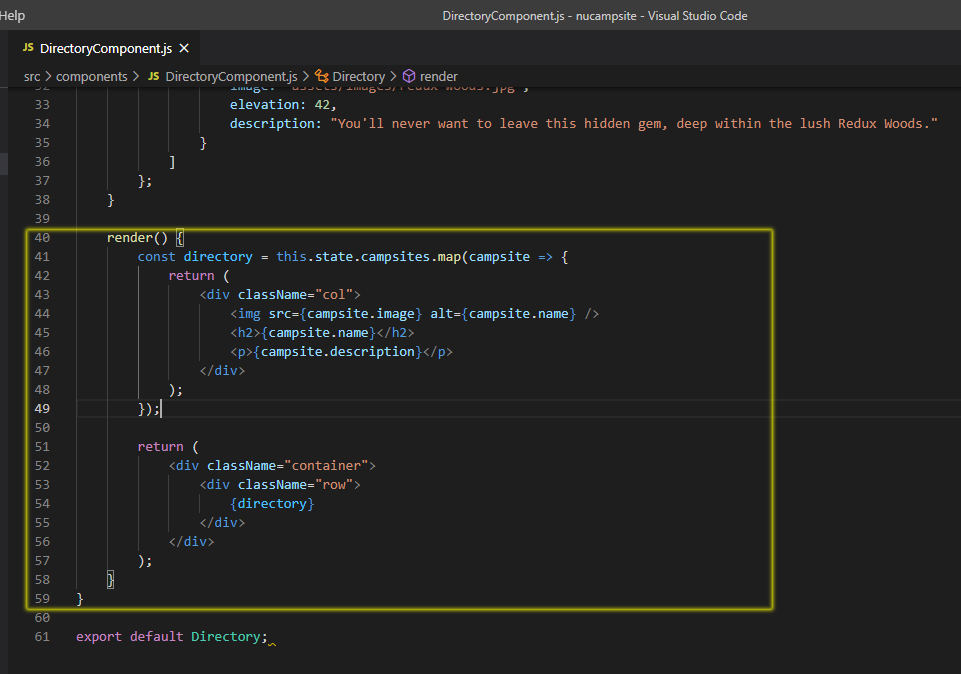
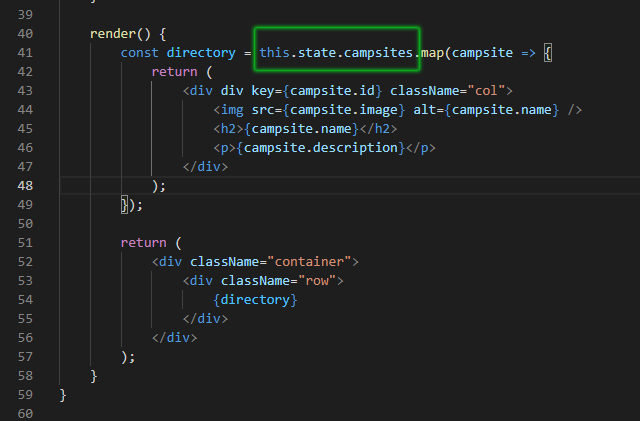
Now going down to line 40 for render method. Render method must have a return inside it and it has to return a single React element. We will use a JSX div to create that and we will give it the bootstrap class of container using className instead of class. We will add a row div. Now line 54 will create a JSX variable {directory}.
So on line 41, we set up a directory variable and it’s going to contain an array of elements. It turns out, if you give React an array of elements to render, it will just pull out all the elements from the array and render them. It just knows what to do. So how do we create this array? We will use the local data. We know we have an array up above.
So with the code below, what will happen is that this map will go through all of the campsites from the local state and it will make a new array where each array item contains this same set of JSX elements, but using a different campsite for each item. Then that whole array is going to be rendered inside this bootstrap row.
Let’s connect now connect this component to the rest of our app. Then we can take a look in the browser.
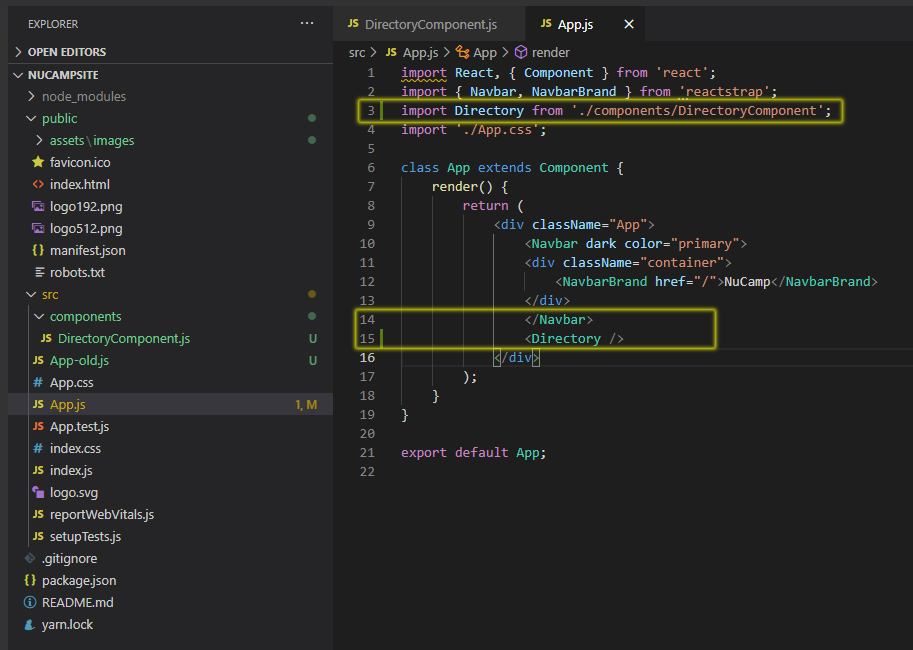
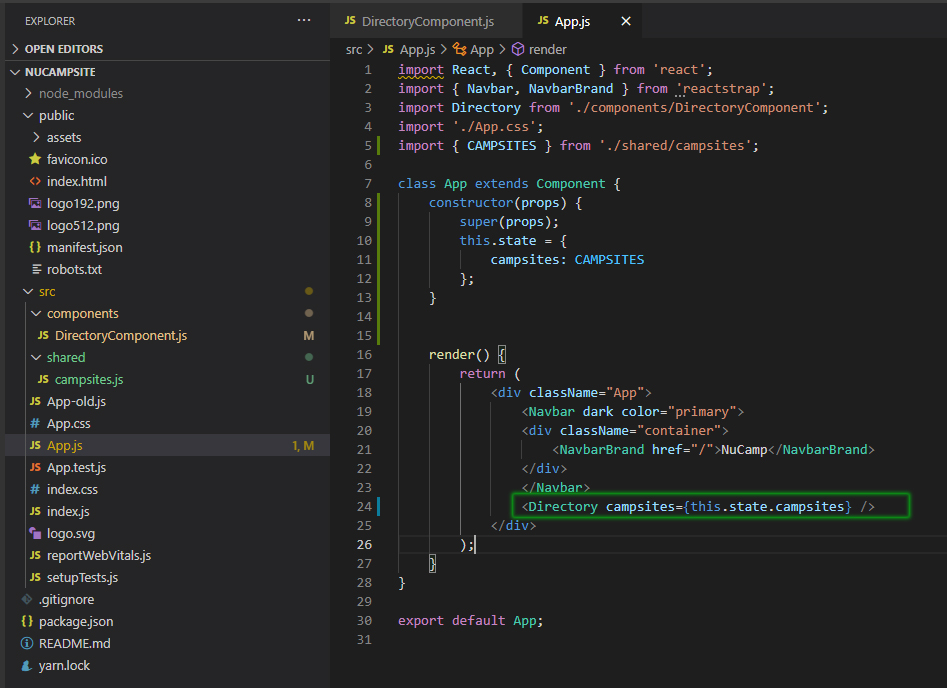
Now we go to the app.js file and we will import the Directory component at the top on line 3. And add on line 15 Directory.
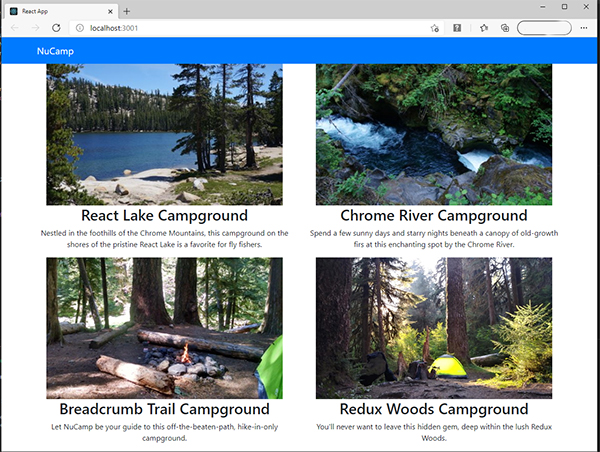
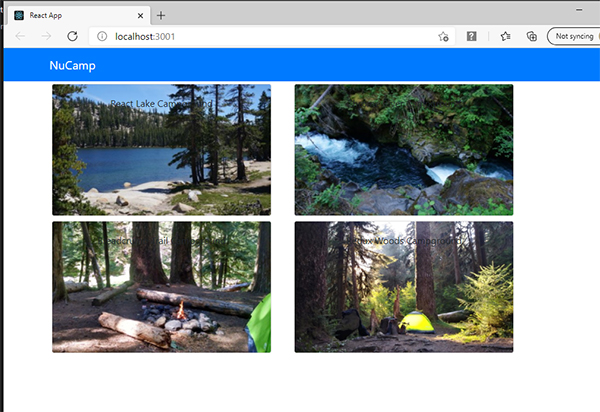
Now, test your app in the browser now by running it with yarn start. You should be able to see the campsites’ images and names displayed. If did everything correctly at this point you should see this:
Now if you inspect and check console log you will see all this red warning message that says: Warning: Each child in a list should have a unique “key” prop.
Sometimes you will see warning messages to ignore but this one we won’t ignore. The code works but we are not following best practices here.
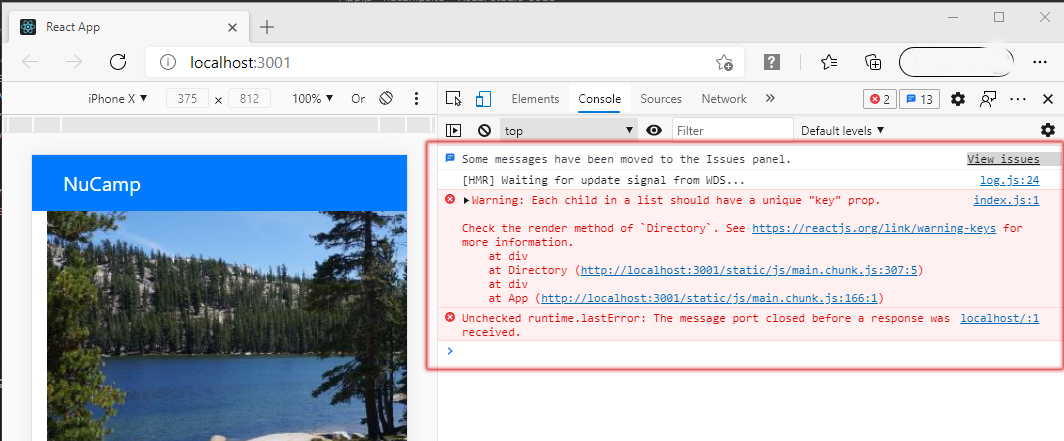
To render an array of elements most efficiently, add a unique key attribute to the topmost element in each array item.
The word ‘list’ here does not refer to HTML lists created with the <ol> <ul> and <li> elements specifically, though it can also apply to HTML lists. This refers to lists generated in React through rendering an array, as we have done through the directory array above. When you give React an array of elements to render, it’s smart and knows how to display them as a list, but it needs a little help from you to make the code efficient: a unique key for each of the items in the list.
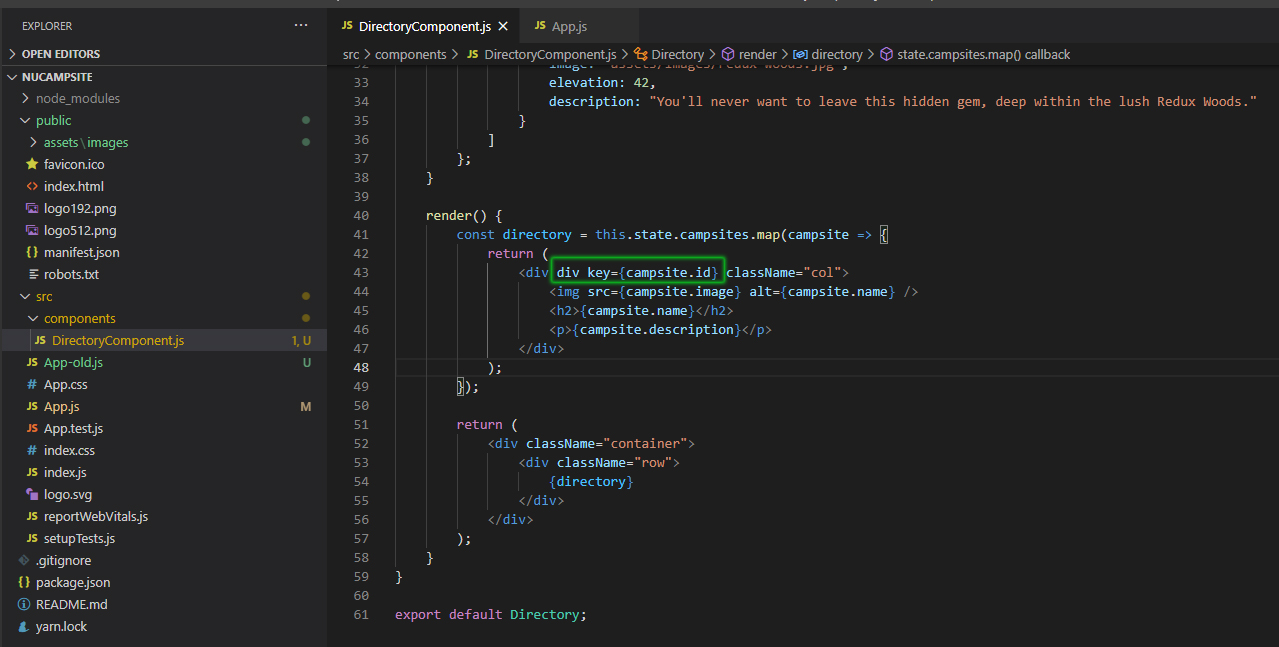
We will use the campsite id for that key.
Now if you test your app, the error message in the console should be gone.
Overview: State and Props
In the last exercise, you saw how we can store data inside the local state variable then use that data to help form the UI
This data is called local state because other parts of the app cannot see it. The only way that other components can see the data stored at state is if we pass it.
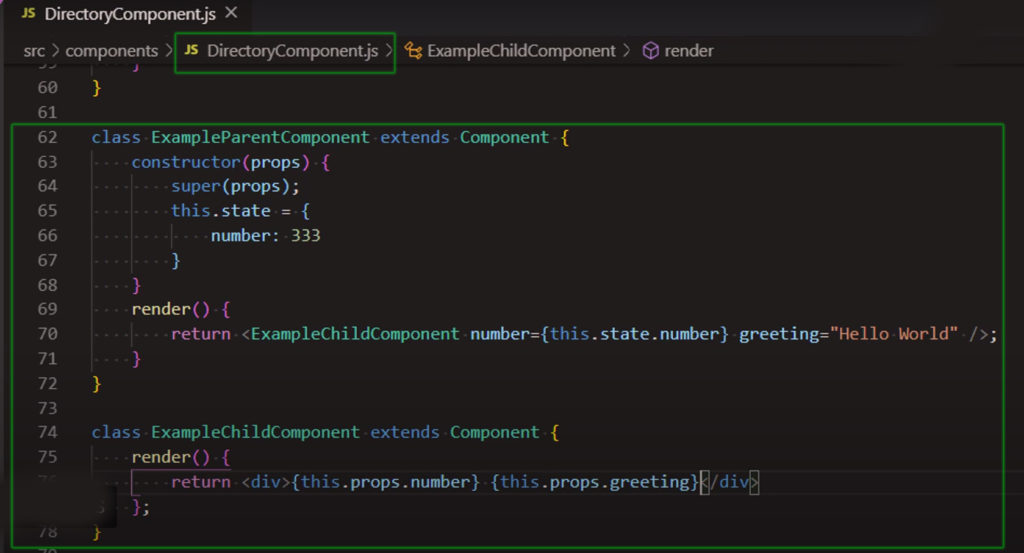
To pass state data from component A to component B, you include that data as an attribute, when you render component B inside component A. Let’s look at an example.
React Components Part 2
When you are designing a React app, you need to consider where to store state data. That is which component. For example you will often want multiple components to have access to the same read-only data.
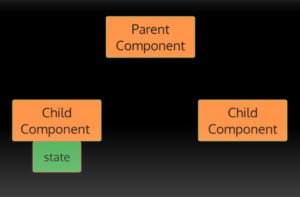
At times that would mean you need to move the state higher up in the component hierarchy. That’s a concept in React called lifting state up. That is the first thing we will do!
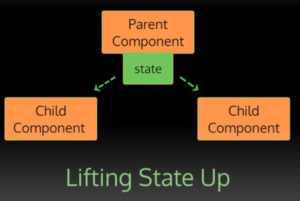
We will remove the campsite’s data from the local state of the directory component and we’ll lift it up to its parent component app. Remember that the app component is set up to render the directory component inside it, so that makes app the parent and directory the child.
Just delete the entire campsites array inside:
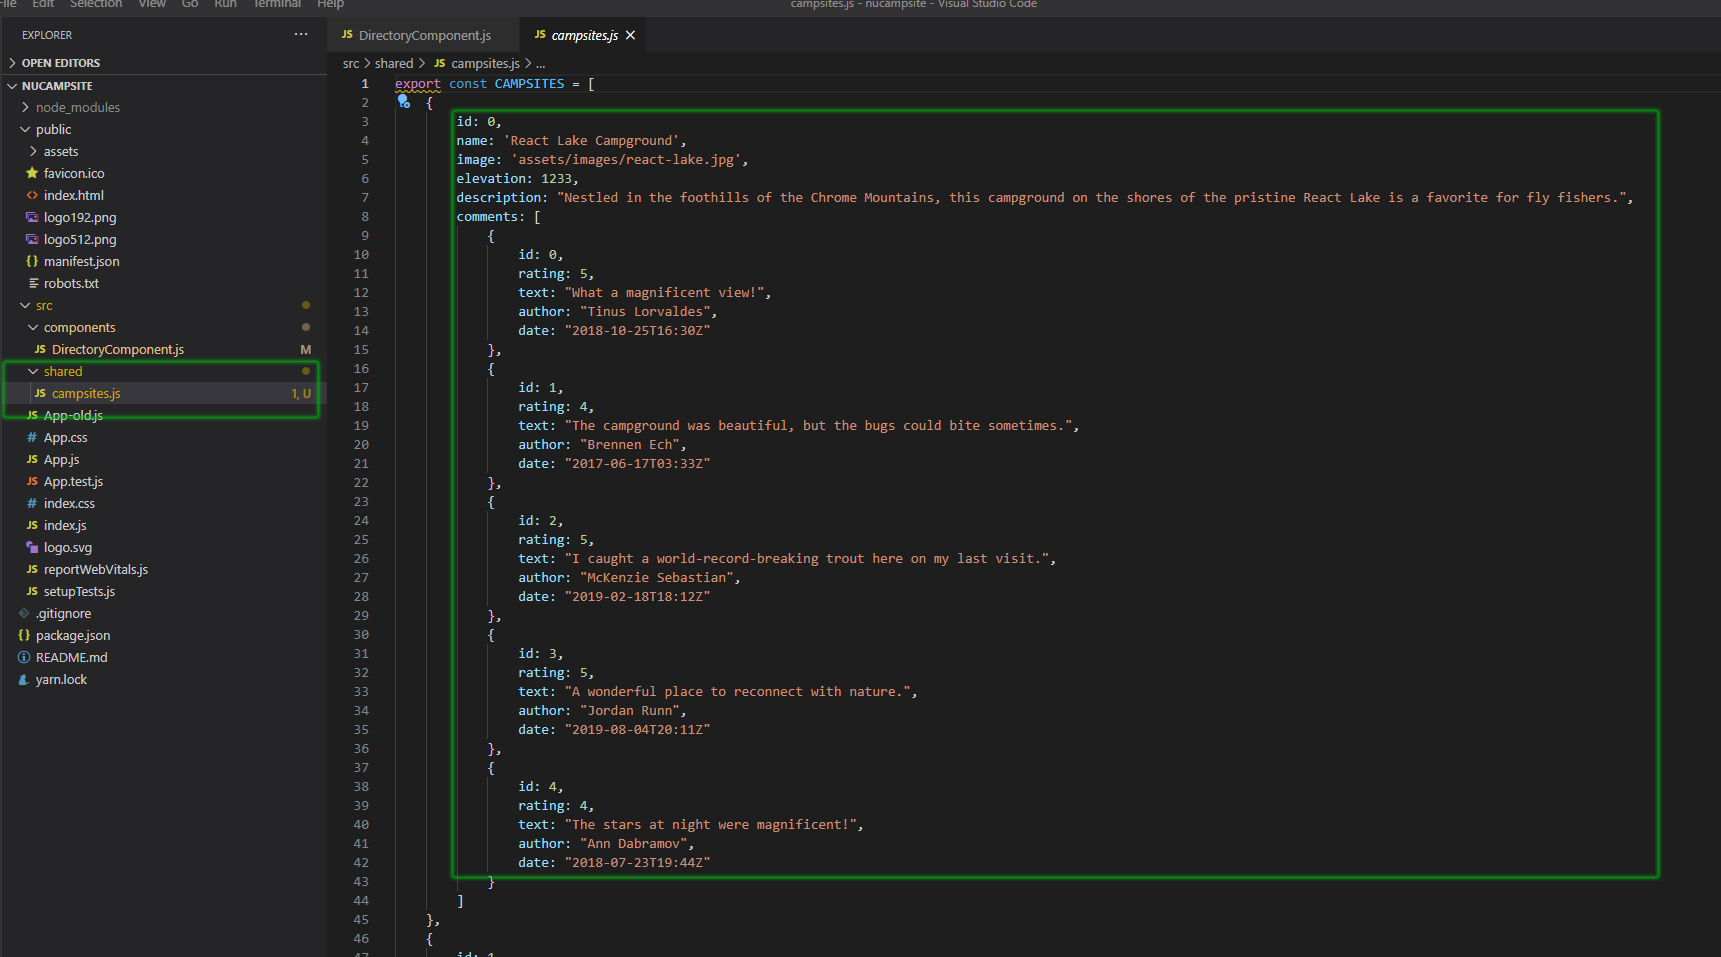
Now we create a shared folder inside components folder and then add campsites.js.
Inside the campsites.js file is an array of campsite objects just like what you deleted from the directory component state. Also, on line 1 you will notice there’s an export keyword here in front of it, which means that this array can be imported into another file and that is just what we will do in app.js
So we add these in App.js and then we now have data from campsites.js of app state.
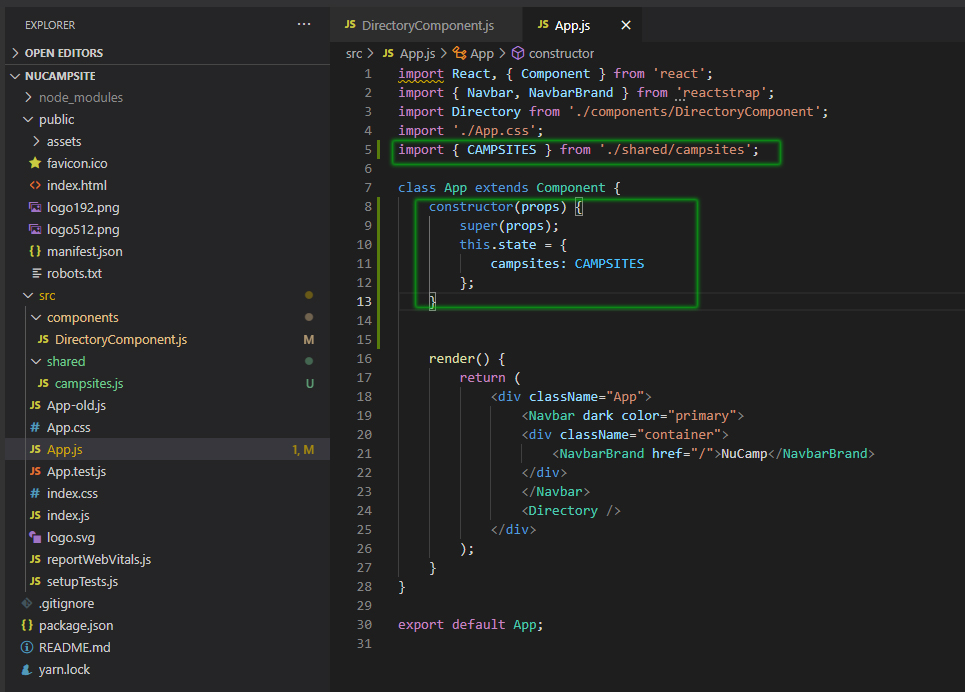
Next we are going to pass it down as props to the directory component and we will do that by setting up a custom attribute here:
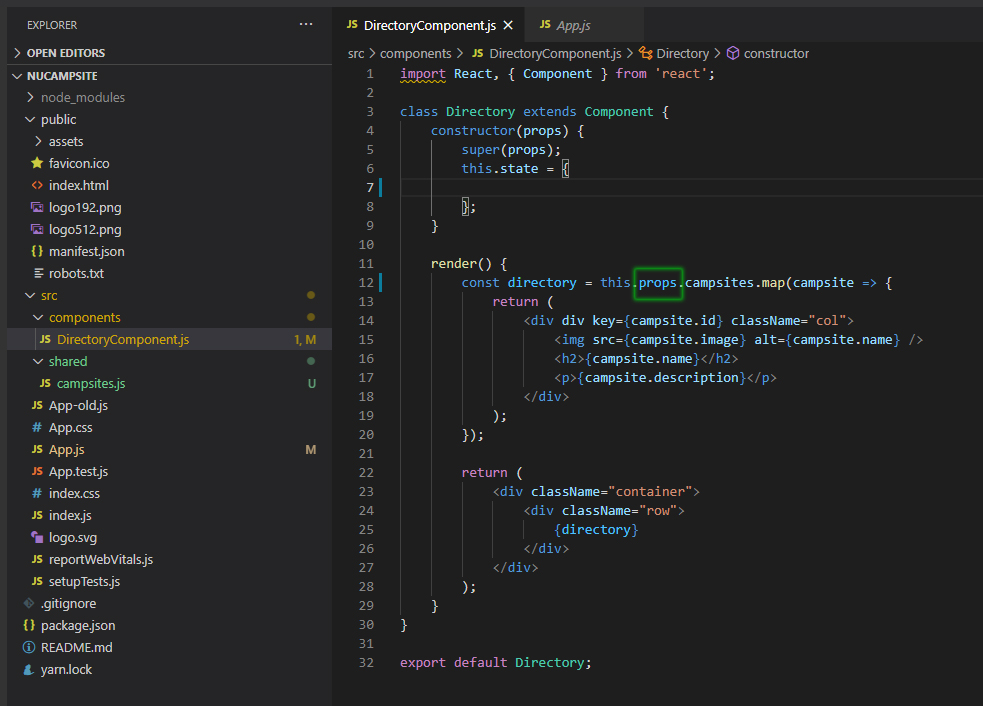
Now back in DirectoryComponents.js
First there is no campsites property in this component state anymore. It is being passed in as props. So we have to change the state here to props.
Now run in terminal: yarn start
It should still work the same as before.
ReactStrap Card
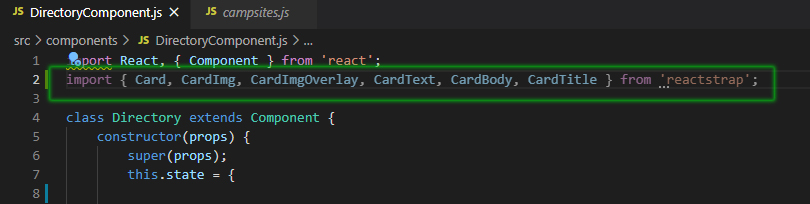
The first thing we do in DirectoryComponents.js on line 2 is import it at the top. We will be using a few different components from ReactStrap to put our card together.
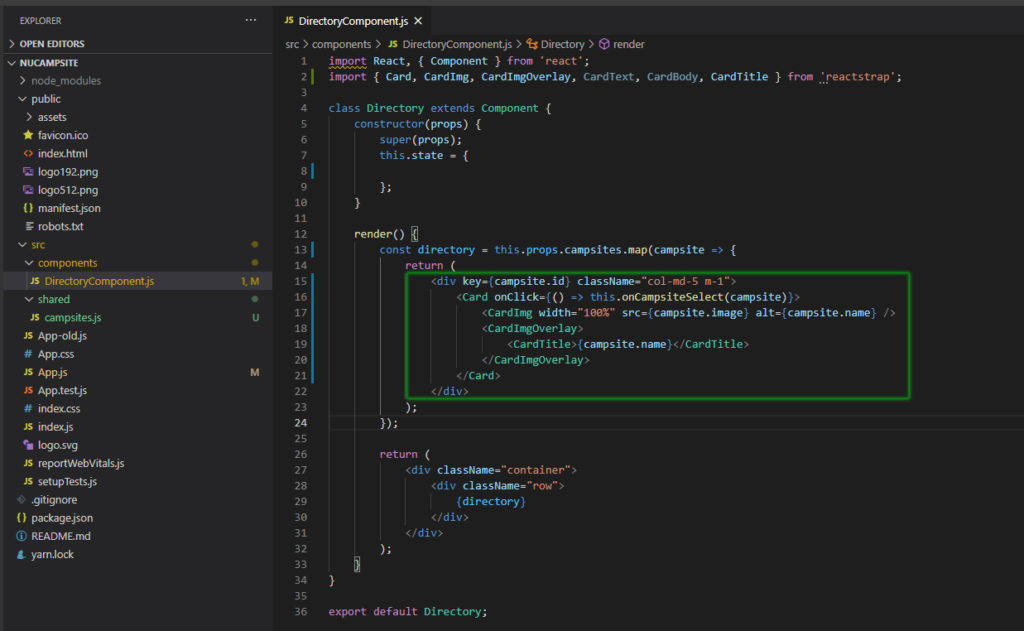
Then down here (Lines 15-22) where we are mapping, out each campsite into JSX we are going to add these components. Notice the card from Bootstrap?
Now run in terminal: yarn start
Looks different now, we will add some style later to it.
The last thing we are going to do in director component is set up an event handler for when one of these cards is clicked.
Add event handler & Change state
Now, what we want to have happen is that when we click on one of these cards. We will get a new card at the bottom that has more details about that particular campsite. This is going to take a few steps to set up.
We will start at the top DirectoryComponents.js file. Example below:
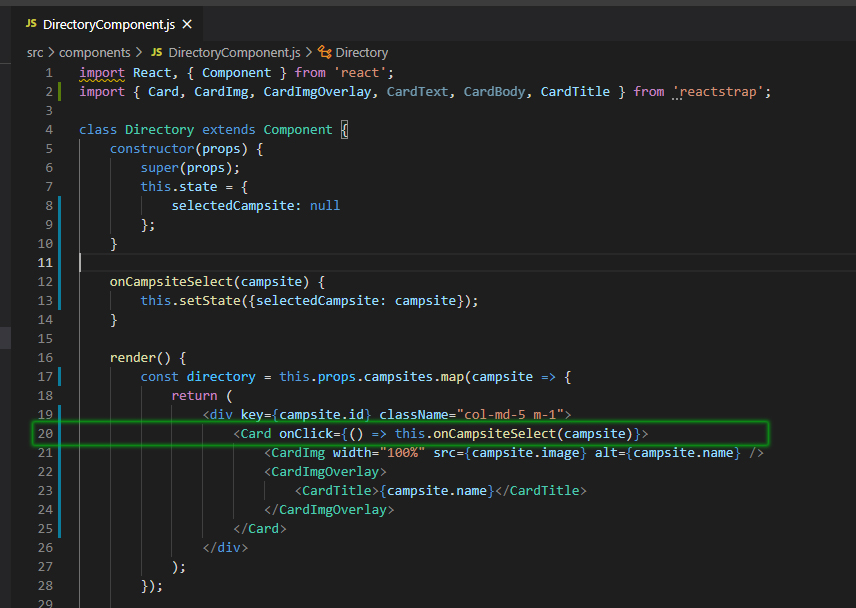
On line 8 we will set up a new property in the state this property selected campsite will keep track of whatever campsite was last selected by the user. We will give it an initial value of null for when nothing is selected yet. Below this on line 12 to 14, we will set up a method called onCampsiteSelect(campsite) that we want to have fire whenever campsite is clicked on. The campsite object will get passed into this method and inside it we are going to sue this method that React gives us called: this.setState to change the value of the selected campsite’s property of state. In this case what we are doing is updating the selected campsite property to the campsite object that’s passed into this method. This is important so take note. In React you never want to update the state directly. Outside of the constructor, you always always use setState. That’s so React can make updates to the DOM properly, because React has some special things that it’s doing behind the scenes and you do not want to bypass that. This is the part of React being a declarative versus an imperative library.

Line 20. Next we have to trigger this method somehow and what we want is for this method to be triggered whenever we use the clicks on a campsite card. So let us go back to where we mapped out those cards. In each Reactstrap card component we will add a React on click handler. Notice that the C is capitalized here. Then we will pass out an arrow function, which contains a call to the on campsite select method, passing in the current campsite object that we got from the props data. There are different ways to set up event handlers in React and this is just one of them. Now we have it set up so that whenever someone clicks on a card that campsite gets set as the selected campsite in the local state.
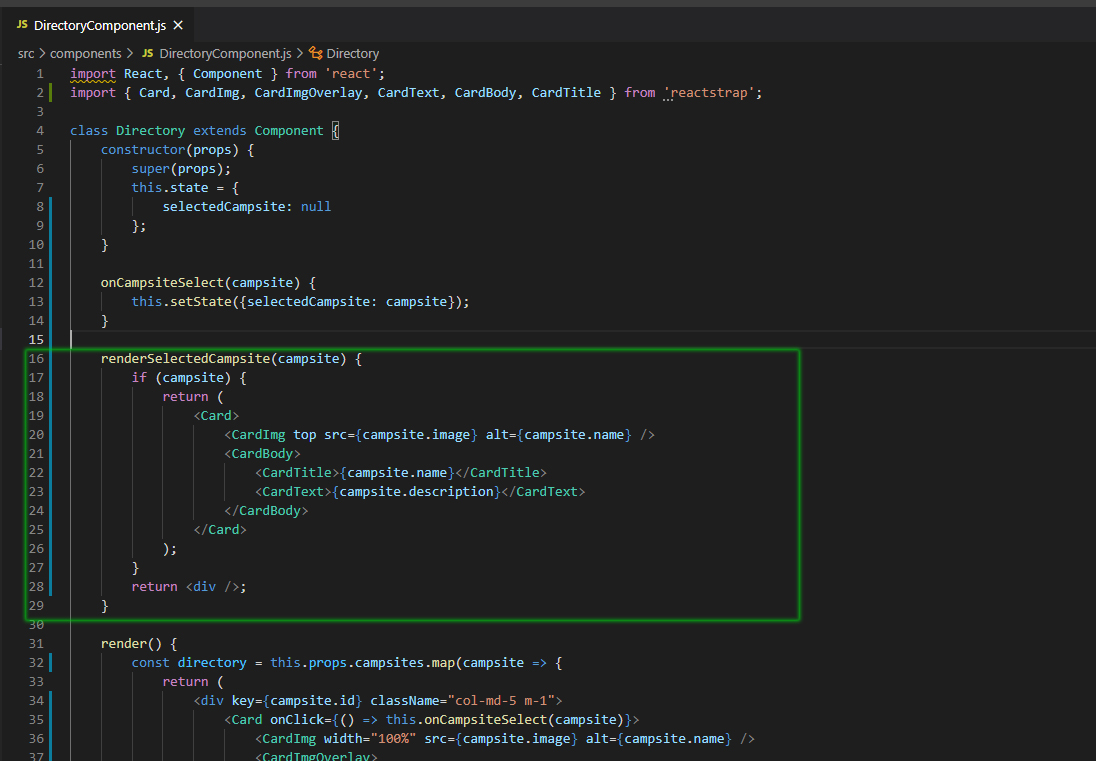
Starting at line 16, example below. Now we need to actually display that campsite’s details to the view. To do that, we will make a new method. This method will be named renderSelectedCampsite(campsite) and we will pass in a campsite object. Inside we’ll first check if campsite this will make sure that the campsite has an object in it, because this condition would return false if the campsite value is null or undefined. Then inside the if block, we will return a card that includes not just the campsite image and name, but the description as well. Inside this card component, we will use a card image component giving it the top attribute for alignment as well as source and alt attributes with their values set to campsite.image and campsite.name properties. We will use a Cardbody component as wrapper around a card title component that shows the campsite name and a card text component that shows the campsite description. Outside of this if block, we will set up a return for if we didn’t make it inside this if block. That is if the campsite value was null or undefined or otherwise falsey and from this we will return a simple empty div.
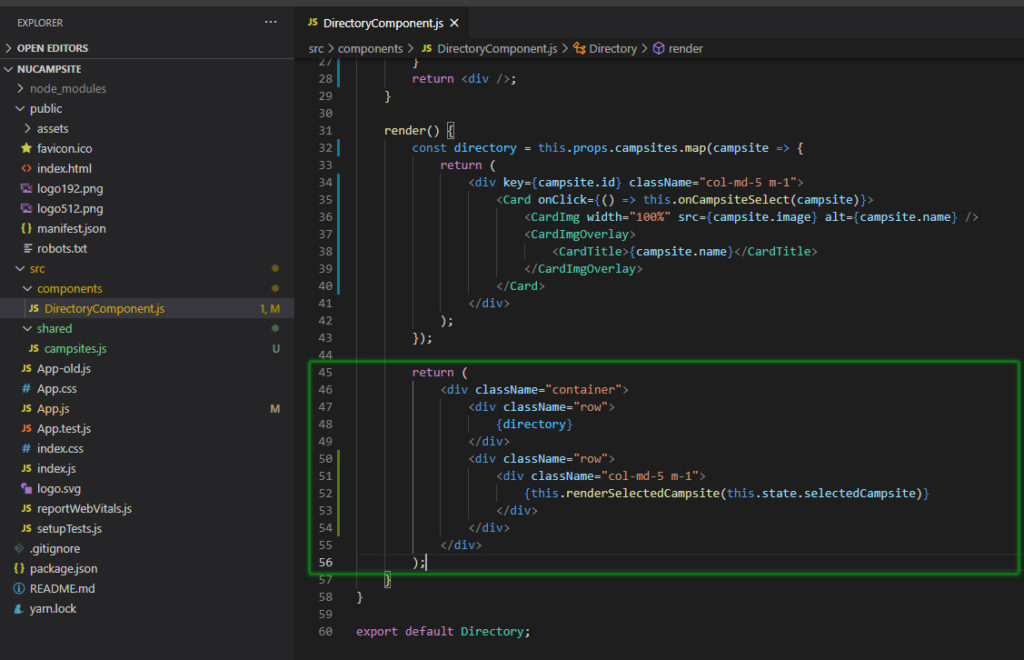
Finally (Lines 45 to 56) we need to actually call this method that we just created. We will go to the return for the entire directory component. Remember these other returns are for methods that are contained inside the directory component and are just being used to pass data around inside the component. When we are finally ready to break out of this component and send some data back to the parent component, that’s going to happen in this final return for the entire directory component. Right here you can tell which one it is because it’s the first top level return inside the render method. All those other returns are inside other methods. So in this return below the div where the array of campsites gets rendered, we are going to add a new div as a new bootstrap grid row. Inside that we add a col div. Then we will call the render selected campsite method and we will pass it the campsite object that’s stored in the selected campsite property of state.
Now run in terminal: yarn start
Let’s see what we have now. When you click on a card. The campsite appears at the bottom with more information.
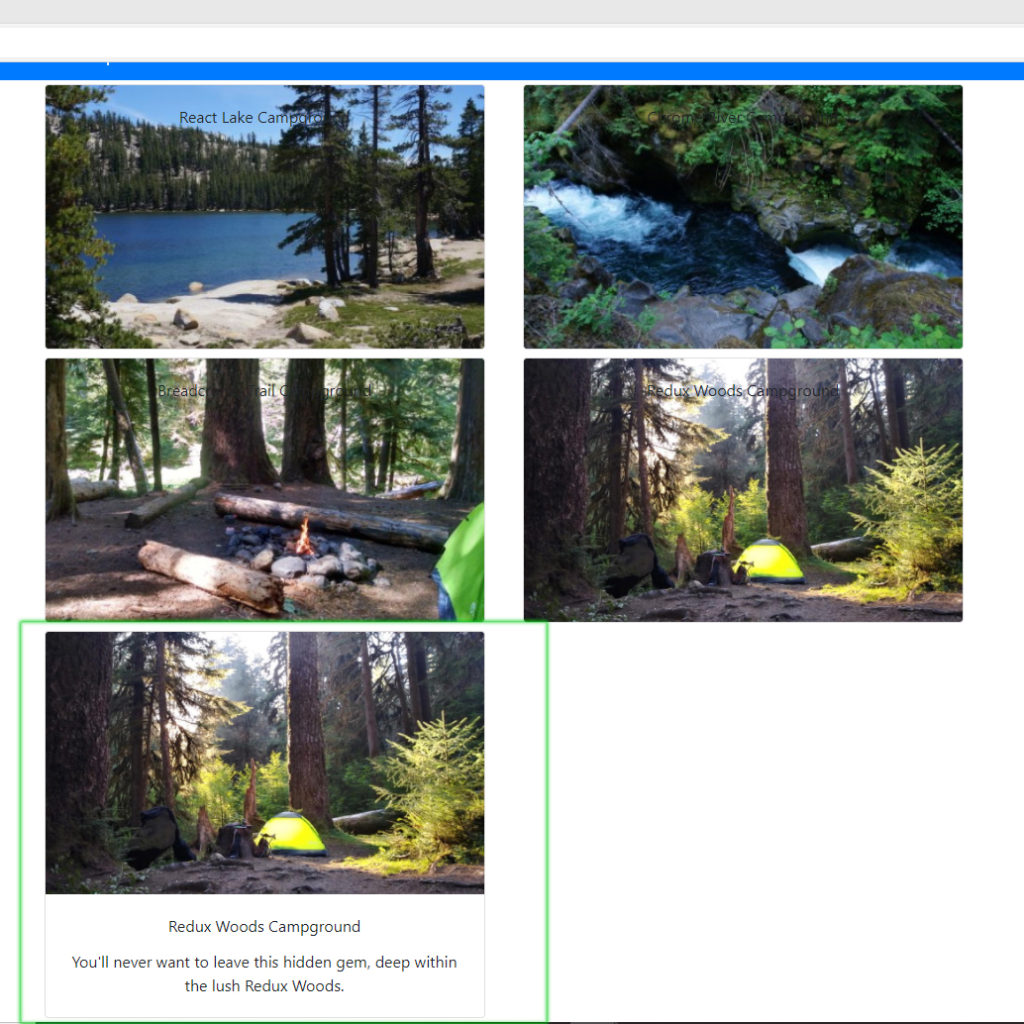
The last thing we need to do is import a couple of Google Fonts and add some styling to this website.
ADD FONTS AND STYLES
To add Google fonts to the website, do these in your terminal to add these font packages:
- yarn add typeface-lobster
- yarn add typeface-open-sans
Then in index.js we will import these like so. Note: Make sure that the import for App is positioned as the last one in the list of imports
import 'bootstrap/dist/css/bootstrap.min.css';
import 'typeface-lobster';
import 'typeface-open-sans';
import App from './App';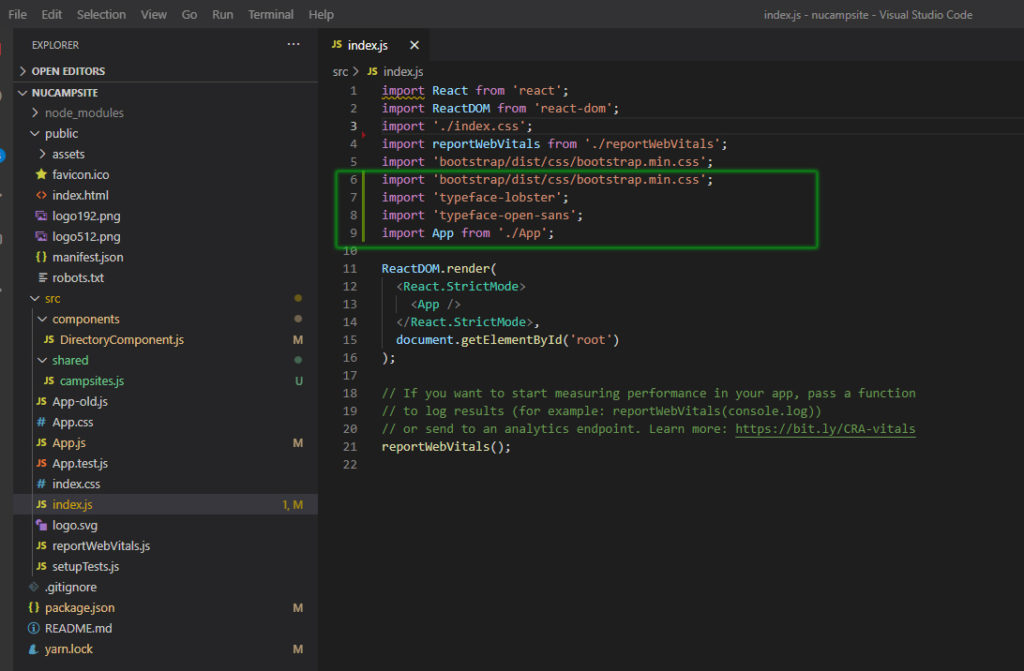
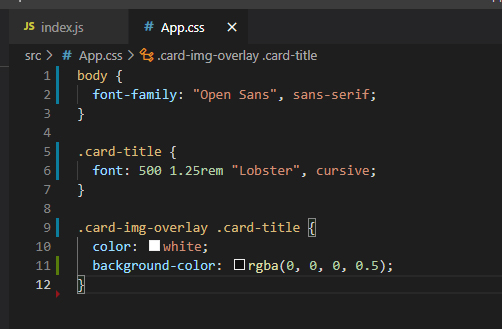
Now. open App.css and delete all its contents. Replace it with the following content:
body {
    font-family: "Open Sans", sans-serif;
}

.card-title {
    font: 500 1.25rem "Lobster", cursive;
}

.card-img-overlay .card-title {
    color: white;
    background-color: rgba(0, 0, 0, 0.5);
}
Save and test all the changes. If you had the server open previously, you may need to stop and restart the server to see the changes.
Optional: Do a Git commit with the message “Components Part 2”.
React Developer Tools
Browser extension for Chrome or Firefox: React Developer Tools
- Install extension.
- Terminal: yarn start
- Then inspect
- You will have two extra tabs at the end: Components and Profiler

The profiler tab is for auditing the speed of a React application.
The components tab shows you all the components on a page and can be helpful for debugging.
Codepen Examples:
Additional Resources:
- React – Components and Props
- React – React.Component
- React – Components and Props
- Alligator.io – Class Component Overview in React
- React – Components and Props
- W3Schools – React Props
- React – Lifting State Up
- Reactstrap Card
- Chrome Web Store – React Developer Tools
- Firefox Addons – React Devtools
- React Common Problems