Bootcamp Notes – Day 11 (Wed) – React Native: Week 4: Building Standalone Apps


Building Standalone Apps
Windows only: Install Ubuntu and enable WSL (Windows Subsystem for Linux)
- Windows users must have WSL enabled. Expo recommends installing Ubuntu from the Windows Store for this step. Be sure to Launch Ubuntu at least once after installation, then you can close it.
- Afterward, open Windows Powershell with administrator privileges. You can do so by typing powershell into the Windows search bar, then selecting the Run as Administrator option, as you see below:
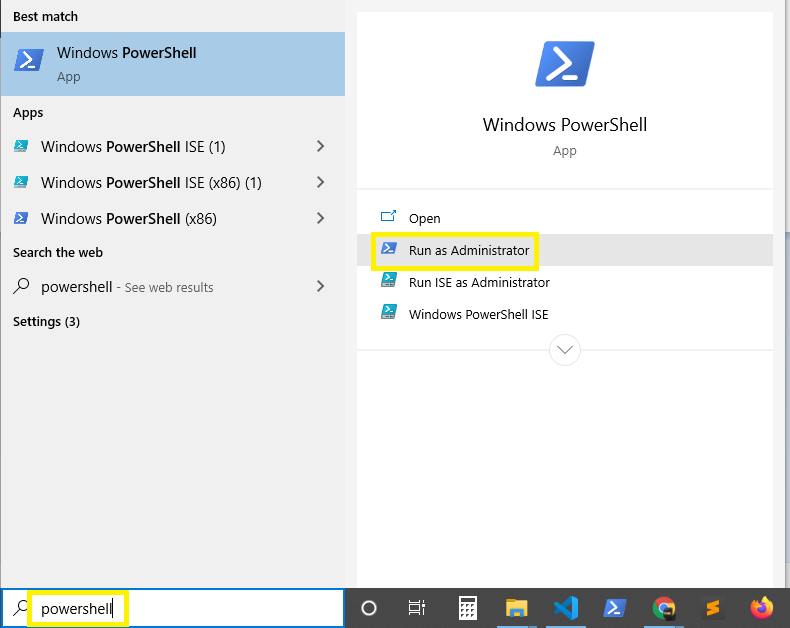

-
- Then enter this command into Powershell:
Enable-WindowsOptionalFeature -Online -FeatureName Microsoft-Windows-Subsystem-Linux
Configure project for building
- All instructions below this line are for both Windows and MacOS users:
- Download the icon.png file given above in the Exercise Resources section, and place it in your project’s assets folder, replacing the one that’s in there. This will be your app’s icon on your mobile device.
- Open the app.json file in the project’s root folder and update the “ios” and “android” properties for “expo” as follows (f there are other properties already listed for either “ios” or “android”, you can leave them in, just make sure to add a comma where appropriate):
{
  "expo": {

    . . .

    "ios": {
      "bundleIdentifier": "co.nucamp.nucampsite.student",
      "buildNumber": "1.0.0"
    },
    "android": {
      "package": "co.nucamp.nucampsite.student",
      "versionCode": 1
    }
  }
}
- The
ios.buildNumberandandroid.versionCodedistinguish different binaries of your app. Make sure to increment these for each build you upload to the App Store or Google Play store.
Build the Android APK using Expo
- Because Apple requires that you purchase a developer license in order to build standalone apps, we will only walk you through the build for Android. If you are using MacOS, you can still build for Android and test it using an Android emulator or an Android mobile device.
- This link provides the details on how to use Expo to build your app for both Android and iOS. If you are interested in building apps for iOS, you can refer to that link after purchasing a developer license from Apple. We will not ask you to do that; that is up to you. We have reproduced the instructions for Android below, in simplified form.
- To build your Android APK, type the following at your command prompt from inside your project folder:
expo build:android
- Expo will ask you to create a new account or log in. If you have already created an account, log in; if not, you will need to create one.
- Expo will also ask you if you would like to upload a keystore or let Expo handle it for you. Let Expo handle it for you at this time.
- If after this step, you run into this error:
connect ECONNREFUSED 127.0.0.1:19001
Try these steps to resolve it:
-
-
- Run expo start inside your project folder.
- Once Expo DevTools has loaded in your browser, open a second bash terminal and run the expo build:android command once again.
-
- Once the build is completed (after waiting patiently for what can be a long time), you will be provided with an APK file link hosted on Expo’s servers. It will look similar to this:

- Copy this link.
- You can now download your standalone to your mobile device or your computer by pasting the link into your browser.
Install the APK to your Android mobile device or emulator
- If you intend to test your app on your Android mobile device, then the simplest way to download and install it is to point your mobile device’s browser to that location. You could email or Slack DM yourself the URL then access it from your mobile device. Then paste the URL into your mobile device’s browser and it will download to your phone.
- If you wish to install it on an Android emulator on your computer, then point your browser to that location in order to download it to your computer. Once downloaded, you can drag and drop the file into your emulator and it will automatically install, as seen below:

- Then, drag up from the bottom to access installed applications. You should now see a Nucamp application with the icon from the icon.png file.
- Alternately if you already have Android Developer tools set up and know how to use adb, then you can run “adb install <your APK File>” with your mobile device plugged in and USB debugging enabled on it. (If you do not know how to enable USB debugging on your device, the instructions vary by Android version, so do your own research to find out how.)
- Your standalone app is still retrieving its data from your json-server, so in order for your application to retrieve data correctly, you will need to have your mobile device connected to the same network as your computer, and you will still need to have json-server running and serving up your data and image files as before.
Fetch your Android Keystore
- If you intend to publish an app to the Google Play Store, then you will your app’s keystore. This is what the Expo documentation says about fetching your keystore:
"Once you submit an app to the Google Play Store, all future updates to that app must be signed with the same keystore to be accepted by Google. If, for any reason, you delete your project or clear your credentials in the future, you will not be able to submit any updates to your app if you have not backed up your keystore."
- Use the below command from a bash shell in your project folder to fetch your keystore:
expo fetch:android:keystore
- The fetched keystore will be named nucampsite.jks.
Additional Resources: