Bootcamp Notes – Day 1 (Mon) – NodeJS: Week 1: Intro to Node and Express


Intro to Node and Express
So far we have been focused on client-style technologies code that runs on a browser or a mobile device. We will lift the curtain on the backend technologies that handle the server side. Let us take a look at what we will be learning.

Node.js – server-side runtime environment for JavaScript
Express.js – the most popular server application framework for Node.
MongoDB database software: – the “M” in the MERN stack (MongoDB, Express, React, Node)
MongoDB is referred to NoSQL database that uses JSON-like documents
NoSQL means it does not use SQL – Structured Query Language, a common database language
MongoDB is considered the leading NoSQL database today, which integrates well with JS/Node apps
Mongoose ODM (Object Data Modeling) library: makes it even easier to use MongoDB and Node together
Authentication:
- Basic authentication with Express
- Browser cookies
- Express Sessions middleware to track authenticated sessions
- Passport module and JSON Web Tokens (JWT)
Secure communication using, HTTPS, private and public keys
Uploading files to the server from a client
CORS – cross-origin resource sharing in Express
OAuth open standard for third party authentication, FACEBOOK authentication
Integrating front end and back end code.
NODE.JS
The history of node.js is a relatively short one in the world of development. It has only been around since 2009, when it was created by a developer named Ryan Dahl, 14 years after JavaScript. Fundamentally, node.js takes the Chrome V8 JavaScript engine and uses it to create a runtime environment for JavaScript outside of the browser, so that it can be used for server-side applications. When JavaScript was limited to the browser, it meant that developers working on the backend had to use a another language on the server side such as: PHP, Java, Python. But with node.js you can use JavaScript for the entire web application stack. Node.js is designed to be a non-blocking asynchronous input, output model. It uses callbacks and an event loop for a non-blocking, asynchronous i/O model.
Node.js was not actually the very first server-side JS runtime environment created, but the most popular. The Node Package Manger (NPM) was created in 2010 to help Node and JavaScript developers package, version, and share their code through the NPM registry. The widespread use of node and NPM has led to an explosion of open source creativity and innovation in the JavaScript ecosystem that continues today. NPM is now the largest registry in the world, with over a million packages registered as of 2019.
This week we will be learning:
- how to use Node to run JavaScript outside of the browser
- how to write and use Node modules, about Node core modules
- Express server framework for Node.js
- how to create a basic web server, respond to HTTP requests
Install Postman by visiting the Postman website , which provides a graphical user interface for sending test HTTP requests to a server.
- Use this command from a terminal to check your version of Node (which should be 14.9.0): node -v
Overview: Node Modules
In this lesson we will cover the purpose and different uses of node modules. Let us begin with some background understanding of how the node module system came about. JavaScript was originally designed to use for browser scripts within a web browser. In modern web development, JavaScript has gone far beyond its original intention and is now being used for writing full-fledged applications, both within and outside the browser, which node does. Other programming languages (C, C++, Java, etc) were designed from the start with standard libraries to access the underlying hardware, and a structured way to take pieces of code from multiple files and combine them together into a single application. This type of structure was built into these other programming languages from the start, this was not the case for JavaScript as it has evolved far beyond the original vision. JavaScript did not start with common libraries or support for distributing code to multiple flies then merging them into a single application. In 2009, CommonJS format was created to fill in that gap. CommonJS defined a module format for JavaScript apps into multiple files or modules. Shortly thereafter node.js and NPM were developed using CommonJS module format. The node package manager were developed using the common.js format for working with modules. The entire node and NPM ecosystem was built on top of the CommonJS format.
THREE CATEGORIES OF NODE MODULES
Modules and node can be of three categories:
- External, third party modules – installed using NPM to node_modules folder
- Node core modules –
- built into Node,
- do not need to be installed,
- intentionally kept small and minimal, include path, fs (filessytem), OS, util, and more
- File-based modules within our own application
- Use module.exports syntax to export code from JS files
- Import into other files using Node’s built-in require function
- Very much like ES6 import/export concept, which is also available in Node from Node version 8.5 and up
In our course we will use CommonJS system of require/exports in this course which Node was built upon.
Let us look at a Brief Module Example.
We make two files:
- example.js
- test.js


By typing node test you can see that it logged 6 to console, which is the value of 3 doubled. So this should demonstrate to you the basic use of modules in node and how we can define a function in one file, export it and then import it with the require function into another file and use it there.
Understanding Node Modules
- Learn about writing Node applications using JavaScript.
- Understand the basics of Node modules and how to write simple file-based Node modules.
Create a new Node application
- On your computer’s filesystem, go to your NucampFolder/5-NodeJS-Express-MongoDB folder.
- Create a new folder named node-examples and open it with VS Code.
- Create a file named app.js and add the following code to this file:
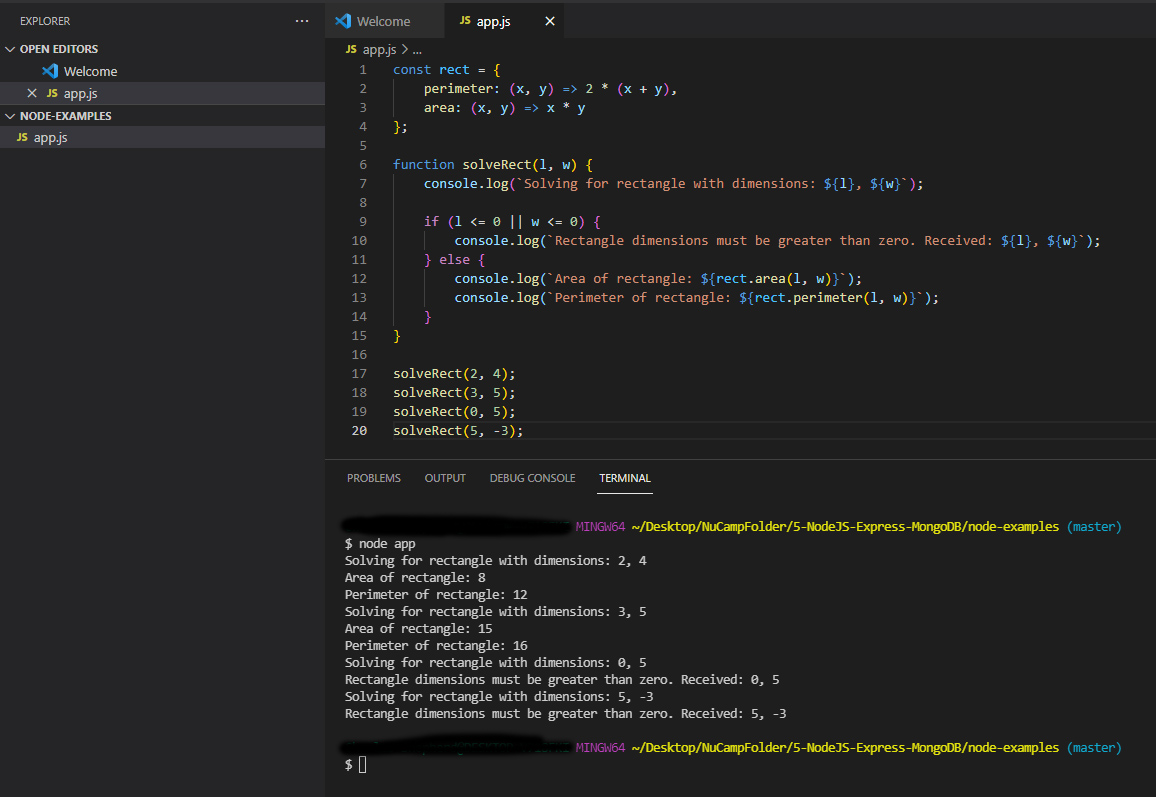
- To run the Node application, type the following into your bash terminal, inside the node-examples folder: node app
Implement a Node Module (Convert your Node app to use a module)
- Now, create a file named rectangle.js, and add the following code to it:
exports.perimeter = (x, y) => 2 * (x + y);
exports.area = (x, y) => x * y;

Now this file rectangle.js, is a module with two exports!
- Then, update app.js as follows, replacing the entire declaration of rect you added previously with the line below:
const rect = require('./rectangle');
- Run the Node application again with the node app command and observe that the result will be the same.

This should give you an understanding of how we can use exports or module.exports to make a JavaScript file into a node module then use that module in another JavaScript file by importing from it with the require function.
Note that module.exports exports and require are all part of node not a part of vanilla JavaScript. If you were to try to use those keywords with just vanilla JavaScript in a browser, it would not work, so be aware of that.
Callbacks, Closures, and the Node Event Loop
JAVASCRIPT CONCEPTS
As we begin to explore node, we will want to revisit and expand upon some of our JavaScript concepts and understand how they apply to node. We will start by discussing the concept of callback functions as they will become very important to how node is able to compute asynchronous operations and handle errors.
- First-Class Functions
- A programming language is said to have first-class functions when it supports treating functions like any other variable
- Functions can be assigned to variables, passed around as arguments to other functions, used as the return value of another function
- Higher-Order Functions
- A function that takes another function as an argument or returns a function as its return value
- Callback Functions
- A function that is passed to another function as an argument.
- Commonly used to execute asynchronous code
- A callback is passed into another function as an argument, then waits for an asynchronous operation to finish, such as a setTimeout function or fetching data from a server, before the callback is executed.
- A function that is passed to another function as an argument.
For example, this setTimout function is a higher order function that takes a callback function as its first argument then a number of milliseconds to wait as its second argument.
setTimeout(() => console.log(“Timer has finished”), 2000);
When the timer has finished then the callback function is run. The code you see here calls the function set timer, waits two seconds, then runs the arrow function that was passed in as a callback.
You could also write the code like this:
const myFn = () => console.log(‘Timer has finished’);
seTimeout(myFn, 2000);
In the first example, you are defining the callback function inline within the parameter list of setTimeout. In the second example, you are defining the callback function separately and assigning it to a variable name then using that as the first argument in the parameter list for setTimeout. Either way you do it, the important thing to note is that a function is being passed into another function to be executed asynchronously.
CLOSURES
Now let us talk about a feature of JavaScript that we have not discussed previously. It is a support for a programming concept called closures.
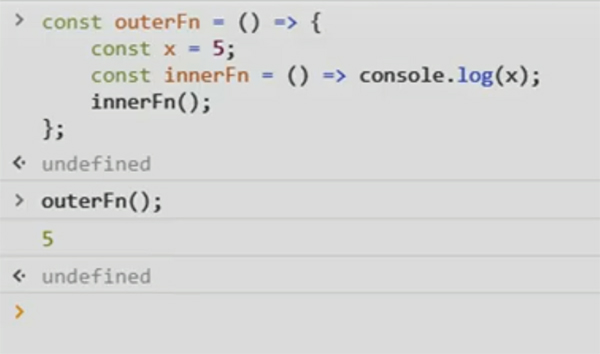
The concept of a closure in programming refers to an inner function that has access to its enclosing scope. When a function is defined inside another function, the inner function automatically gets access to the variables in the outer function.
In this example, you can see the inner function is able to console log the value of x, even though we did not pass x into inner function. It can still access it because JavaScript supports closures, so inner functions have access to the outer function scope. The cool part is that even if the outer function has completed execution, the inner function will still have access to that outer function scope.
Callbacks and asynchronous computation
When writing applications using synchronous computation you specify various operations to be completed one at a time in sequence. As an example let’s say we have operation 1, which is a long running operation , followed by operations 2 and 3.
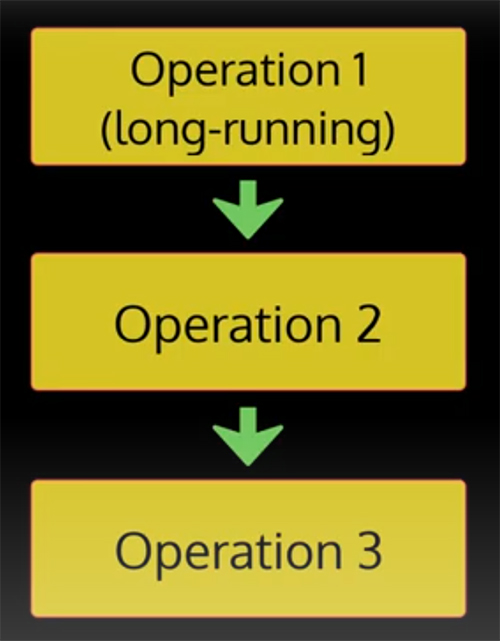
In this arrangement, let us assume that operation 2 is dependent upon operation 1 to complete its work, for example it may need some data that’s returned from operation 1. Then it makes sense for operation 2 to wait to execute until operation 1 is completed. Then let’s say operation 3 is not dependent on 1 or 2 in order to be executed. So in this case, if we do synchronous execution of these operations, then operation 3 will get stuck waiting for both 1 and 2 to finish, even though it doesn’t need anything from either of them.
With an asynchronous approach we can rearrange this work in such a way that operation 1 can be handed off to be done behind the scenes independently. Then operation 2 can be set up as a callback function to be executed when operation 1 is finished. That will free up operation 3 to start without waiting for operation 1 or 2 to finish, then operation 2 can be executed after operation 3. So this is a much better approach especially with iO (input/output) operations, which can take a long time. iO can refer to interactions with either the file system or network. This kind of asynchronous approach is built into node.js

THE NODE EVENT LOOP
- Node.js is organized into a single-threaded event loop
- JavaScript is single-threaded, but modern systems kernels are multi-threaded and can handle multiple parallel operations in background
- Node event loop executes incoming requests, one after another
- Whenever it needs to, will offload i/O requests to system kernel
- When finished, system kernel will let Node know so it can queue associated callbacks & eventually execute them via loop
As an analogy, let’s say you are in the middle of work and you need to get an important document from somebody, but you also have a lot to do at your own office and you would lose valuable time if you had to leave to get it. So you call for a courier and the courier goes to get the document. Meanwhile, you can continue other work and you make a reminder to yourself to deal with the document when it arrives. When the courier brings the document to you, that reminder is then put on the list of things that you need to do, so that you can deal with it the next time your attention is free.
So the event loop is a continuously running loop, which basically picks up request from a queue and then service them one at a time. Node.js is single threaded, which means it can only handle one thing at a time, but at the same time, it’s able to get more done by delegating much of it’s time intensive work, then using callbacks to pick up where it left off, once the delegated work is completed.
Six phases of the Node event loop
- Timer Phase
- Pending Callbacks Phase
- Idle, Prepare Phase
- Poll Phase
- Check Phase
- Close Callbacks Phase
As a node developer, you will typically only deal with the timer phase, pull phase, and the check phase. The other phases are generally handled by Node.
- Timer Phase: Event loop executes callbacks scheduled by setTimeout() or setInterval() functions
- Pending Callbacks Phase: deals with certain system-level error callbacks (you will not use this)
- Idle, Prepare Phase: Use internally by Node (you will not use this)
- Poll Phase: Processes a queue of callbacks, once the queue is empty, will wait for handle any requests or timers.
- Check Phase: Handles callbacks from setImmediate() timer function when the queue in the poll phase is empty
- Close Callback Phase: Handles emitting the ‘close’ event if a socket or handle is closed abruptly(you will not use this)
This is a big picture view of how the node event loop works.
Callbacks and Error Handling In Node
In the previous lesson you learned about how asynchronous operations can be handled with the use of callbacks, functions that are passed into other functions then executed at a later time. In this exercise we will look at an example of how we make use of this within a node application. We will continue from where we left off on the previous exercise.
- More clearly understand the use of callbacks in Node.
- Learn about a common approach for handling errors in Node.
Now we update rectangle.js to use Callbacks and handle errors:

Then, update app.js as shown below:

In summary what is illustrated, is that node support for asynchronous computation; asynchronous functions can take their own time to finish and return the results, while the main computation can proceed forward. Then once the asynchronous function is finished, they can return to the main computation thread using a callback. You will see that with Node and Express and later with MongoDB. This kind of pattern will repeat very often in the way that we write our code. Also, the error callback pattern where a module function will accept a callback with an error object as its first argument is a common convention for handling errors asynchronously in node.
Additional Resources:
- MDN – JavaScript modules
- FlavioCopes – Introduction to CommonJS
- FreeCodeCamp – Requiring Modules in Node.js – Everything You Need To Know
- NodeJS – What is Require?
- MDN – JavaScript modules
- FlavioCopes – Introduction to CommonJS
- FreeCodeCamp – Requiring Modules in Node.js – Everything You Need To Know
- NodeJS – What is Require?
- Understanding Module Exports and Exports in Node.js
- I/O-bound vs CPU-bound in Node.js
- NodeJS – The Node.js Event Loop
- IBM Developer – Learn Node.js – The Event Loop
- Codeburst.io – What the Heck is a Callback?
- MDN – Closures
- Dev.to – Closure & Lexical Scope
- NodeJS – What are callbacks?
- NodeJS – What are the error conventions?
- MDN – JavaScript Global Objects – Error