Bootcamp Notes – Day 11 (Wed) – NodeJS: Week 3: Passport and Token-Based Authentication


Passport and Token-Based Authentication
Overview: Passport
In the previous lessons, we learned about various strategies for user authentication.
- We started with basic authentication
- and then moved onto Cookies
- Express Sessions – way of authenticating and tracking users
- Registering & Adding User Documents
In this lesson we will look at Passport which is an authentication middleware for Express. As we’ve seen in the previous exercises, authentication can involve a lot of repetitive code for handling errors and devising ways of validating the user and so on. All of this, is simplified with Passport!

Passport provides a modular extensible approach using plugins to handle different types of authentication, which it calls Strategies. There are hundreds of different Passport Strategies including Facebook, Twitter, Steam etc.
Passport
- Supports sessions – generates cookies that carry session ID’s, browsers send them to the server with every request, server tracks users by session ID and stores server-side data
- Also supports a technology calls JSON Web Tokens (JWT) – token based authentication as an alternative to sessions
We will start with Local Strategy using sessions, then with JWT along with the local strategy. Next week we will look at Passport w third party Strategy.
PASSPORT LIBRARIES FOR LOCAL STRATEGY
We will need to install:
- passport
- passport-local – a library
- passport-local-mongoose – a library to integrate Passport with Mongoose and MongoDB
Let us go over each of these briefly.
USING PASSPORT
Remember, there are Express routing methods for each HTTP request type such as: .get(), .post(), .put(), .delete() and more!
You have seen them like this passing first an argument for the path, then second a specific type of callback function that Express calls a middleware function, which has access to the request object, the response object, and optionally the function called next and is able to handle that request in some way and that middleware function is responsible for handling the request and response and it can send back a response or pass the client on to the next middleware.
So for example in our user router, the login routing method is called like this: router.post(‘/login’, (req, res) => {..});
What we have not mention before is that these routing methods for: .get(), .post(), .put(), and so on support multiple middleware functions in the argument list which will be executed in sequence.
This example here: router.post(‘/login’, (req, res) => {..}); only supports one middleware function, but we could add another and Passport takes advantage of this!
When we start using Passport we will modify this post method call like this: router.post(‘/login’, passport.authenticate(‘local’), (req, res) => {..});
passport.authenticate() middleware will intercept request and attempt to authenticate using given strategy (‘local’ in this case)
If successful, passport adds user property to request object with information about user (req.user) and then passes control to next middleware to continue handling request.
PASSPORT-LOCAL
Passport-local is a library plugin to implement the local strategy.
Local Strategy: Handles authentication with username/password stored on server.
Use Local Strategy plugin by installing passport-local, import Strategy constructor, then passport.use():
.const LocalStrategy = require(‘passport-local’).Strategy;passport.use(new LocalStrategy(verifyCallback)
verifyCallback function checks if user exists, password matches – we will use verifyCallback function created by passport-local-mongoose
PASSPORT-LOCAL-MONGOOSE
Use with Passport with Local Strategy, MongoDB & Mongoose. Mongoose has a way to accept plugins to a particular schema to extend that schema’s functionality.
For example we will plug this into our use schema like this: userSchema.plugin(passportLocalMongoose);
Once we have done this it will automatically handle adding username/password fields to Schema, so we no longer have to add those ourselves and furthermore it will store the password in a more secure way by putting it through two processes called: hashing and salting.
- Hashing: Run through hashing algorithm to transform password; one-way process, cannot be decrypted, and is not an encryption method because the concept of something being encrypted would also mean that it can also be decrypted. Hashes cannot be decrypted. So even if the stored passwords were stolen somehow, the real passwords could not be retrieved from them.
- Salting: Is a process that adds a unique, random string before hash, increases security.
- When a user tries to authenticate, entered password hashed & salted in the same way then checked for match against stores passwords.
So handling the username and passwords fields of the user schema and hashing insulting passwords for storage are what this plugin does for us. Beyond this, passport-local-mongoose plugin provides us various helper methods for authentication. The main one is a static method on the model called .authenticate() that we will use as the verifyFunction for the LocalStrategy:
new LocalStrategy(verifyFunction)
With the passport-local-mongoose plugin configured to use with the user schema, we can simply pass in its authenticate method like this:
new LocalStrategy(User.authenticate()); and this will take care of checking the username and password sent to the server from the client and verifying whether it exists in the database and if the password matches, so that we no longer need to write the code to do that ourselves. So that is another way that this plugin is very helpful to us.
We will now see in the following how to configure local strategy for authenticating users using passport, passport local, and the passport local mongoose node modules.
User Authentication with Passport
- Use the Passport middleware together with its supporting packages passport-local and passport-local-mongoose for setting up local authentication in your server.
- Use the Passport together with express-session to set up user authentication.
Installing Passport
- Open the nucampsiteServer folder in VS Code.
- Install the Passport and related Node modules in this folder as follows: npm install passport@0.4.1 passport-local@1.0.0 passport-local-mongoose@6.0.1
Add passport-local-mongoose plugin to userSchema
- In the models folder, update user.js by adding the following code to it:
Implement Local Strategy
- Add a new file named authenticate.js to the root level of the project folder (in nucampsiteServer, at the same root level where app.js is) and add the following content:
const passport = require('passport');
const LocalStrategy = require('passport-local').Strategy;
const User = require('./models/user');

exports.local = passport.use(new LocalStrategy(User.authenticate()));
passport.serializeUser(User.serializeUser());
passport.deserializeUser(User.deserializeUser());
- Open users.js file in the routes folder and update the code as follows:
- Finally, update app.js as follows:
- Test the server using Postman.
- Optional: Do a Git commit with the message “Passport”.
Overview of Token-Based Authentication
This week we learned about sessions, a popular method to keep clients authenticated over a period of time without having to send sensitive username and password data over and over again. Now tokens generally do the same thing, so why do we need tokens?
Well Sessions have two main drawbacks that do not exist with tokens:
- Not scalable, server must keep track of user sessions, constantly create/read/update/delete session data on server side, difficult with many users
- Mobile applications typically do not work well with sessions
With token-based authentication, typically there’s no data stored on the server side so it is scalable and easier for mobile applications to use.
Token-based authentication helps w/cross-origin resource-sharing (CORS) & cross-site request forgery (CSRF) problems.
Token-based authentication also makes it easier for one application to share authentication between sites in a secure manner. With session-based authentication, this kind of authentication sharing is not straightforward. So you can see that there are several advantages to using token-based authentication.
How does token-based authentication work?
Similar to what we’ve seen already with cookies and session-based authentication. In token based authentication a user must log in somehow to the server, this could be with a local strategy or a third party strategy. However it’s done, once the user is validated on the server, the server will then issue a token to the client. Then all subsequent requests coming from the client side, will bear the token in the request. The token can be in the request header or the body of the request message or it could even be in the URL query parameters as part of the URL.
- Token is stored on the client side, server does not store it, thus more scalable
JSON WEB TOKENS (JWTs)
The most common way of using tokens is called JSON web tokens or JWT.
JWT is the standard way to use tokens. JSON (JavaScript Object Notation) is a lightweight data-interchange format.
IETF RFC 7519 defines standards for JSON Web Tokens. IETF (Internet Engineering Task Force) mandates internet protocols and policies.
RFCs (Request for Comments) – internet standard documents. RFC’s are documents released by the IETF that lay out standards for the internet.
A JSON web token is a self-contained token, that carries all information necessary to identify a user, thus can be shared between applications. That means that a JSON web token can be shared between two applications. So one web or mobile application could authenticate a user and pass a JSON web token to the client, then that same token could potentially be used to give the user access to protected resources on a completely different application. So that it possible with tokens, where it’s not possible with sessions.
What is in a JSON web token?
A JWT is encoded into a long, 3-part string: Header, Payload, Signature
Each part is separately encoded with BASE64URL encoding (similar to Base64) then joined together with two periods. Here is an example below:

Let us examine the three parts:
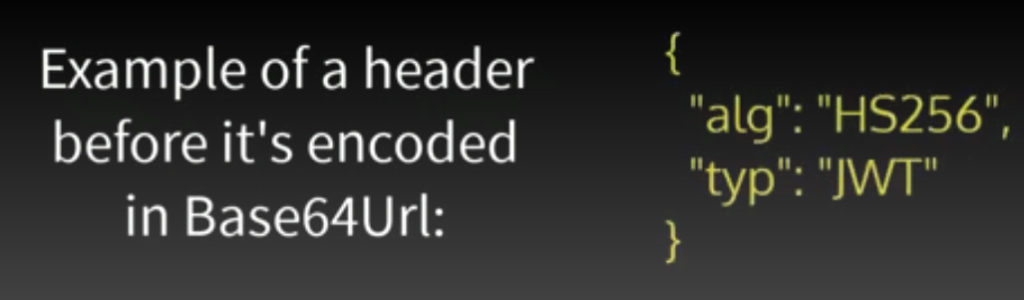
HEADER
When a token is created it is signed with a specific algorithm. The header contains the algorithm that was used for signing this token and type of the token itself. The two most common algorithms for JWT are H2256 and RS256; we will use HS256; used to hash information inside the token. HS256 is a 256-bit encoding scheme used for hashing the information instead of the token. The type is set to ‘JWT’
PAYLOAD
The payload contains information that helps you to identify the user, such as an ID. You can also add additional information to be encoded such as name, but you want to keep this small. The more information you store, the larger the token will be. It is also possible to store an ID in a session like way on the server side.
SIGNATURE
The third part of a JSON web token is the signature. To create a signature, the encoded header, the encoded payload and a secret key stored on the server side are taken together and signed using the algorithm specified in the header. This signature is used to guarantee message authenticity, when a server receives a token from a client, it can use the signature to make sure the token has not been tampered with by any third parties along the way.
JSONWEBTOKEN & PASSPORT-JWT
For using JSON web tokens in a node application, there are two node libraries that are of interest to us. One is simply called JSON web token and the other is called passport-JWT.
The jsonwebtoken library contains methods to sign, issue, and verify JWTS from a Node application.
The passport-jwt provides plugin (Strategy) for Passport for JWT-based authentication.
Later on, we will use these libraries to convert our application from using sessions to using JSON web tokens.
User Authentication with Passport and JSON Web Token
- Sign and issue JSON web tokens for token-based user authentication using the jsonwebtoken Node module.
- Update the Passport strategy to use JWT Strategy.
- Grant access to the GET endpoints for all routers to unauthenticated users, but only allow authenticated users to access the POST/PUT/DELETE endpoints.
- Use the following file when you need a campsite document to paste into Postman during testing:
Install passport-jwt and jsonwebtoken Node modules
- You will continue working with the Express REST API Server in the nucampsiteServer folder. You will modify this project to set up user authentication support using tokens and Passport.
- Install the passport-jwt and the jsonwebtoken modules as follows: npm install passport-jwt@4.0.0 jsonwebtoken@8.5.1
Update the app to use JSON Web Tokens
- Create a new file named config.js at the root level of the nucampsiteServer project folder, and add the following code to it:
module.exports = {
    'secretKey': '12345-67890-09876-54321',
    'mongoUrl' : 'mongodb://localhost:27017/nucampsite'
}
- Update authenticate.js as follows:
- Open users.js file in the routes folder and update the code as follows:
- Update app.js to remove the auth function and the app.use(auth) call, along with all references to sessions and cookie-parser, and add code as follows:
Control routes with authentication
- Open campsiteRouter.js and update the code as follows, adding the authenticate.verifyUser middleware function to all endpoints except the GET endpoints:
. . .
const authenticate = require('../authenticate');
. . .

campsiteRouter.route('/')
. . .
.post(authenticate.verifyUser, (req, res, next) => {
   . . .
})
.put(authenticate.verifyUser, (req, res) => {
   . . .
})
.delete(authenticate.verifyUser, (req, res, next) => {
   . . .
});

campsiteRouter.route('/:campsiteId')
. . .
.post(authenticate.verifyUser, (req, res) => {
   . . .
})
.put(authenticate.verifyUser, (req, res, next) => {
   . . .
})
.delete(authenticate.verifyUser, (req, res, next) => {
   . . .
});

campsiteRouter.route('/:campsiteId/comments')
. . .
.post(authenticate.verifyUser, (req, res, next) => {
   . . .
})
.put(authenticate.verifyUser, (req, res) => {
   . . .
})
.delete(authenticate.verifyUser, (req, res, next) => {
   . . .
});

campsiteRouter.route('/:campsiteId/comments/:commentId')
. . .
.post(authenticate.verifyUser, (req, res) => {
   . . .
})
.put(authenticate.verifyUser, (req, res, next) => {
   . . .
})
.delete(authenticate.verifyUser, (req, res, next) => {
   . . .
});

. . .
- Make similar updates to promotionRouter.js and partnerRouter.js — require the authenticate module, and add the authenticate.verifyUser middleware to all endpoints except the GET endpoints.
- Save the changes and test the server by sending various requests.
- Optional: Make a Git commit with the message “Passport JWT”.
Additional Resources:
- PassportJS.org
- PassportJS – passport-local
- NPM – passport-local-mongoose
- PassportJS.org
- NPM – passport
- NPM – passport-local
- Github – passport-local example
- NPM – passport-local-mongoose
- Mongoose – Plugins Guide
- JSON Web Tokens
- Scotch.io – The Ins and Outs of Token-Based Authentication
- IETF RFC 7519 – JSON Web Token (JWT)
- NPM – JSONWebToken
- NPM – passport-jwt
- JWT.io
- DigitalOcean Tutorials – How to Implement API Authentication with JSON Web Tokens and Passport