Bootcamp Notes – Day 3 (Wed) – NodeJS: Week 1: Express Server Framework and NPM Packages

Express Server Framework and NPM Packages
Overview
Node core modules were intentionally designed to be small and lightweight. This was designed to not only minimize the size of Node, but also to leave room for third-party developers to come up with innovative solutions to problems. So once Node is released many third-party developers started designing and releasing interesting external modules for the node platform. We have used many third-party node modules for front-end development in the previous courses. In this course we are looking at server-side development and on the server-side one of the most popular third-party node modules is a framework for building HTTP servers called Express, which is a framework for building HTTP servers.

EXPRESS MIDDLEWARE
Express is the de facto server framework used for node applications. Express, is a fast, unopinionated minimalist web framework for Node.js. Unopinionated means that it’s designed to be flexible about how you can use it. It is designed to be a minimal framework. Express can be extended with third party middleware for additional functionality if and when you need it.
Many middleware libraries are available to use for Express.
- Morgan – logs information about server requests
There are also a few built-in middleware functions accessed as methods of the express object. One is express.json() which is a built-in middleware, that helps parse JSON encoded HTTP request messages and extract information from them.
We will also use a built-in middleware method in Express called: express.static() – built-in middleware to serve static files. The express.static method can be given a path to a directory and you will be able to serve up the static files that are in that directory.
In our package.json you will see version: x.x.x which is called semantic versioning. This convention is used for all npm packages. Semantic versioning consists of three numbers. Major Version.Minor Version.Patch (ex. 4.17.1).
Major Version: Major update, might introduce breaking changes not backward compatible with previous version
Minor Version: Typically will not contain any (intentional) breaking changes.
Patch: Small update such as minor bugfix, no breaking changes
NPM INSTALL
You can specify a particular version of an NPM package to install, (ex: npm install express@4.17.1) If you don’t specify the version, NPM will install the latest version.
Install latest patch within same minor version, eg: npm install express@~4.17.1
Install latest patch OR minor version within same major version, eg: npm install express@^4.17.1
There is one more way to use the npm install command you should know about. If you type npm install on its own: it will install all dependencies listed in package.json (including devDependencies unless you use — production flag). It is useful for installing node_modules at another location.
For example: If you download a Git repository and try to recreate the project, git repo won’t have node_modules (waste of space)
Instead, use npm install to make a fresh install of the dependencies from package.json
Also, npm generates a package-lock.json file. Newer versions of NPM will automatically generate this file. package-lock.json stores information about the exact file tree generated whenever node_modules or package.json are modified. package-lock.json is meant to help when package.json contains dependencies using ~ or ^ to allow install of higher patch or minor version. Sometimes this automatic updating can cause unforeseen bugs.
When npm install is used to install dependencies for a project, will use package-lock.json by default if it exists, so it will install same versions as the last time package-lock.json was generated.
Introduction to Express
Set up the node-express folder and install Express
- Create a folder named node-express in the NucampFolder/5-NodeJS-Express-MongoDB folder.
- Copy the public subfolder from the node-http folder, into node-express.
- Open the node-express folder with VS Code. Inside it, create a package.json file that contains the following:
{
  "name": "node-express",
  "version": "1.0.0",
  "description": "Node Express Examples",
  "main": "server.js",
  "scripts": {
    "test": "echo \"Error: no test specified\" && exit 1",
    "start": "node server"
  }
}
- Open a bash terminal and make sure that it is open to the node-express folder. Then, install the Express framework by entering the following: npm install express@4.17.1
- If you are using Git, initiate a local repository. Then create a file named .gitignore and add the following to it: node_modules
-
- Before, in your React and React Native courses, you used create-react-app and expo-init to scaffold out your starter files, so you did not need to create a .gitignore file or initiate a Git repository manually because those CLI tools automatically did so for you. Here, you’re on your own.
Set up a new Express server and test it
- Create a file named server.js and add the following code to it:
const express = require('express');

const hostname = 'localhost';
const port = 3000;

const app = express();

app.use((req, res) => {
    console.log(req.headers);
    res.statusCode = 200;
    res.setHeader('Content-Type', 'text/html');
    res.end('<html><body><h1>This is an Express Server</h1></body></html>');
});

app.listen(port, hostname, () => {
    console.log(`Server running at http://${hostname}:${port}/`);
});
- Start the server by typing the following at the prompt. npm start
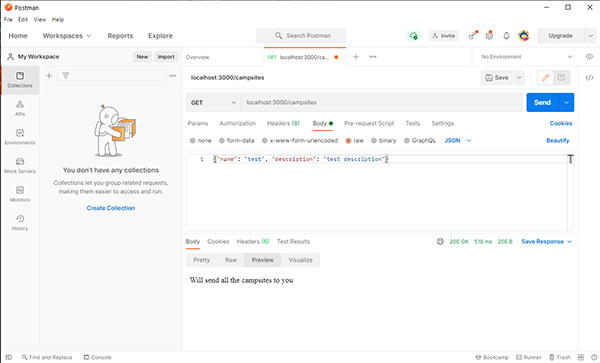
- Test the Express server using Postman. View the exercise video for details.
Serve static files with express.static and use Morgan middleware for logging
- The Morgan middleware library is used for logging. Install Morgan by entering the following command into your bash terminal, in the node-express folder.: npm install morgan@1.10.0
- Update server.js as follows:
. . .
. . .
- Start the server, then interact with it and observe the behavior, using your browser and Postman.
- Optional: Do a Git commit with the message “Intro to Express Part 2”.
Introduction to REST
REST – Representational State Transfer
REST is a software architectural style that defines a set of constraints for creating Web services that can communicate with clients.
Web Services – resources available over the Web.
Two basic types of Web Services:
- SOAP web services
- RESTful web services
SOAP – Simple Object Access Protocol
The SOAP way of building web services is the older approach. It uses the WSDL (Web Services Description Language) to specify how two endpoints in a network communicate with each other. SOAP typically depends on XML for its messaging format, whereas REST is more flexible.
REST – can use XML, HTML, plain text, or JSON for its messaging format.
SOAP web services were the de facto standard, now REST has become more widely used. REST is simpler and easier to implement.
SOAP is a protocol with strictly defined rules; REST describes an approach and does not lay out specifications.
6 DEFINING CONSTRAINTS OF REST
Their are 6 DEFINING CONSTRAINTS OF REST, web services that conform to these constraints are called RESTFUL.
- Client-Server Separation: The client and server can be implemented from each other, as long as the interface between them stays consistent. This division of UI and data storage concerns improves the flexibility and scalability of both sides, and they are able to evolve independently of each other.
- Statelessness: The server does not store any information about the client’s state after the communication is complete. The client is responsible for tracking its own state through the front-end application state, cookies, etc.
- Uniform Interface: Resources that are exposed by the server must have a single URI (Uniform Resources Identifier). This is done with a directory-like style, as you have seen with the routes you’ve created with react-router, eg http://localhost:3000/directory/1.
- Cacheable: Clients can cache responses, and server responses will contain information about how to cache them, or if they should be cached at all.
- Layered System: There can be many layers between the client and the server. The client will not necessarily know if it’s dealing directly with the end server or from an intermediary server that has cached the data that’s being requested.
- Code On Demand: This is the only optional constraint. Servers may temporarily extend the functionality of client-side code by transferring executable code, such as JavaScript.
So these are the constraints that define a RESTful web service.
THE 9 HTTP METHODS (VERBS)
RESTful web services are built upon the HTTP protocol and will use the HTTP methods known as (VERBS). Their are 9 of them!
- POST – create a new resource on the server (Create)
- GET – request a resource from the server (Read)
- PUT – update a resource on the server (Update)
- DELETE – delete a resource on the server (Delete)
- HEAD
- CONNECT
- OPTIONS
- TRACE
- CATCH
POST, GET, PUT, DELETE are analogous to CRUD operations from database programming: Create/Read/Update/Delete
GET, PUT and DELETE are considered Idempotence (is concept in mathematics and computer science): When an operation can be repeated multiple times and does not change it operand more than once, if at all.
An example of Idempotence would be multiplying by zero.
So one thing to be aware of, what operation is Idempotence (can be repeated without consequences) and which ones you have to be more careful not to repeat.
Resources and Representations
A resource on a server is any data that can be requested by a client – a name from a database, a stock price, a weather, report, an image or HTML file etc
Resources are made available at unique URi, and a client can request each resource specifically by its URi.
The server responds to a GET request for a resource by sending a representation of that resource, typically as JSON or XML.
Or the client will send a POST or PUT request by sending a JSON/XML representation in its request body, and the server will create a resource from it.
For example the client may send a GET request for information about a stock from a servers database. That information is stored in that particular database format. But the server will take that information and encode it into a format that is useful for the client, which cannot read the database format. Most of the time it will be in the form of JSON or XML format. Then that JSON or XML data is a representation of the resource and that representation is what actually gets sent in the servers response. Or a client might send a POST request to the server and that request would include a body of a representation of some data in JSON or XML form. The server would take that representation and use it to create a new resource. So the client and the server do not send resources to each other, they send representations of resources which are then converted to resources. That’s why we call representational state transfer.
Overview: Express Router
BUILDING A RESTFUL API WITH EXPRESS
In the lesson on REST you learned about the REST architecture and how it describes constraints for client server interaction using HTTP methods such as GET and PUT, which are also called HTTP verbs.
Next we will look at Express support for a REST APi based server, including:
- Express routing methods
- Route Parameters
- Express Router
- How to subdivide our app to handle endpoints
Express provides a method that corresponds to each type of HTTP verb. These are called the the routing methods.
Express routing methods:
- app.get()
- app.post()
- app.put()
- app.delete()
- and more
- and you can use app.all() if you want to match all HTTP verbs
You can use these methods to handle requests that come in through the corresponding HTTP verb. These routing methods have two required parameters: path and callback function.
The path is typically provided like this, based on the part of the HTTP address that comes in after the base URL and the callback function is a middleware function that will be used to handle the server request to that endpoint. So in our application where the base URL is localhost:3000, if a server request is sent to localhost:3000/campsites then the code shown here would be able to handle that request assuming it was a GET request.
app.get(‘/campsites’, (req, res, next) =>
….
});
We will be using the word endpoint, which means the combination of the path and the HTTP verb. So this endpoint here is for a GET request to the forward slash campsites path.
Endpoint: a path + an HTTP verb such as GET or PUT
You can also set up your Express app to handle a dynamic request for a more specific endpoint using a route parameter such as a campsiteId.
Route Parameters: Use a colon to parse a string in a request path into a parameter stored in re.params, eg.:
app.get(‘/campsites/:campsiteId’, (req, res,next) =>
}
….
});
This code above will look familiar to you from the route params that you used in React and React Native. The colon here before the word campsiteid tells the server if we receive a request, where there’s a string after the forward slash campsites forward slash, then we are going to store that string inside a route parameter named campsiteid. Thereafter we can access that string via the re.params.campsiteid property. In the above example, if server receives GET request for /campsites/23, it will store ’23’ as the value for re.params.campsiteid
express.json()
A GET request is a fairly simple (read) operation – the server receives a GET request and responds with the requested data.
A POST or PUT request is a more complex (write) operation – request message body contains data that the server needs to parse
The built-in express.json() middleware automatically parses JSON data into properties of the req.body JavaScript object, so we can use that data easily.
EXPRESS ROUTER
If you are implementing an express server that handles endpoint for multiple paths then it can make sense to use the Express router to subdivide the routing into different modules. The express router is a built in middleware that we can use to handle the routing for a particular path. When handling endpoints for multiple paths, use the built-in Express router to subdivide the routing into multiple modules.
Example: router module named campsiteRouter can be used to deal with requests that involve paths beginning with ‘/campsites‘.
This will make the routing much more easy to manage when there are many different endpoints to be handled. We will implement this in the next part.
Express Router
- Learn to use routing methods in the Express framework to support REST API endpoints.
- Learn to create an Express router in a separate module to subdivide routing.
- You will continue in the node-express folder and modify the server in this exercise.
Part 1
- Update server.js as follows:
- Start the server and interact with it from the browser/Postman.
- In Postman Test: GET, POST, PUT, DELETE
Make sure these are set in POSTMAN for testing:

Part 2 – Use the Express router
Express Router
- use multiple routers to manage routing for different paths
- each router works like a mini Express application that’s focused on routing only
- routers can use other middleware through router.use() method
- each router also behaves like middleware itself, can be used as callback argument for app.use()
- Update server.js as follows:
- Next, create a new folder named routes in the node-express folder.
- Create a new file named campsiteRouter.js in the routes folder and add the following code to it:
const express = require('express');
const campsiteRouter = express.Router();

campsiteRouter.route('/')
.all((req, res, next) => {
    res.statusCode = 200;
    res.setHeader('Content-Type', 'text/plain');
    next();
})
.get((req, res) => {
    res.end('Will send all the campsites to you');
})
.post((req, res) => {
    res.end(`Will add the campsite: ${req.body.name} with description: ${req.body.description}`);
})
.put((req, res) => {
    res.statusCode = 403;
    res.end('PUT operation not supported on /campsites');
})
.delete((req, res) => {
    res.end('Deleting all campsites');
});

module.exports = campsiteRouter;
- Start the server and interact with it from the browser/Postman.
- In Postman Test: GET, POST, PUT, DELETE
Make sure these are set in POSTMAN for testing:
Additional Resources:
- ExpressJS
- MDN – Introducing Express
- FlavioCopes – Semantic Versioning using npm
- NPM – npm install
- NPM – package.json, package-lock.json
- Dev.to – But what the hell is package-lock.json?
- Express
- Express – Using middleware
- Express – Serving static files in Express
- MDN – Express web framework
- Github – Morgan
- Alligator.io – Getting Started with Morgan, the NodeJS Logger Middleware
- RESTfulAPI.net – What Is REST?
- Guru99 – Web Service Architecture
- Guru99 – SOAP vs REST
- Public RESTful API examples – Twitter / WordPress / Google Maps
- Difference between URL and URI
- REST – Resources and Representations
- W3Schools – SOAP
- Express – Basic routing
- Express – Routing Guide
- Express – Routing Methods
- Express – Route Parameters
- Express – Router
- Express – express.json() middleware
- Express API Reference – Router
- 10 Best Practices for Writing NodeJS REST API
- ExpressJS Tips for Large Applications