Bootcamp Notes – Day 4 (Mon) – NodeJS: Week 2: Introduction to MongoDB – Express Generator

Introduction to MongoDB – Express Generator
NodeJS, Express, and MongoDB
Last week we were introduced to a Node.js server side JavaScript runtime environment and the Express server application for node.js. This week will continue to work on Node.js and Express including how to use the Express Generator app utility to scaffold out a starter express application. We will also learn more about how callbacks are used in node for asynchronous computations and how that can lead to a problem that’s called callback hell and how ES6 JavaScript promises can help address that problem.
The main focus this week will be learning about the database software called MongoDB. You will learn about the MongoDB fundamental concepts such as:
- collections
- documents
- NoSQL database
We will install the MongoDB server software and learn how to start the database server and interact with it manually through shell commands. Then we will install the MongoDB Node.js Driver, which provides an APi that you can use to interact with a MongoDB server to perform CRUD operations from a NODE application.
We will also learn how to impose structure on MongoDB documents by using a popular third-party library called Mongoose. The mongoose library provides a wrapper around the MongoDB node driver that allows you to define rules for how data is structured.
At the end of the week, we will learn how to put all the pieces that you have learned together by combining what you have learned about MongoDB and Mongoose with an express application along with the campsite router and its REST APi endpoints that we developed last week, so that you can send GET, PUT, POST, DELETE htttp requests from and http client to the express server, then have the express server translate those requests into the corresponding CRUD operations on the MONGO database.
Overview: Express Generator
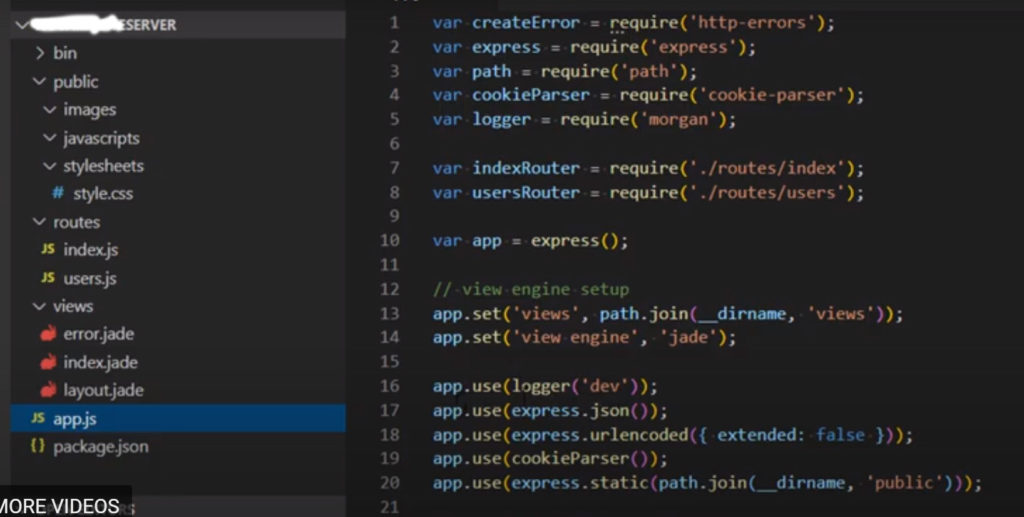
Last week, we saw how we can make use of express and the express router to build up a restful web server by putting all the pieces together and organizing the files ourselves. Wouldn’t it be nice if we had a tool to automatically generate a standard structure for our express server application just like we had for RECT and REACT Native. Some kind of command line interface that automatically scaffolds out these starter files and folders. So we can then go in and modify it to suit our needs. The express generator tools does exactly this. It will generate a starter express app for us from the command line with standard server code already set up and some commonly used middleware already included. We will install the generator package through NPM in the following exercise and to use it we will type express <application name>
- CLi tool to scaffold out starter files and folders for a basic server application
- Automatically installs commonly used middleware
- Installed through NPM, then used with CLi command: express <application name>
Now let us preview and check out what that would generate in VSCode.

Express Generator
Install express-generator
- Install express-generator globally by typing the following into your bash terminal (from any directory).
- Prepend the command with sudo if you are using MacOS or Linux. npm install -g express-generator@4.16.1
- Note: You may need to close your bash terminal and start a new session before you can use the express command after this installation.
Scaffold out an Express application
- Navigate to your NucampFolder/5-NodeJS-Express-MongoDB folder in your bash terminal.
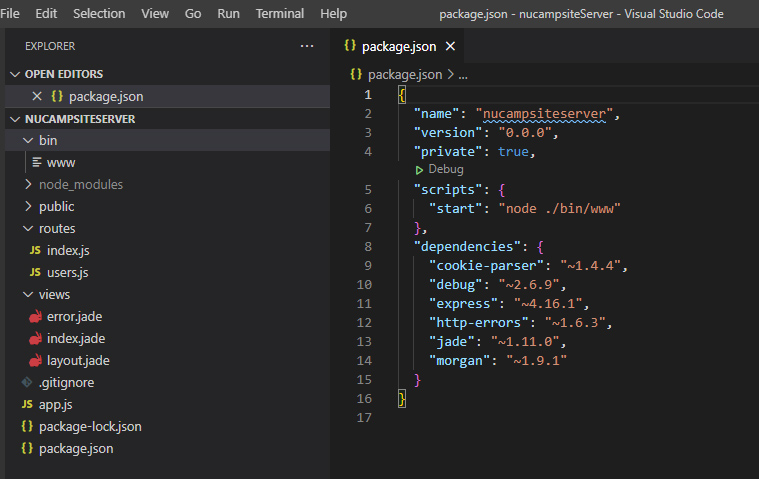
- To scaffold out an Express application, type the following at the prompt: express nucampsiteServer
-
- NOTE: If the “express” command does not work for you even after you have installed express-generator globally, you can use this command instead: npx express-generator@4.16.1 nucampsiteServer
- Next, move into the nucampsiteServer folder. You can do this by either opening the nucampsiteServer folder in VS Code and using the integrated terminal after that, or you can manually move into the new folder from your current folder by typing cd nucampsiteServer.
- Making sure to be in the nucampsiteServer folder, type the following at the command prompt to install all Node dependencies: npm install
- You can start the Express server by typing the following at the prompt: npm start
- Optional:
- If using Git, add a file named .gitignore to the project folder and type the following into the file: node_modules

Implement a REST API
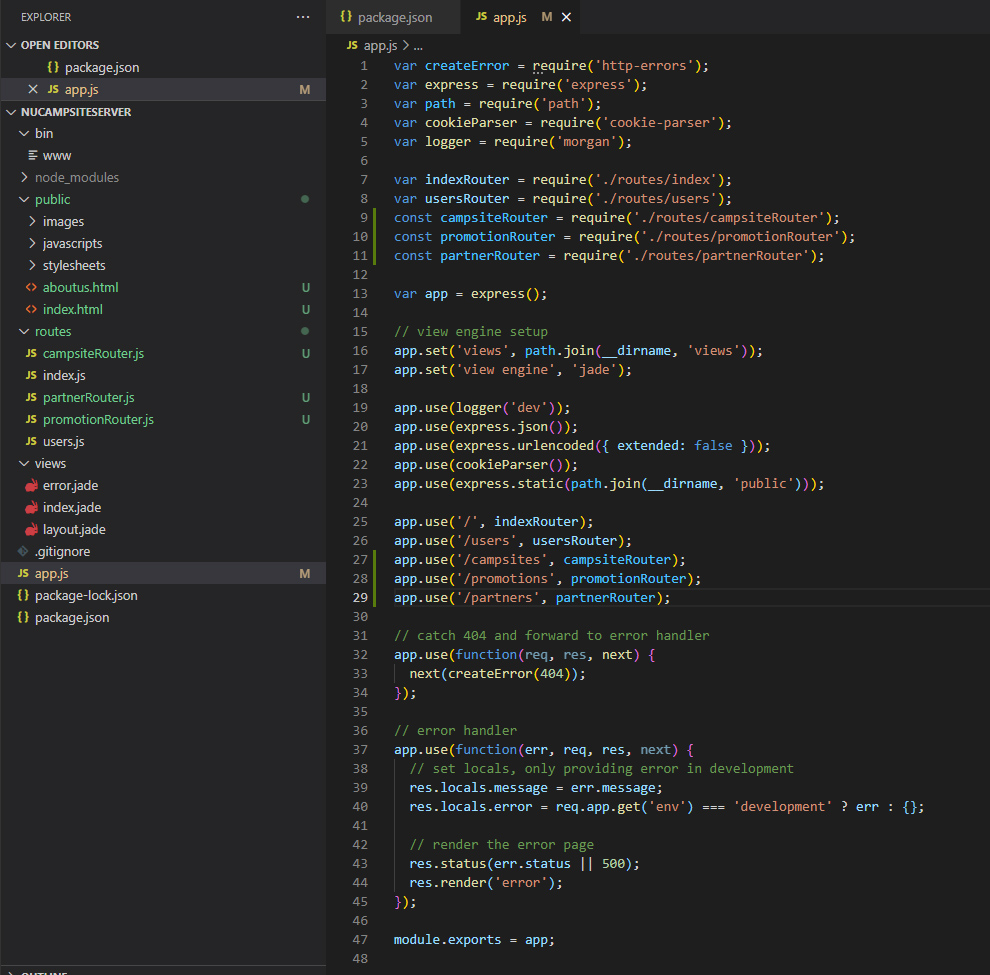
- Now, copy the campsiteRouter.js, promotionRouter.js and partnerRouter.js from your first assignment (node-express/routes folder) to the routes folder within the Express application that you just scaffolded out (nucampsiteServer/routes).
- Furthermore, copy the index.html and aboutus.html file from the node-express/public folder to the public folder in your new project.
- Then, open the app.js file and then update the code in there as follows:
. . .

const campsiteRouter = require('./routes/campsiteRouter');
const promotionRouter = require('./routes/promotionRouter');
const partnerRouter = require('./routes/partnerRouter');

. . .

app.use('/campsites', campsiteRouter);
app.use('/promotions', promotionRouter);
app.use('/partners', partnerRouter);

. . .
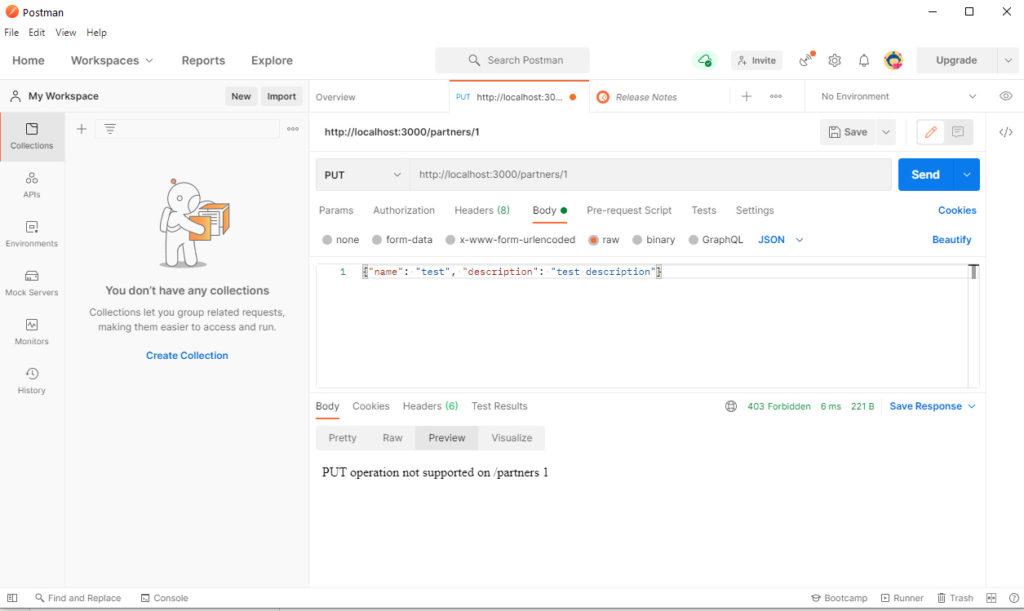
- Save the changes and run the server (npm start). You can then test the server by sending requests and observing the behavior.
- Test in Postman: GET, POST, PUT, DELETE on
- http://localhost:3000/partners/1
- http://localhost:3000/promotions
- http://localhost:3000/partners
- http://localhost:3000/campsites


Optional: nodemon
What is nodemon?
- nodemon is a development tool that automatically restarts Node applications when file changes in the directory are detected. By using it, you will no longer have to stop and restart your running node server every time you make a change. Using nodemon is optional in this course, but highly recommended.
Installation and usage
- Note: In order to prevent nodemon from automatically restarting your application before you’ve finished updating your code, you will need to turn off Autosave on VS Code and remember to save manually.
- Install it globally with the following command: npm install -g nodemon
- nodemon wraps around the node command. To use, it, use nodemon wherever you would normally use the node command.
- To use it in the Express server that you just generated, you can go to the package.json file inside the nucampsiteServer folder and replace this line:
“start”: “node ./bin/www”
- with
"start": "nodemon ./bin/www"
- Now whenever you run npm start, nodemon will start up and restart your app whenever you make changes to relevant files. Otherwise, you would have to stop your server and restart it manually every time you made a change and wanted to see it take effect.
- Use ctrl-c to stop nodemon. To be safe, remember to stop nodemon before you install any packages to your project.
- Note: Once again, don’t forget you will want to turn off Autosave, so that nodemon will only restart your server when you save manually instead of while you’re in the middle of making updates. If you have been used to VS Code auto-saving for you, that means you will need to get in the habit of remembering to save your work manually!
- When using node directly from the command line instead of package.json, you can also substitute node with nodemon. In Week 1 of this course, you ran Node applications by entering node followed by the application filename into your terminal, e.g. node app. In that case, you would enter nodemon app instead.
- By default, the files watched for changes are of .js, .json, .mjs, .coffee, and .litcoffee. For information on how to add other file extensions to the watch list, and more details on nodemon, visit the nodemon documentation.
Additional Resources:
- Express – Express application generator
- NPM – express-generator
- MDN – Express Tutorial Part 2: Creating a Skeleton Website


