Bootcamp Notes – Day 5 (Tues) – NodeJS: Week 2: Introduction to MongoDB

Introduction to MongoDB
Before we can talk about MongoDB which belongs to the family of NOSQL database systems, let us talk briefly about SQL.
SQL stands for: Structured Query Language used with relational databases.
SQL was created for use with a type of database called a relational database. In fact relational databases are often called SQL databases.
The origins of SQL and relational databases go back to 1970, when a computer scientist at IBM named E.F Codd proposed what is called a relational model of data for databases along with relational algebra as the basis for the database query language. The most commonly used database technology today.
The SQL syntax itself is relatively simple yet powerful. You can see a couple of examples here:
SQL syntax examples:
SELECT * FROM Partners; – This would select all the rows from the Partners table
CREATE DATABASE campsites; – This would create a new database named campsites
In relational databases, data is represented as tables and columns. Data is designed to be easy to sort and analyze data, use queries to create new tables with specific criteria, etc.
A strict schema is enforced on each table. Every row in table must have identical structure, with values for the same columns. Even if the value is null.
Some popular Relational Database Management Systems (RDBMS) include MS Access, Oracle, and MySQL.
While SQL databases have been very effective and widespread solutions for managing data, they do have some limitations.
As time went on increasing demand for new capabilities beyond what SQL-based relational databases can provide has led to a new class of databases, that are loosely grouped as NoSQL category. Simply meaning that they are not SQL-based relational databases.
We have at least 4 loose classifications of NoSQL databases:
- key-value (Redis)
- column-family based (Cassandra)
- graph based (Neo4j)
- document based (MongoDB)
MongoDB
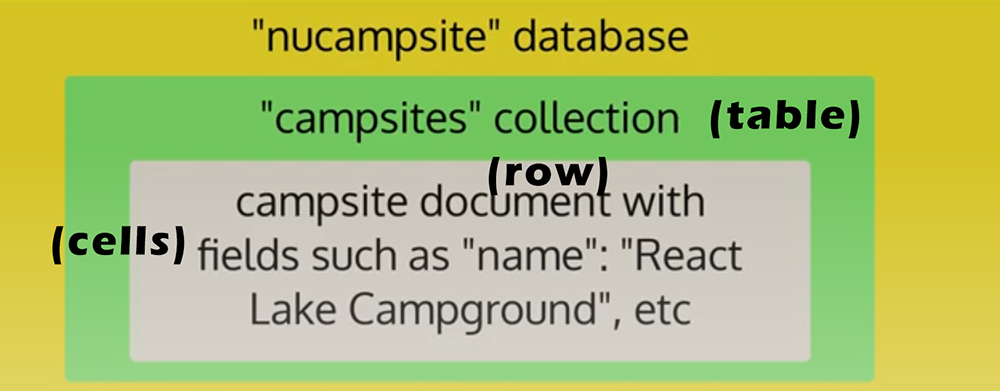
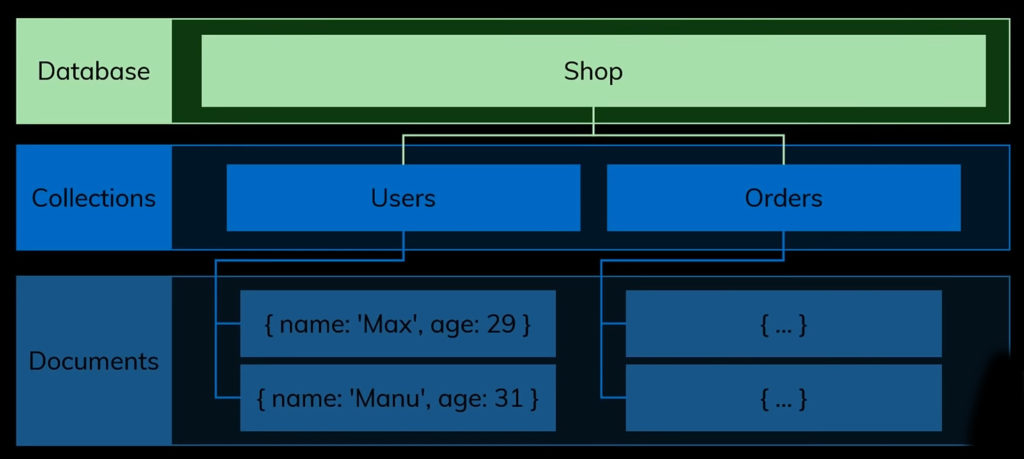
MongoDB originated in 2007, the Mongo is short for humongous. It is designed to be able to handle large amounts of data. A MongoDB database contains collections, collections contain documents, documents contain fields.
A MongoDB database contains collections, a concept that is roughly analogous to the concept of a table. The collections contain documents, which is analogous to a row in a table. The documents themselves are composed of fields, which are like cells in a table.
For example we will be creating a Mongo database with the name of “nucampsite”
Analogous terms:
- collection ==> table
- document ==> row
- fields ==> cells
MongoDB does not enforce any inherent structure on documents. So documents in the same collection can have completely different structure from each other and that would be OK. However, this is not always desirable and later we will learn how to impose structure when you want it on MongoDB documents.
MongoDB – BSON
Documents in MongoDB use the JSON format. Behind the scenes, documents are stored in BSIN (BSON) format which stands for binary JSON.
BSON extends the JSON model to provide additional data types, ordered fields, and to be efficient for encoding and decoding within different languages.
MongoDB – BSON & ObjectID
Here you see an example below of a document (row) stored in MongoDB. Notice the underscore ID field in this document (row). In MongoDB, every documents must have a unique _id field as a primary key. Which is immutable once it is set. You can set this key yourself, but if you don’t set the value, MongoDB will generate it using ObjectID api.
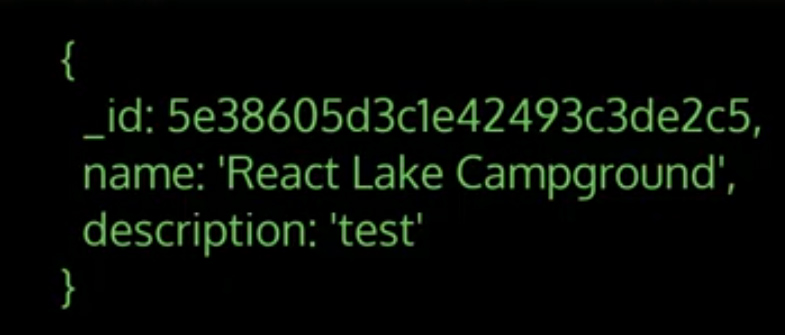
ObjectID is a data type provided by the BSON format, uses timestamp, increment value, etc, to create unique ID every time. It is possible to decode the timestamp from the object id to know exactly when it was generated. Unless you have some reason that you need to use your own values for the underscore id field in a document the auto-generated object ID is a good choice to use.
Aside from ObjectID other additional data types provided by BISON include date, regular expression, and binary data.
NOSQL DB/MongoDB vs SQL DBs
NOSQL databases were introduced to address some limitations of SQL databases.
Advantages of NOSQL Databases over SQL based:
- Major advantage is: Scalability
- Ease of Deployment
With databases there are two basic ways to grow, either horizontally or vertically.
- Vertical scaling: Improve capacity (RAM, CPU, disk space, etc) of existing server to be able to handle more data
- Horizontal scaling: Distribute database over multiple servers, ideal for cloud computing
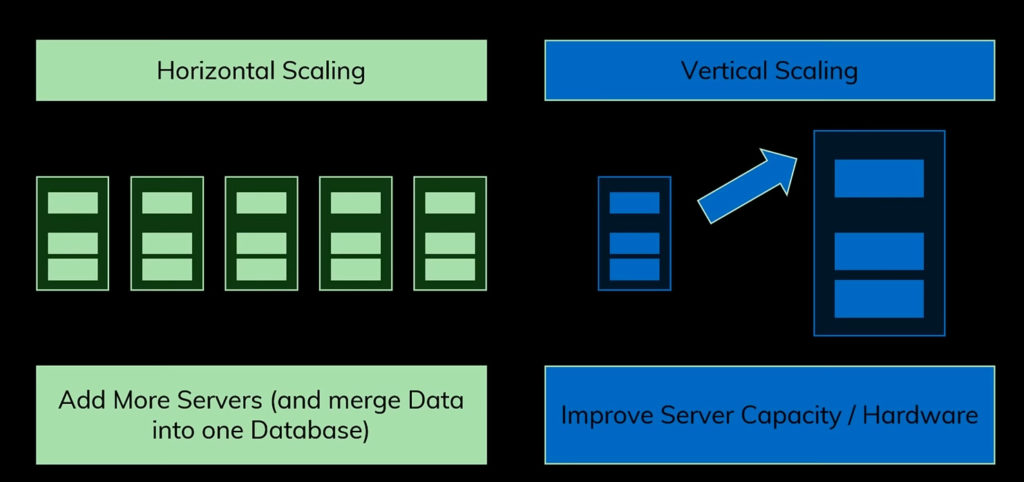
There are limits to how much you can scale a single computer. Whereas if you can distribute your database out to multiple computers, your potential scalability is much greater.
SQL databases are difficult to distribute over multiple servers, and typically limited to vertical scaling.
MongoDB is designed for handling large amounts of data using horizontal scaling, using a method called sharding that allows for distributing data across multiple machines.
Ease of Deployment is another advantage with MongoDB. With a NoSQL DB that stores data as JSON-like documents, much easier to map data to JavaScript objects for use in Node applications.
The format used by SQL databases to store data does not have this kind of direct mapping to server side application languages. So it can take a lot more work to accomplish that mapping whether to Java or JavaScript or any other language. Again, SQL databases, must perform more work to map to the server-side application’s programming language.
Some advantages of SQL databases over NoSQL:
- Faster at performing complex, analytical queries
- More stable for high transaction uses with frequent updates to records, where data integrity is important (such as banking)
- More established, tested technology, more tools, wider userbase
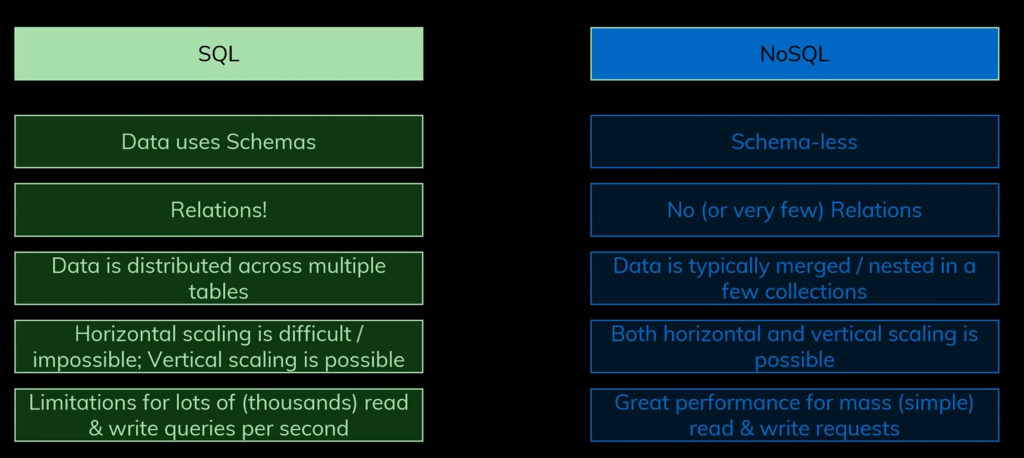
In summary, no clear winner between NoSQL and SQL DBs, it just depends on how the database will be used.
Introduction to MongoDB: Install MongoDB
- Download and install MongoDB.
- Start a MongoDB server and interact with it using the Mongo REPL shell.
Download and install MongoDB macOS Users:
- From a bash terminal, use Homebrew to install MongoDB:
brew tap mongodb/brew
brew install mongodb-community@4.2
-
- Note: At this point, if you see an error that says “CompilerSelectionError: gcc cannot be built with any available compilers”, you will need to install the code command lines with the command: xcode-select –install
Afterward, run the brew install command above once again.
- Next, enter: brew link mongodb-community@4.2
Windows Users:
- Go to https://www.mongodb.com/download-center/community, then download and install the most recent 4.2 version (as of this writing, 4.2.12) as per the instructions given there, installing with default options and the Complete setup, with the following exception:
- When you are asked if you want to Install MongoD as a Service, uncheck the box as shown below and hit Next.
- If asked to install the MongoDB Compass software along with MongoDB at any point, this is optional. MongoDB Compass is a GUI that is used to interact with MongoDB visually. We will not be using it in this course, but you’re welcome to install it and try it for yourself. A more lightweight third-party GUI for MongoDB called Robo 3T will be introduced in the next module of this course, for optional use as well.
- After installing MongoDB, add the path to the MongoDB’s binaries folder below to your System Path variable. This will let you run the mongod and mongo commands globally without needing to specify the full path every time.
- To add the path to your System Path variable, follow this guide.
- For the path to add, use the one given below, assuming that you installed MongoDB to the default location. If you changed the installation location during the install, then you will need to update the path used. If you installed a different version of MongoDB (e.g. a 4.4.x version), then you will need to update the path below accordingly (e.g. to use \4.4\bin instead of \4.2\bin).
C:\Program Files\MongoDB\Server\4.2\bin
Confirm your installation
-
- Confirm that your installation was successful with the following command: mongod -version
-
- This should show you the version of mongodb that was installed.
- If you see a “command not found” type response to this, in macOS, make sure that you did not receive any error messages when you used the brew commands for installation. In Windows, make sure you have correctly followed the instructions for updating your system Path variable, and reboot your computer if you have not.
- If you are still having issues, ask for help in this course’s Slack channel (#5-nodejs).
Set up folders and start the server, then add data through the Mongo REPL shell
- Create a folder named mongodb inside your NucampFolder/5-NodeJS-Express-MongoDB folder, and create a subfolder under it named data.
- Open a bash terminal in the mongodb folder and then start the MongoDB server by typing the following at the prompt: mongod –dbpath=data
- Open another bash terminal (in any location), then type the following command to start the Mongo REPL (Read Evaluate Print Loop) shell: mongo
- The Mongo REPL shell will start running, inside which you can issue commands to the MongoDB server.
- At this prompt, enter the following commands one by one and observe the results:
db
use nucampsite
db
db.help()
- Next, create a collection named campsites, and insert a new campsite document in the collection:
db.campsites.insert({ name: "React Lake Campground", description: "Test" });
- Then to print out the campsites in the collection, type:
db.campsites.find().pretty();
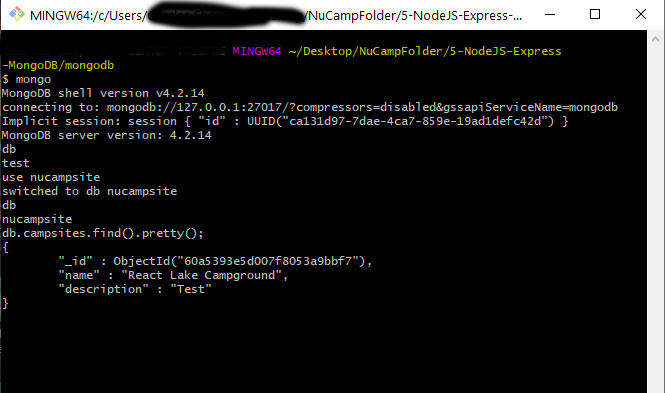
- Note the “_id” that was automatically assigned to the campsite.
- Next, we will learn the information encoded into an instance of ObjectId by typing the following at the prompt:
const id = new ObjectId();
id.getTimestamp();

- To exit the REPL shell, type exit at the prompt: exit
Installing ROBO 3T
What is Robo 3T?
- Robo 3T is a third party application that provides a free, lightweight graphical interface for MongoDB. It can make viewing and interacting with MongoDB easier than using the Mongo REPL shell.
- Robot 3T download it and try it for yourself,.
- Note: The download link leads to a page that has two downloads, Studio 3T and Robo 3T. Choose the Robo 3T option.
Basic usage instructions
- If your mongoDB server is not started already, you will need to start it. Open a bash shell session to the mongodb folder you created in the previous exercise and enter the command:
mongod --dbpath=data
- Download and install Robo 3T.
- Open Robo 3T. This should automatically open to the MongoDB Connections dialog. If it does not, go to File > Connections. Click Create a new connection. You should then see this Connection Settings dialog:
- Leave all settings at their default values except the Name, which you will probably want to change to something more descriptive such as nucampsiteDB.
- Go to the Advanced tab and in the field for Default Database, enter the full path to the mongodb/data folder you created in the previous exercise.
- For Windows users, this will typically look like this:
C:\Users\<your username>\Desktop\NucampFolder\5-NodeJS-Express-MongoDB\mongodb\data
-
- For macOS users, this will typically look like this:
/Users/<your username>/Desktop/NucampFolder/5-NodeJS-Express-MongoDB/mongodb/data
- Click Save, then Connect. If you are unable to connect, make sure that you have started your mongoDB server in a bash shell session.
- To the left, you should now see a panel that looks like this:
- Click the word nucampsite at the bottom. This is the nucampsite db you created in the previous exercise via the Mongo REPL shell (by using the command use nucampsite, which switches to an existing database by that name if there is one, or creates a new database by that name if there isn’t one).
- Double click the word Collection, and you should see that it has a campsites collection.
- Double click the campsites collection, and you should see the campsite document that you inserted in the previous exercise:
- Let’s delete and re-insert this document for practice’s sake. Right click on the document (or control-click if you do not have a right mouse button). Choose Delete Document:
- Right click again, either inside the panel from where you just deleted the document, or on the word campsites in the left-hand panel. Either way, you should now see an option to Insert Document.
- Choose this, and in the panel that next appears, enter the same document that you inserted in the previous exercise using the Mongo REPL shell:
- You should now see that a document with this name and description appear in the campsites collection.
- Throughout your course, most of the manipulation of your database (inserting, deleting, etc) will occur programmatically, through Node applications you will build in future exercises. However, the Robo 3T GUI will allow you to quickly view what’s in your collections and documents, which can be very helpful for debugging.
Additional Resources:
- MongoDB Manual
- MongoDB – BSON data types
- MongoDB – ObjectId
- Thorntech.com – SQL vs NoSQL
- MongoDB – mongo Shell Methods, Working with the Mongo Shell
- MongoDB – Insert Methods, ObjectId, Query Documents


