Bootcamp Notes – Day 9 (Mon) – NodeJS: Week 3: Authentication


Authentication
This week the focus will be on authentication. We will start learning about the basic authentication scheme that is built into HTTP, which will allow the server to protect resources by challenging clients that request them to authenticate with a username and password before granting access. The server challenge and client’s credentials will both be sent using HTTP headers.
- Basic Authentication – built HTTP, uses HTTP headers to challenge for credentials/submit credentials
You go onto learn about generating cookies on the server side and sending them to the client, so that the client can use them to verify itself with the server.

- Cookies – Generated by the server, sent to authenticated clients so that the cookie can be used for continued verification
Next we will learn about using sessions, a technology that allows you to combine using cookies along with tracking information about an authenticated client on the server side.
- Sessions – Combines using cookies and tracking information about an authenticated client on the server side
You will set up a user’s collection in your database with the help of a Mongoose Schema and model. You will then complement this with an Express Router that provides endpoints for users to sign up for accounts, as well as log into and log out of accounts.
- Set up Express router to handle users/signup, users/login, users/logout
You will learn how to start Express sessions when users log in, and how to delete upon logout.
Continuing on you will learn to use the passport authentication middleware for express which can be used with hundreds of different authentication strategies, including using local sessions, but also third party authenticators.
- Passport – authentication middleware for Express, can be used for hundreds of different authentication strategies including local sessions and third party authenticators.
You will also learn about more recent and more scalable alternative to sessions called token based authentication using JSON WEB TOKENS, which is also supported by Passport. You will also round out the week by learning about useful a useful feature in Mongoose called: Mongoose Population which allows us to reference documents from other documents in a different collection. This does not have much to do with authentication intrinsically, however it opens up ways for us to link authenticated user documents with other resources, such as referencing a user from a comment that that user has submitted.
- Mongoose Population – allows documents to reference documents in other collections, eg. referencing a user from a comment that the user submitted.
Overview: Basic Authentication
The Express Rest APi server that we implemented last week allows any user to perform any of the GET, POST, PUT or DELETE operations. That means anyone can access our server through an HTTP client and CREATE, READ, UPDATE, DELETE, any of the data exposed through the APi that we implemented without restrictions. This is a dangerous situation if your website was actually in production and not only in development.
Typically servers are implemented with some restrictions on what users can access which operations. In our project for example, we might allow anyone to access a GET request to see a list of campsites, but we might protect access to the campsites data so that only an authorized user can add update or delete campsites.
We might even have another medium level of authorization, where a user is permitted to add new campsites, but not allowed to update or delete existing ones. So you can have different levels of users with different sets of permissions. To do any of this, we need to be able to authenticate users. That will be our focus this week.
We will start by learning a basic implementation, that is called basic authentication and then build upon that throughout the rest of this week.
Basic Authentication
Basic Authentication is the most basic HTTP mechanism for authenticating users. It is a very simple mechanism. The client must submit a username and password, when requesting a protected resource. If the authentication credentials are not present, when the request is made. The server can challenge the client to repeat the request with the username and password. If the credentials are valid then the server will grant access. The authentication credentials must then be presented by the client along with every request to a protected resource not only the first time. That is the gist of it.
- Client must submit authentication credentials to request protected resource
- If credentials not present/invalid, server can challenge client for username/password
- If valid, server will grant access
- Credentials must be presented with every client request
- If client tries to access protected endpoint, server checks for request header of “Authorization” containing credentials
- If no such header, or invalid credentials, server can respond with header of ‘WWW-Authenticate‘ and ‘Basic‘
- Browser will then prompt user to enter username/password
- Encodes as value for “Authorization” header, re-sends request
- Server will then grant access if credentials are valid
AUTHORIZATION HEADER
The authorization value will start with a string with the word Basic, followed by a space, followed by Base-64 encoded string for username and password
This string is in the Base-64 format: Basic YWRtaW46cGFzc3dvvcQ=
Base64-encoding is not encryption, easy to decode. It is not encryption. Encoding is not done for security purposes.
When decoded, string will contain username and password separated by a colon. Example: someusername:somepassword
When the server receives this authorization header from a client, it can decode this content, check if the credentials are valid and if so, grant access to the client.
AUTHENTICATION AND EXPRESS MIDDLEWARE
To help you understand how authentication process is carried out. Let us examine how Express applications are organized with a series of middleware through the use method.
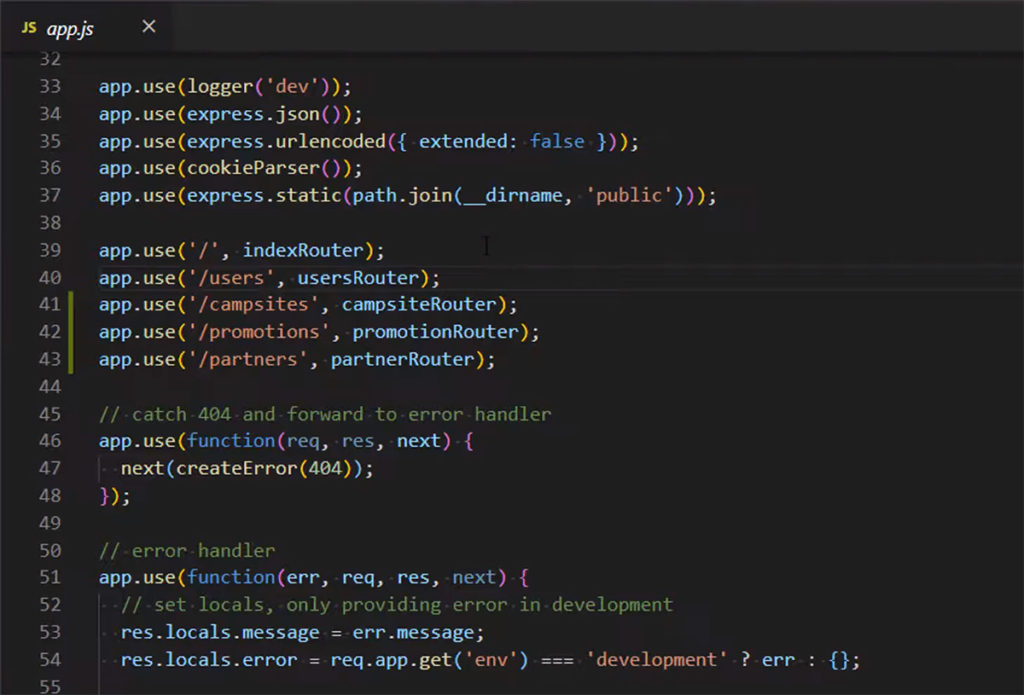
As you can see here in the app.js file. The express server uses all this middleware, from the Morgan logger to built-in middleware like express.json and express.url encoded to cookie parser and so on. Then you can see the routing middleware here including the three routers that we made. Whenever a request comes into the express server for my client, middleware is applied to that request in the order in which the middleware is declared here. So for this application, the sequence of the middleware that you see in this app.js file is the exact sequence in which they’ll be applied.
What is middleware? Each middleware is a function!
When a request comes in from the client to the server, the Express server constructs two JavaScript objects from the request: the request object and the response object. These are of a special type of object called a stream, but still objects. The request object and the response object are both sent into the first middleware function as arguments. Then the middleware function will parse the request and can add information to the response stream or even end it.
If the response is not ended, pass request and response objects to next middleware function, repeat until response is ended or run out of middleware to run.
So for example in our app example here below is that the Morgan middleware gets run, so Morgan immediately looks at the request header and logs that information from it to the console, then it passes the request and response objects to the next middleware which is express.json and this is actually a more modern replacement for body parser in recent versions of express. So this will act in a similar way to body parser, parsing the request body so that we can use it more easily in our application. Then our application continues down this line of middleware in sequence.
All this here with the json parsing and logging and whatnot, we don’t need to authenticate for that, so we are going to insert our authentication here right before the express.static middlware to serve static files because that’s the first of the middleware functions that’s actually going to start sending something back to the client
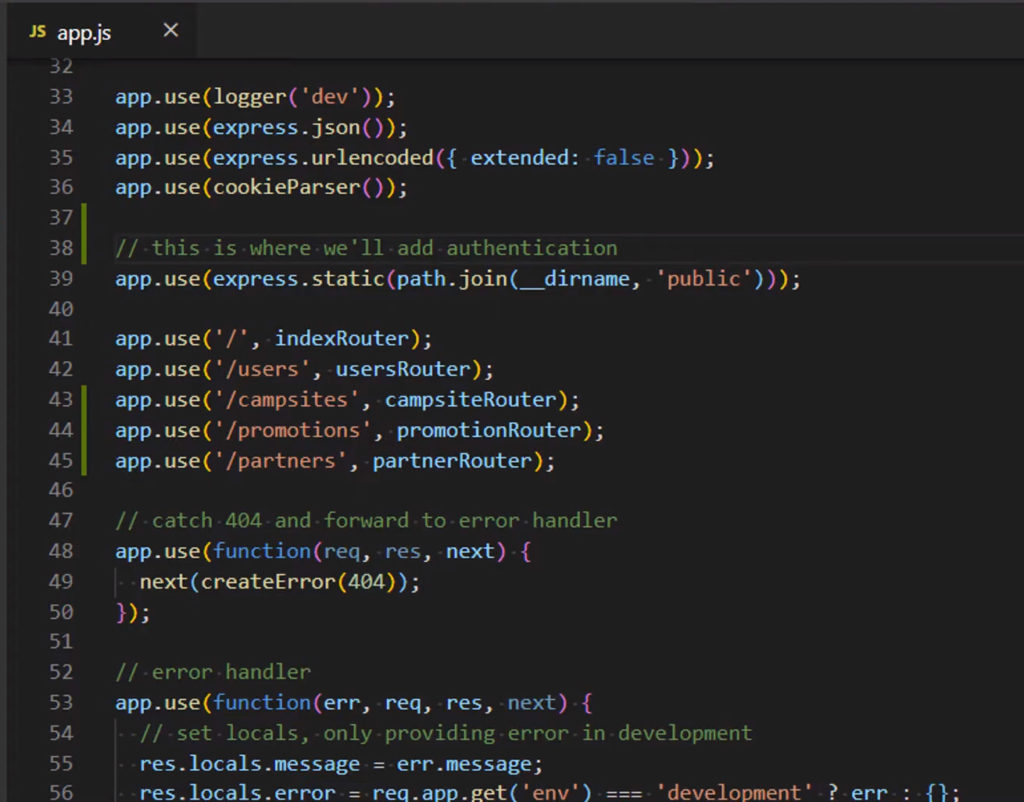
What we are going to do in the next exercise is both create an authentication function and use it in our express app with the use method as middleware and that will authenticate the request before passing it off to the rest of the middleware below it, that handles responding to the client with data from the server. If authentication does not succeed, then the client will never get past this gatekeeping mechanism, it will never reach the express.static middleware nor the routers below it.
Exercise: Basic Authentication
- Set up an Express server to handle basic authentication.
- Use the basic access authentication approach to authenticate users.
- You will continue with the Express REST API server that you have been working on in the previous module in the nucampsiteServer folder.
- Open the app.js file and update its contents as follows:
. . .
function auth(req, res, next) {
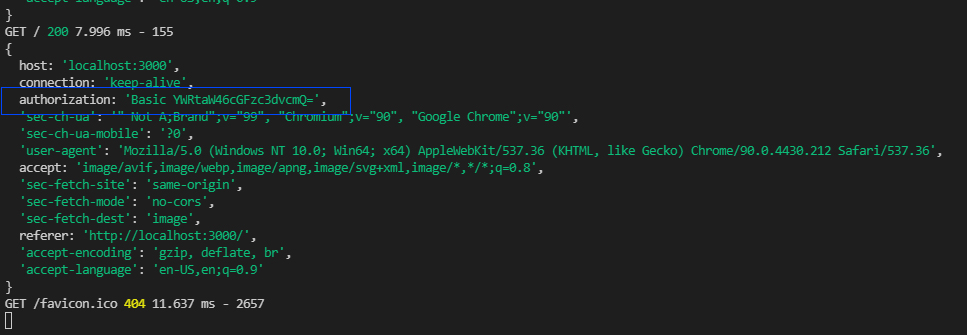
console.log(req.headers);
const authHeader = req.headers.authorization;
if (!authHeader) {
const err = new Error('You are not authenticated!');
res.setHeader('WWW-Authenticate', 'Basic');
err.status = 401;
return next(err);
}
const auth = Buffer.from(authHeader.split(' ')[1], 'base64').toString().split(':');
const user = auth[0];
const pass = auth[1];
if (user === 'admin' && pass === 'password') {
return next(); // authorized
} else {
const err = new Error('You are not authenticated!');
res.setHeader('WWW-Authenticate', 'Basic');
err.status = 401;
return next(err);
}
}
app.use(auth);
. . .
- Save the changes and start the server. Access the server from a browser by opening an incognito window and see the result. (Open an incognito/private window in Chrome with Ctrl-Shift-N for Windows/⌘-Shift-N for MacOS, or in Firefox with Ctrl-Shift-P for Windows/⌘-Shift-P for MacOS.)
- In your browser now, type in: localhost:3000
- Press Enter and login window pops up now
- Enter username: admin
- Enter password: password
- Now look at Terminal and you should see something like this:
- Do a Git commit with the message “Basic Authentication”.
Additional Resources:
- MDN – HTTP Authentication
- MDN – HTTP Headers: WWW-Authenticate
- Express – Using middleware
- Medium.com article – Powering the Internet with Base64
- Node.js – Buffer.from