Bootcamp Notes – Day 1 (Mon) – React Native: Week 1: Welcome to React Native!

Welcome to React Native!
By the end of this week you will learned:
- Learn how to scaffold out a starter React Native app using Expo CLi
- Learned how to install an Android emulator (Android Virtual Device/AVD) for testing out your React Native App
- Understand different approaches to developing for mobile devices: native, web, cross-platform, hybrid
- Begin to build your first React Native app
- Will also learn similarities between React and React native components and how styles are set in React Native
- Learn how to Render lists using flat list and list item
- Learn about navigation between different screens in React Native using a library called React Navigation
- With React Navigation you will learn how to create what’s called a drawer navigator
- Also learn to create Stack Navigators, which lets you put screens on a stack
In the three weeks following the first week you will learn:
Week 2
- Using Redux to manage your React Native application state
- Also learn about fonts, button, modals, forms
Week 3
- More ways for users to interact with your app’s UI, including:
- Swiping for more options, alerts, gestures
- Animation effects; using Redux to persist data
Week 4
Will learn how to tap into the APi’s that allow your app to take photos or pick an image from the device’s gallery, share to social media, send email, send local notifications and more!
Overview: Mobile App Development
There are two dominant mobile app platforms: Android and iOS
When developing for the mobile platform, you have a choice of approaches:
Native Approach (Don’t get confused, that’s native not React Native)
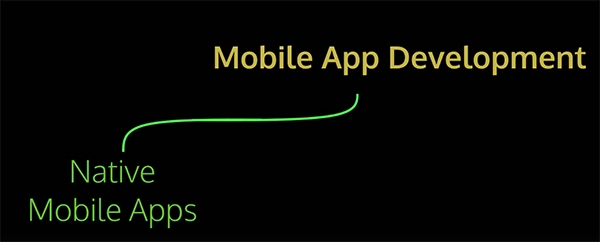
To create native mobile apps, you must use the native development environment and tools unique to each platform.
Android: Java or Kotlin
iOS: Objective C or Swift
Native development gives you full access to all the capabilities of the native platform. All the various sensors and technologies in the device itself. Also native apps will have the best performance. They are fast and responsive. The downside is that if you want your app to be available on both platforms, you would need to develop a separate version for each platform in two different languages so you wind up having to write and maintain two different code bases.
Another approach you can take to make your app available for mobile devices is to avoid developing for the mobile platform altogether and instead focus on making your web app as mobile friendly as possible. Then when your users need to access your app they can do so by pointing their mobile web browsers to your web app. This is easier to implement, especially if you already have a web app.

Drawbacks:
- App will run slower, only available though browser with internet connection.
- Less access to device features – though access is getting better all the time, especially with Progressive Web Apps (PWA’s)
Nowadays, mobile web browsers are able to access a lot more native features than before such as your device’s location and even its local storage, but there are still more limitations to body can access, versus what you can access with a native app.
Another approach is called Cross-platform mobile app development.

CROSS-PLATFORM MOBILE APPS
Use third-party tools to write a single codebase, then use underlying technology to compile for both Android and iOS.
React Native is a cross-platform app that uses JavaScript.
Examples are:
- React Native: JavaScript
- Microsoft Xamarin: C#
- Google Flutter: Dart
Cross-Platform Mobile Apps approaches can be seen as a middle ground between web apps and native apps.
- Middle ground between native and web apps
- Less access to native device capabilities than native apps, but more than web apps, and access is improving all the time
- Not as fast as native apps, so go with native if you need heavy processing such as with a 3D game; otherwise for most use cases, the difference in speed will be negligible
- Facebook, Instagram, Skype, Uber mobile apps all use React Native
- Minor risk: Apple Store sometimes rejects non-native apps, but this is increasingly rare
- Look and act like native apps — you don’t need to open your browser, you can install it and run it just like a native app, and can download from Apple and Google Play stores
- Like web apps, you don’t need to write and maintain two separate codebases which can reduce time and costs
A subset of Cross-Platform Mobile Apps is known as Hybrid Mobile Apps. React Native is a hybrid mobile app.
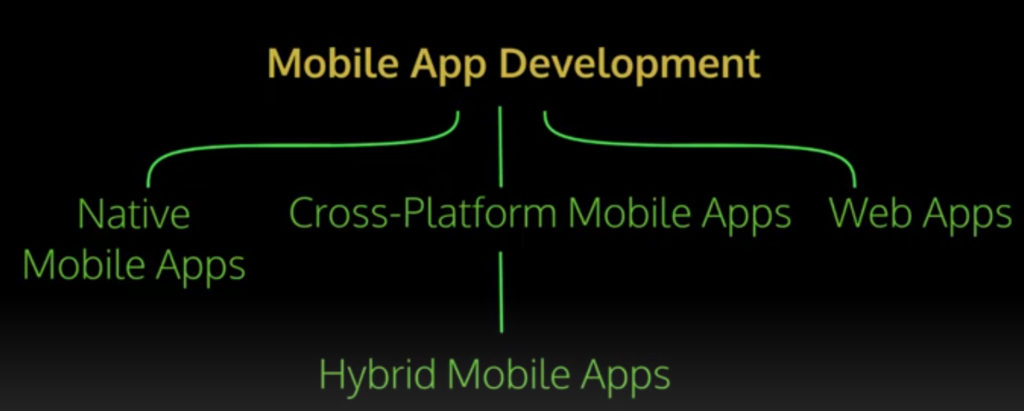
The general idea behind hybrid mobile development is:
- Combine native and web technologies. You can use HTML/CSS/JavaScript, but in a standalone app you can install just like a native app.
- This is great because it makes it much easier for web developers to quickly build mobile apps.
HYBRID APPS
There are many different implementations of the hybrid approach:
Ionic framework uses a technology called WebView, an embeddable browser component that can run web technologies inside a mobile app
React Native and NativeScript frameworks don’t use Webview; instead the both leverage JavaScript engines to run JavaScript outside of the browser. Chrome’s V8 engine and Safari’s JavascriptCore engine
So now you understand a little more about the different types of mobile app development and what are the pros and cons of the various approaches including that of hybrid cross-platform and mobile app development, which is what you will be doing with React Native.
Introduction to React Native
React Native is a cross-platform hybrid mobile app. As you can see on it’s website, it’s tagline is “Learn once, write anywhere.” It is based on the React library, which is converted over to mobile apps with React Native.
So you can use your knowledge of React and use it for developing web apps then you can bring it into React Native and use it for both iOS and android platforms. You don’t have to learn another technology from scratch. React native will give you access to all the native platform APi’s via JavaScript, so you will have access to native capabilities such as: your device’s camera, the fingerprint sensor, the Bluetooth phone, and more!
On the JavaScript side of things, you can not only use Regular JavaScript, but you can also install and use NPM packages including many-third party React Native Libraries such as: React Navigation, a library that handles routing for React Native.
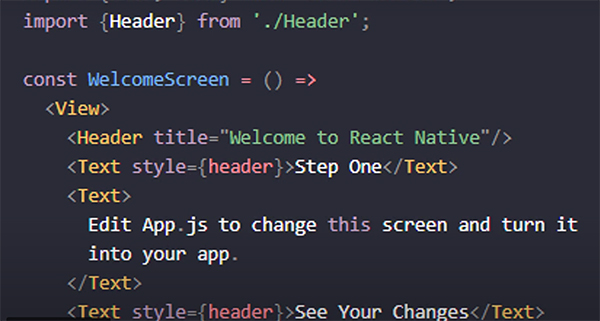
Now React Native is not exactly like React. There will be differences arising from developing for the mobile platform rather than for the web.
For example, as you can see here. Instead of using HTML elements that are meant for the browser like DIV and <p>. You learn instead how to use platform agnostic components such as: <View> and <Text>. However you can see it still looks very similar to React. We are still using components, JSX, imports and exports. We will still have state and props and so on!
So how does React Native work under the hood?
React Native runs it’s JavaScript Code on the JavaScript engine developed by the Safari web browser called JavaScript Core for both iOS and android platforms. The exception is when it’s running chrome debugging, then it will use the Chrome V8 JavaScript engine.
So that is the JavaScript side of React Native. Then there is a part of the app that deals directly with the native code, but typically you will not interface with this.
Instead there is something called the React Native Bridge: which is written in C++, handles communication between JavaScript side and native side (both iOS and Android).
One more technology to mention. Once you start building React Native apps, you will quickly encounter at tool chain called Expo. Expo provides React Native developers with multiple useful tools, including the EXPO SDK (Software Development Kit), EXPO CLi, SNACK code playground and more! Like when we used create-react app for React. We will use Expo to scaffold out a starter react native app that we can build from.
Environment Preparation
Node version check
- Use this command from a terminal to check your version for (14.9.0): node -v
VS Code Autosave
- If you have previously turned AutoSave on in VS Code (File > AutoSave), turn it off at this time. Otherwise, this will interfere with your emulator by attempting to reload your application on it every time you make a change. Be careful: This means that if you were previously using AutoSave, you need to get used to saving your work regularly on your own.
macOS – Disable autosync to iCloud
- In macOS, autosync to iCloud is often enabled by default for any folders in the Desktop. This will cause issues in React Native.
- Disable autosync for the 4-React-Native folder specifically:
- If you do not already see file and folder extensions in macOS Finder,first go to Finder > Preferences in Finder, click Advanced, and select “Show all filename extensions“.
- Go to your NucampFolder. Click the 4-React-Native folder, then press your Return key. This should allow you to edit the folder name.
- Add the .nosync extension to the folder name, so that its name is 4-React-Native.nosync. This will cause macOS to ignore this folder and its contents when autosyncing to iCloud.
Exercise: Getting Started with React Native
In React, we used create-react-app to scaffold out the development environment with starter files and useful tools.
In React Native, we will use the Expo CLi to do the same thing!
Note: You can build a React Native app without using EXPO Cli, just as you can build a React app without using create-react-app, but it is recommended for beginners.
Prerequisite for macOS only: Switch to bash as your default terminal if not already
- Open your macOS Terminal application and enter this command: echo $0
- The output should include the word bash or zsh.
- If it contains the word zsh, switch your default terminal to bash by following the instructions here: https://www.howtogeek.com/444596/how-to-change-the-default-shell-to-bash-in-macos-catalina/
- Close Terminal then open it again. You will probably see a message that says “The default interactive shell is now zsh.” Don’t panic! This is normal. Type echo $0 again to verify that your shell is bash.
Prerequisite: Check Node version and upgrade if necessary
- This course has been tested using Node version 14.9.0. To check your current Node version, enter this command into your terminal from any directory: node -v
- If it is lower than 14.9.0, please move to this version by following the instructions below. If it is higher, you can proceed using it, but be warned that if you run into issues with the higher version, you may need to change it to 14.9.0 later.
Windows:
- Uninstall Node: Search for and open the Add or Remove Programs utility provided by Windows and remove Node from there.
- Follow this link to download the Windows installer for Node 14.9.0, then run the installer, accepting default options.
- Check node -v again in your terminal.
macOS:
- For macOS, we advise that you use the Node version manager utility NVM to install the 14.9.0 version of Node. You can do this on top of your existing Node installation.
- Open your Terminal application. Make sure that you have followed the instructions at the top of this page to ensure that bash is your default terminal. If you see a message that says “The default interactive shell is now zsh.” — don’t worry, this is a rather misleading message and actually means that zsh is not your default terminal, and you can ignore it.
-
- Next, enter the following command into your bash terminal: touch ~/.bash_profile
- Install NVM with the following command: curl -o- https://raw.githubusercontent.com/nvm-sh/nvm/v0.35.3/install.sh | bash
- Once NVM is installed, you can update to 14.9.0 by entering: nvm install 14.9.0 and nvm use 14.9.0
- Check node -v again and make sure that your version is now 14.9.0.
Prerequisite: The Yarn package manager
- We will be using Yarn to install the Expo CLI. Yarn should have been installed during the React course.
- If you have not yet installed Yarn, please do so.
- Not sure if you have Yarn installed? You can check by entering into your terminal: yarn -v
- If you do not have Yarn installed, you will see a “command not found” type error. If you do have Yarn installed, you will see a version number.
Set up the Expo CLI
- If you have json-server running in any terminal, stop it at this time with control-c. Any packages that were installed globally using Yarn must be stopped before you add any new global installations.
- To install the Expo CLI globally, enter into your terminal: yarn global add expo-cli@3
- This will install the command line tool for creating React Native applications managed by Expo.
- Close your terminal and open a new one before you continue. If using the VS Code integrated terminal, be sure to close it using the trash can icon and not the X icon; the X icon only hides the terminal and does not close it.
- To confirm your installation, enter at the prompt: expo –version
Generate and serve a React project using expo init
- Open a bash terminal inside the NucampFolder/4-React-Native folder.
- Enter: expo init nucampsite –name NuCamp -t blank –yarn
- If you see a prompt that says “Please enter a few configuration values“, press enter once, then the initialization will start.
- This should create a new folder named nucampsite inside the 4-React-Native folder and generate your starter application there, along with dependencies and tools.
- Move into the nucampsite folder with: cd nucampsite
- Then enter the following: expo start
- This will compile the project and then start serving the project through Expo at the URL exp://<Your Computer’s IP address>:19000.
- It will also automatically open a browser tab pointed to http://localhost:19002 — this is the Expo DevTools. If you don’t see it, go to http://localhost:19002 in your web browser.
- You will not be able to access the project yet without connecting to it with an Android emulator or a mobile device, which you will do in the following exercise.
Update to Locked Versions
When you previously installed the expo-cli tool, this also installed several other packages in your project, including expo, react, react-dom, and react-native. These installations were done automatically, and did not provide a chance to specify the version numbers. We will need to downgrade these versions at this time to ensure that other libraries in this course will work correctly.
Instructions
- In your bash terminal, in your React Native course’s nucampsite folder, copy and paste the below commands:
- yarn add expo@38
- expo install react@16.11.0 react-dom@16.11.0 react-native@https://github.com/expo/react-native/archive/sdk-38.0.2.tar.gz
- Check the package.json file in that folder to make sure that the version numbers listed there match those given above.
Exercise: Setting Up the Android Emulator
- Install Android Studio and use its AVD Manager to set up an Android emulator, a.k.a. an Android Virtual Device.
- Run your React Native app on your AVD.
- This will take 60 mins to setup!
Set up the Android emulator
- While React Native can be used to develop for both iOS and Android, due to the many differences in mobile devices, during this class we will use the Android default emulator (which can be installed on both Windows and MacOS) to test your code in a consistent simulated environment.
- The download, install, and setup will take a while, so don’t count on doing it last minute. Set aside at minimum, one hour for this – though most of it will be passive waiting time.
Part I: Install Android Studio
1. Download the installer for the current stable version of Android Studio at: https://developer.android.com/studio/. This is a large app; the installer zip file alone is ~1GB. If you need to clear space on your hard drive, do so beforehand.
- System requirements: Install Android Studio to a hard disk with at minimum 2.6GB (Windows) or 2GB (MacOS/Linux) disk space – preferably 4GB. You will need another 7-10 GB free disk space for the Android Virtual Device. You will also need at minimum 4GB RAM (preferably 8+) and 1200×800 screen resolution. The full system requirements can be found at the bottom of this page.
- Windows: If your system uses an Intel processor, it must also be capable of Intel Virtualization Technology (VT-x) – most modern Intel processors are. If you aren’t sure, look up your processor by going to https://ark.intel.com. If you do not know your processor, type This PC into your search bar then right click and select “Properties” on the “computer” app that comes up.
- At the time of writing, the current stable version is 4.0.1. If you find issues with a later version, you can find this version in the download archives at: https://developer.android.com/studio/archive.
2. Run the installer and the following Setup Wizard, both with standard settings. You do not need to import settings. Make sure to check the box to install the Android Virtual Device. Copy down the path for the Android SDK Location/Path. If the default location that is provided for you is not what you want (for example, it is on a drive with low free disk space and you want to use a different drive), change it here and remember the new path. If you have enough space in the default location’s drive, you do not need to change it. Continue the SDK install using the default recommended options. Currently, that is Android SDK + Android SDK Platform API 28: Android 9.0 (Pie.)
3. Windows with Intel processor only: Make sure that the checkbox for Performance (Intel HAXM) is checked. If you do not know your processor type in Windows, type This PC into your search bar then right click and go to “Properties” on the “computer” app that comes up. If your processor is AMD, you will not install Intel HAXM, but you will have an extra step later.
4. For Windows with AMD Processor only: Next, you will need to enable the Windows Hypervisor Platform via Windows Features. This will take the place of the Intel HAXM in your system. Make sure you have the Windows 10 April 2018 update installed. Type “Windows Features” into your Windows search bar and open the “Turn Windows features on or off” option that comes up. Then check the box to enable Windows Hypervisor Platform.
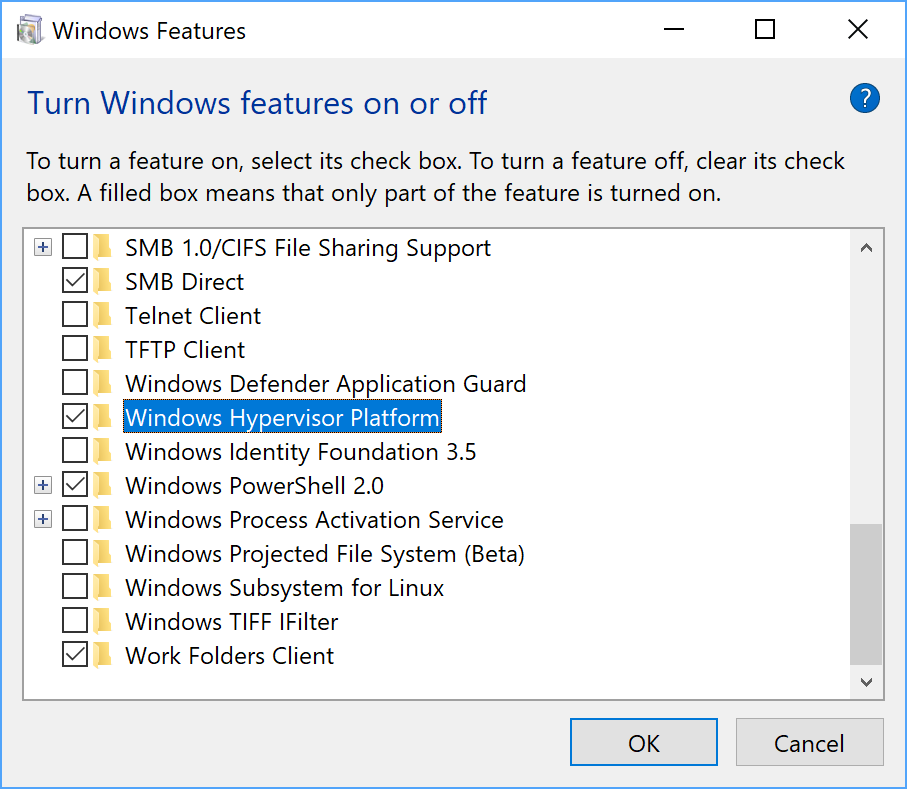
- For more information on Windows Hypervisor, see: https://android-developers.googleblog.com/2018/07/android-emulator-amd-processor-hyper-v.html.
- Note: The above setting will not work for all computers. If you see messages saying that you need to install Android Emulator Hypervisor Driver, then visit this page to update your settings.
Part II: Add the Android SDK Location to your PATH
1. First, verify your Android SDK location. Open Android Studio and go to Configure > SDK Manager > Appearance & Behavior > System Settings > Android SDK. At the top of this dialog, you will see the Android SDK Location. By default, it will look like this for MacOS: /Users/<username>/Library/Android/sdk and like this for Windows: C:\Users\<username>\AppData\Local\Android\sdk – unless you changed the default during installation. Copy this path down – you will need it next.
2. Add the SDK location:
Window
- Type environment into your Windows search bar and click the top result, Edit the system environment variables. In the System Properties dialog that pops up, click the Environment Variables button in the bottom right.
- In the next dialog that pops up, look for the bottom half of the dialog labeled System variables and hit the New button corresponding to it (NOT the New button for User variables).
- For the variable name, type: ANDROID_HOME
- For the variable value, type the path to your Android SDK Location you copied down above. Hit OK.
- Next, in the list of System variables, find the one named Path. Select it and click the Edit button. Click New then type in your Android SDK Location path again, but this time you will add \platform-tools to the end of the path. For example, it might look like this (but the <username> will be a real username…): C:\Users\<username>\AppData\Local\Android\sdk\platform-tools
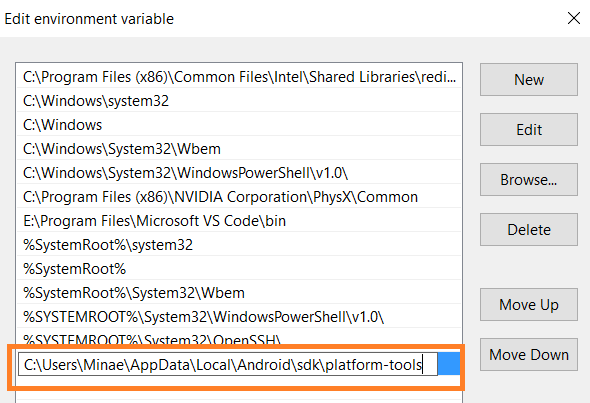
- Hit OK to save the changes.
MacOS and Linux
- To add the Android SDK location to your system’s path, we will need to edit a hidden configuration file called .bash_profile inside your home folder.
- First, we will create a backup of any existing content in your .bash_profile file. This is not a required step, but we will do it for safety’s sake. Open a bash terminal and enter the following commands (from any location):
- touch ~/.bash_profile
- cp ~/.bash_profile ~/.bash_profile_backup
- Next, we will edit the .bash_profile file. Enter this command to open the: nano ~/.bash_profile
- See this guide if you need extra information on using the Nano text editor.
- Once the nano editor opens, you may see existing content in the .bash_profile file. Or you may see nothing at all.
- If there is any existing content, you must leave it alone. Do not delete or edit any existing content.
- Navigate to a blank line below any existing content, using your down arrow key.
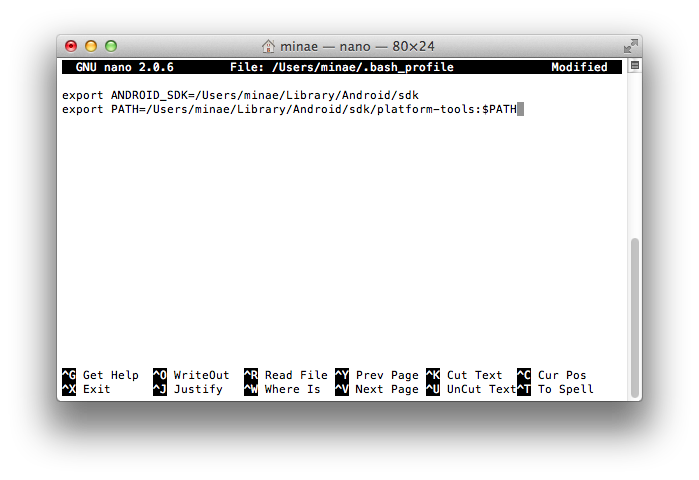
- Type the below script into the line. You must replace the example path (the parts in bold) with the path to your Android SDK location. Unless you changed the default install path for the Android sdk, for most of you this will only mean you need to replace <username> with your actual username.
export ANDROID_SDK=/Users/<username>/Library/Android/sdk
- MacOS only: Also add this line:
export PATH=/Users/<username>/Library/Android/sdk/platform-tools:$PATH
- You should end up with your editor contents looking similar to what is shown, along with any pre-existing scripts that were already in the .bash_profile file.
- To save and exit, type: Control+O, enter, Control+X, enter. (Note: Control+O as in the letter O, not the number 0.)
- Apply changes to your current terminal session:
source ~/.bash_profile
Verify changes
- Close the bash terminal session then open a new one.
- If you are using the VS Code integrated terminal, make sure to close the session using the trash can icon and not the X icon (which only hides the session and does not close it), then open a new terminal. You should not see any previously entered commands in the new session.
- Type adb and make sure the command works. You should see a list of command line options.
- If you do not see the list of command line options when you type adb, try rebooting your computer.
- If it still does not work, go over Part II: Add the Android SDK Location to your PATH carefully and make sure no steps were missed. If the adb command still does not work for you, ask for help in Slack and include relevant screenshots.
Part III: Install an Android emulator (Android Virtual Device)
1. Open Android Studio and go to Configure > AVD Manager. Click: + Create Virtual Device.
2. While you may wish to install other devices later, to begin, we will install the latest version of Pixel as recommended by Expo. (At the time of this writing, this is Pixel 3.) Select this and hit Next.
3. In the “Select a system image” dialog that appears next, choose Pie: API Level 28/Android 9.0 or higher. But don’t hit Next yet.
4. Still in the “Select a system image” dialog, click on the middle tab that says “x86 Images“. There, for the Release Name that you selected in the first tab, select the corresponding x86_64 ABI option with the Target of “Android x.0 (Google APIs)“, as shown below with Pie as the example:
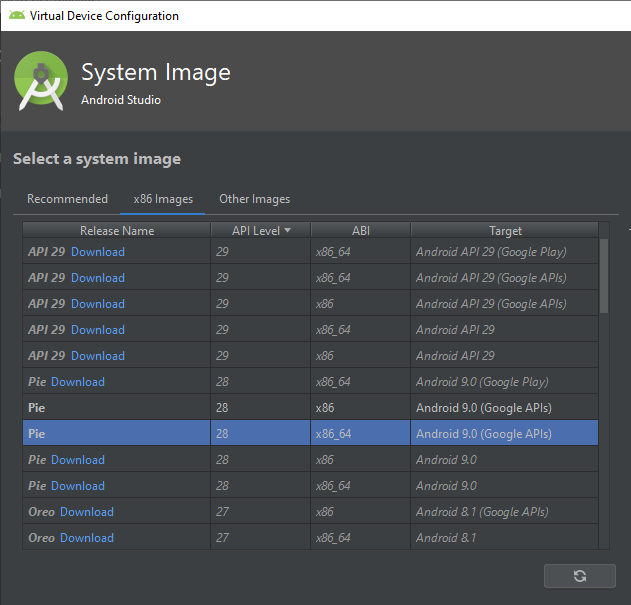
NOTE TO MAC USERS WITH THE M1 CHIP: You will need to click on the “Other Images” tab and select an ARM64 image instead of x86_64.
5. Click the Download link next to the Release Name, accept the license agreement, and hit Next.
6. Once the download is completed, make sure that the downloaded system image is selected and hit Next, then Finish. This will create the virtual device then return you to the Virtual Device Manager.
7. You should now see a row containing your newly installed AVD. In its far-right Actions column, hit the triangular Play button (not the Play Store button) to launch your emulator/AVD.
Note: If you see an error regarding virtualization at this step, you may need to check that Virtualization is enabled in your BIOS. To access the BIOS, follow these steps: https://www.laptopmag.com/articles/access-bios-windows-10 – then look for the Virtualization setting and enable it. If you are unable to find the Virtualization setting, search online for a manual to your particular BIOS version. Reach out for help on the Nucamp Slack if you need it, and be sure to provide as much of this information as possible: computer/motherboard manufacturer, processor, and BIOS software version.
Part IV: Testing the emulator with React Native/Expo.
1. Make sure that your AVD is running (see part III, Step 5 above).
2. Open your bash terminal to your React Native nucampsite project folder and type expo start.
3. A browser tab for http://localhost:19002 should open automatically. This is the page for Expo DevTools. If it doesn’t open automatically, point your browser to that address. You’ll know you’re on the right page when you see “Metro Bundler” in the upper left. From that page, click the “Run on Android device/emulator” link. (You can also type the letter a in your bash terminal session where you started expo to achieve the same result.)
NOTE: Some antivirus software (such as Avast) may interfere with your ability to connect with your emulator. If you have timeout issues when trying to connect, try disabling your antivirus temporarily to test if it is the issue. If it is, you will need to change your antivirus configuration to ignore your Android SDK path.
4. The first time you do this, Expo will automatically install itself on your virtual device. You should see logs to the console in the Expo DevTools page in your browser that say “Downloading latest version of Expo“, then “Installing Expo on device“, then “Opening on Android device“. This can take a while the first time, sit tight.
5. At this last part when you see “Opening on Android device”, you may see a dialog pop up on your emulator asking you to enable “Permit drawing over other apps“. If you do, then click OK, enable the setting, then use the Back triangle at the bottom left of the device screen (not the one on the upper left) to return to the Expo install.
6. You will see a white screen and the words “Building JavaScript bundle” for a while as it installs. Eventually, the React Native app should load, and you are done! You should see the words “Open up App.js to start working on your app!” on the emulator screen.
You may see a message that says “Hello there friend!” then informs you about a menu that you can open with Cmd/Ctrl + M. If you see this message, click OK. Then you will see a menu with options such as “Reload”, “Copy link to clipboard”, etc. Simply close out of this menu (click the X at the upper right). We will discuss this (the Expo Developer Menu) at a later time.
Note: If you have any strange issues at this step, before anything else, please try closing everything and rebooting your computer. Then open Android Studio > AVD Manager, start your emulator again, and continue.
OPTIONAL: Running your application on a mobile device
- While you are welcome to follow the instructions below to test our your application on your personal mobile device, unfortunately this will not be supported by Nucamp due to the many differences in mobile devices. If you have issues installing the emulator, try this as an alternative. (Or, if you are so inclined, just try it for fun!)
- Install the Expo client app on your iOS or Android phone. Download for Android from the Play Store or for iOS from the App Store. The Android app requires Android 5.0 and up. The iOS app requires iOS 10.0 or later.
- Connect your phone to the same wireless network as your computer.
- After you have started your Expo app on your computer: On Android, use the Expo app to scan the QR code in your computer’s terminal or browser. On iOS, follow on-screen instructions to get a link. This will connect your phone to your computer so that you can test your React Native app.
Overview: React Native App Structure
Now look at our example below in our App.js.
We are importing React just like we have done before and we are importing a few components from React native: Stylesheet, Text, View.
Then we are exporting a function component called App. Note: This is a different way to make a default export from a module than we were using in React. But it is the same thing, just another way to do it instead of writing the export line at the bottom. Inside the App component we are returning a view component. The <View> component is the most fundamental building block for the React Native User interface. It is a generic container component that supports layout with Flexbox, styles and more. You can think of it as analogous to the HTML <div> element. React Native is very similar to React, but we are no longer dealing with HTML elements, because we are no longer in the browser world. So expect to be no longer writing JSX that looks like HTML elements. You will be using components for all of your Ui. <Text> will be a generic container for displaying text. Any text nodes, by which I mean strings like this Hello World here must be wrapped in a text component. You will also notice the <View> component has a style attribute and the value is the container property of this styles object that was created below with the stylesheet APi.
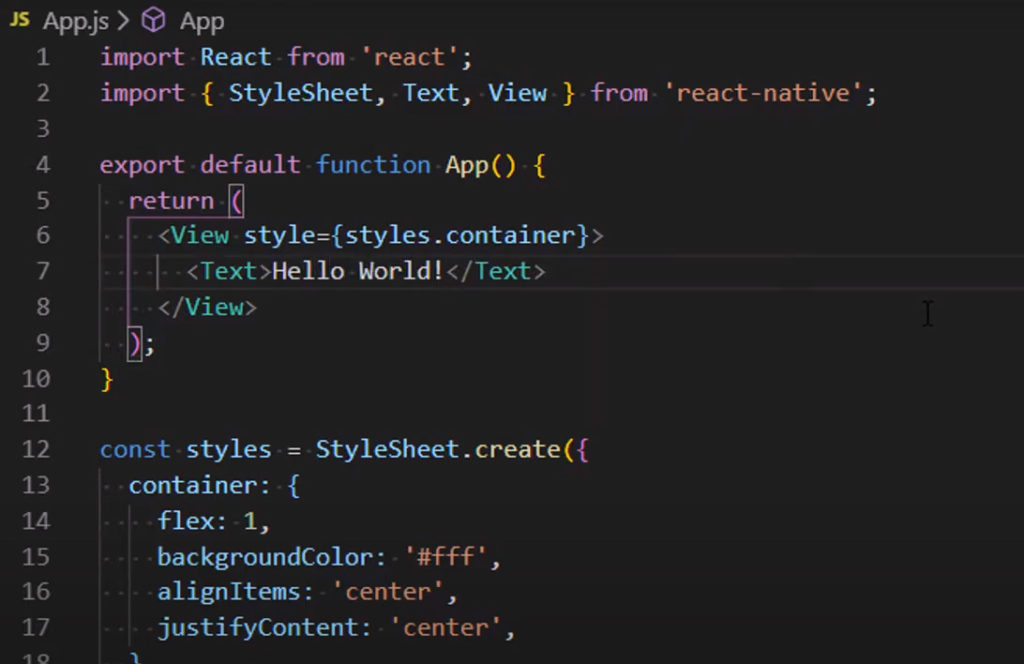
You can also set styles inline similar to how you can set inline style in HTML. In the example above the styles have been placed in a style sheet. StyleSheet which we imported from React native is not a component, it is part of the general APi. What goes inside the stylesheet object looks a lot like CSS. But it is not really CSS. Just like JSX isn’t really like HTML. This is a way that REACT native has chosen to expose this styling functionality to us in a way that’s similar to what we are used to in CSS. It is really just JavaScript.
In this list of APi’s we can go through and click on any of the links that say props and it will show you the different style properties that you can use. There is image style props, layout props, shadow props, text style props, and view style props.
Let us make some changes to our styles object. We will get rid of a couple of style here and change the background color.
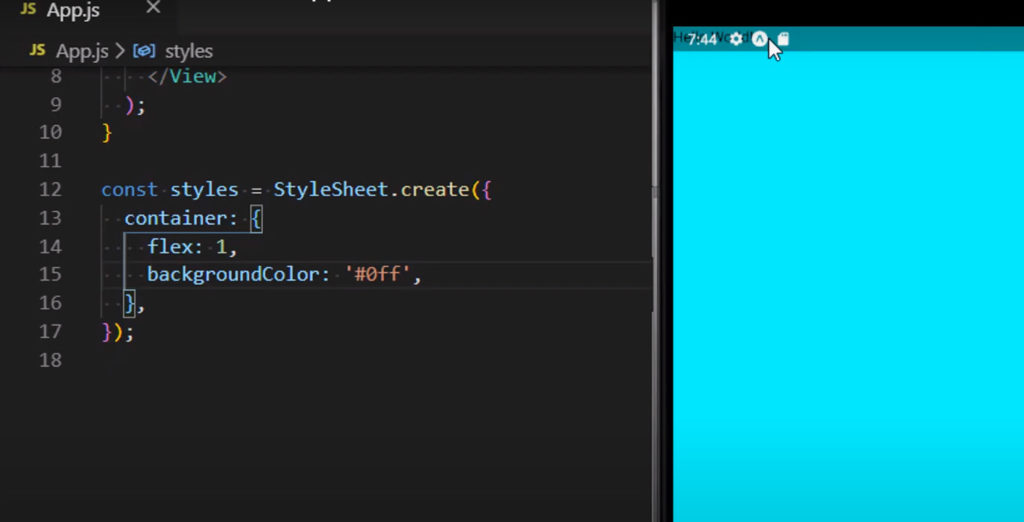
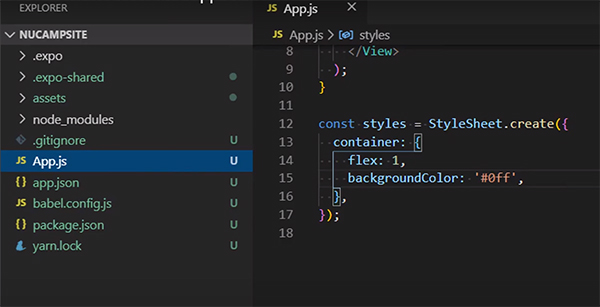
Let us look at more of the overall app structure.
Notice that if we look at the files inside a project, there is no index.html because we are not using any HTML. But we do have a package.json file.
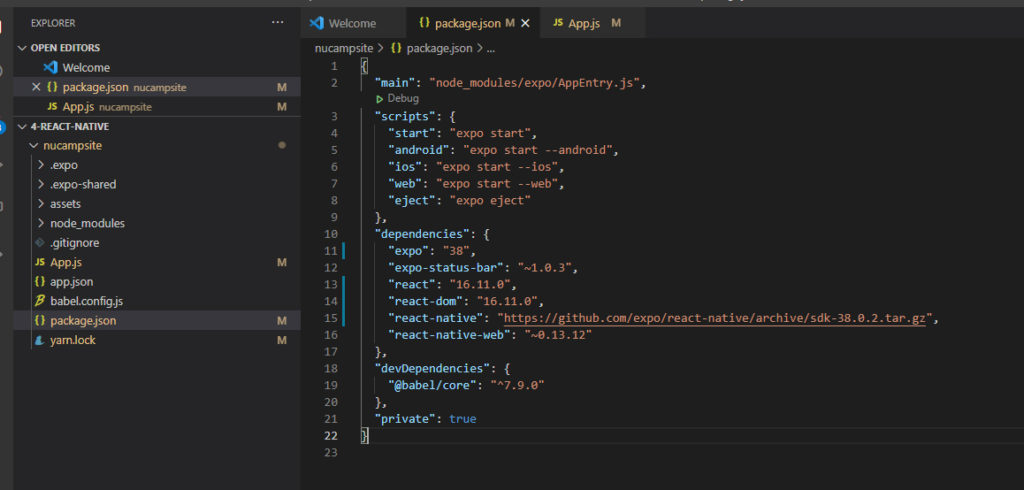
As you can see, we still have a few dependencies installed by default, including EXPO and REACT. And we also have script that are all using expo to carry out the commands
Additional Resources:
- A Guide to Hybrid Mobile App Development
- What is Hybrid App Development?
- Native vs Hybrid Apps
- Hackernoon – Native App Development vs Hybrid App Development
- Where Do Cross-Platform App Frameworks Stand in 2019?
- Xamarin vs React Native vs Ionic vs NativeScript: Cross-platform Mobile Frameworks Comparison
- React Native
- React Native – JavaScript Environment
- Hackernoon – Understanding the React Native Bridge Concept
- Wait… What Happens When My React Native Application Starts?
- React Native Internals
- Expo CLI
- All installers for Node 14.9
- Hackernoon – Understanding Expo for React Native
- Expo vs React Native CLI
- NVM – Node version management utility (macOS)
- Android Studio
- Android Studio – Managing AVDs
- Android Emulator – AMD Processor & HyperV Support (Windows HyperVisor)
- Expo – Android Studio Emulator
- macOS – Nano Text Editor Guide
- React Native – View and Text components
- React Native – StyleSheet API
- React Native – Style
- Expo Development Server
- Expo CLI
- Android Studio AVD Manager
- Transitioning from React Web to React Native
- Converting a React App to React Native
- Differences between ReactJS and React Native
- How Do You Go From React To React Native?
- Migrating Incrementally From React To React Native


