Bootcamp Notes – Day 1 (Mon) – Bootstrap: Using Git


Using Git
What is GIT? It is a free and open-source distributed version control system (DVCS) used by software developers worldwide. There are other version control systems like Git, but Git is without doubt the most widely used today. Version control systems are used by software developers to store a history of changes to a code project in development, and allow programmers to collaborate with each other.
Why use GIT?

- Keep “snapshots” of your projects code history and be able to revert back or create different branches.
- Share code with others online, work on the same project together at the same time.
Note: Git is one way how developers are able to contribute to open source projects. GitHub, Bitbucket, Sourceforge, Gitlabd all use the GIT technology. GIT is the underlying technology for all of these online repositories and thus a hugely important force behind the open source community and the world of software development in general.
A little history about Version Control Systems
Version control systems have been around for decades, and the first ones were centralized (CVCS) – client/server model. Master code repository was kept on a central server. Users depended on the server for access to full repository. A distributed version control system (DVCS) such as Git is a peer-to-peer model. In 2005, Linus Torvaldes (Linux creator) created Git. Git was not the first DVCS, there were others and still are, but it is the most popular. Today, Git is the most widely used version control system.
Projects in distributed VCS like Git can still have a centralized repository, and they typically do. With a distributed version control system, every user who works on a code project can download a ‘clone’ of the project’s code repository, which includes all the code and its entire change history. Git uses a system called pull requests where users can make changes then request that their code gets pulled into the central repository. We will cover the basic Git usage such as creating repositories and making “commits” to them.
About Git Bash
Git Bash is an application for Microsoft Windows environments which provides an emulation layer for a Git command line experience. BASH is an acronym for Bourne Again Shell. A shell is a terminal application used to interface with an operating system through written commands. Bash is a popular default shell on Linux and MaxOS. Git bash is a package that installs Bash, some common bash utilities, and Git on a Windows operating system.
Bash is the default shell application for Unix-based systems, similar in functionality to Windows Powershell. MacOS is a Unix-based system and so it already uses Bash, but it wraps it inside the emulator called Terminal. With Git installed, Windows users can also now use Bash by using Git Bash. Bash is similar in features to Windows Powershell. Bash is cross-platform with Windows, macOS, and Linux.
Quick Install Steps Below:
Install git for Windows ——->Installer Here
On windows installer just install with the defaults!
On Mac follow these steps for install:
- Open the Terminal application. (The Terminal app comes installed by default on macOS.)
- We will first need to verify your default shell. Enter this command into your terminal: echo $0
- The output should include the word bash or zsh.
- If it contains the word zsh, switch your default terminal to bash by following the instructions here: https://www.howtogeek.com/444596/how-to-change-the-default-shell-to-bash-in-macos-catalina/
- Close Terminal then open it again. You will see a message that says “The default interactive shell is now zsh.” Don’t panic! This is normal. Type echo $0 again to verify that your shell is now bash.
- You will use the Terminal application to install Homebrew for macOS, which you will then use to install Git.
- Open a Terminal window.
- To install Homebrew, copy the following text command, paste it into your Terminal window, and press enter:
/bin/bash -c "$(curl -fsSL https://raw.githubusercontent.com/Homebrew/install/master/install.sh)"- If you are asked for a password, be aware that you will most likely not be able to see anything being entered into the terminal when you type in your password. This is for security reasons. Type in your password and press enter, even if you don’t see anything. Press enter if directed to do so on the next screen.
- Homebrew should now be installed. Next, use Homebrew to install Git by entering this command into your Terminal: brew install git
Now on terminal for both Mac and Windows do these steps in order on command line:
- git –version
- git config –global user.name “Your Name”
- git config –global user.email <your email address>
- git config –list
Now after doing these steps, you should be able to see your user.name and user.email in the output.
Initialize an empty Git repository with this command: git init
Initialize an empty Git repository with this command: git status
Git Commands (The Local Repository):
- ~ stands for home
- cd – change directory (change folder) ***
- cd .. – go back to parent directory (go back one directory)***
- ls – list ***
- ls -a – list with hidden files and folders ***
- git status –
Adding & committing a file to the local repository
code . – in the terminal will open VSCode.
git status – in the terminal check status on project files such at html files
git add – command will add files to a staging area in the local repository where you first mark the files that you want to commit to the repository before you actually commit them. You can add them one by one.
git add . – command will add all the files that are new or modified in the folder since the last commit.

Now will make our first commit:
git commit -m “First commit” (This dash -m stands for message and the string that follows it is the message that will be saved with this commit)

git log (Gives you a history of changes of previous commits) Look below at example:
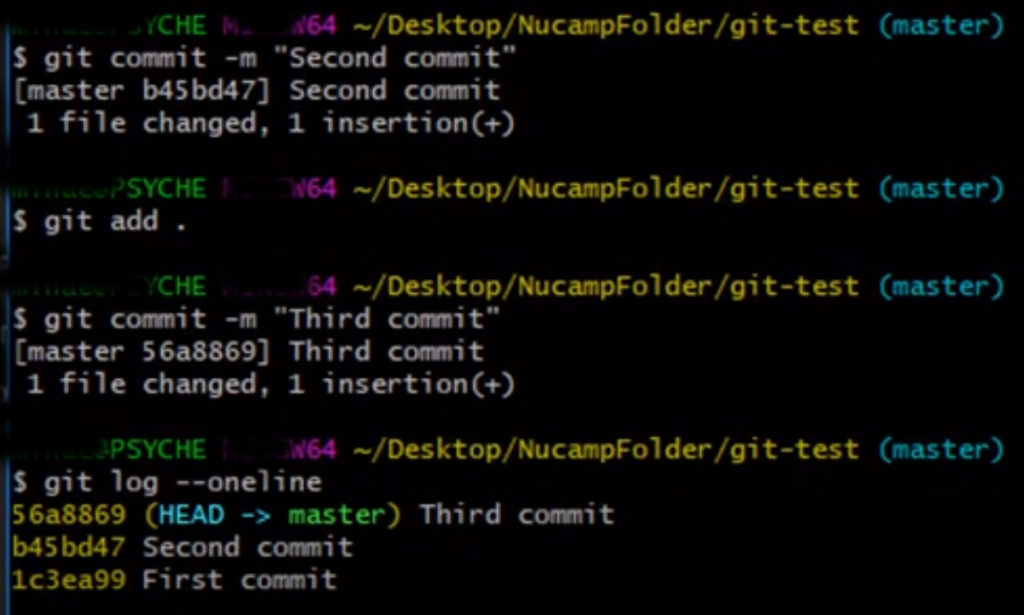
git log — oneline (You will see your commit messages along with a unique identifier here called a hash)

We use the hash to go to a previous commit: git checkout b45bd47 index.html
This then in VS Code would then change your file back to second version.
To rest back to the HEAD you would use: git reset HEAD index.html and git checkout — index.html
Remote Git Repository
With a remote Git Repository, you can access your code from a network. Share you code with others and work on projects with other developers. For this bootcamp you are not required to have a remote git repository, but it is recommended.
We will go over the basics of setting up a remote git repository and synchronizing it with your local repository. For your remote repository we recommend github.com
shift + insert will copy text into git bash command line terminal.
(More to come on this section later)
Git GUI’s
There are also many different graphical user interface (GUI) applications for using Git. There is even one that comes by default with your Git installation, named Git GUI, which you can use by right clicking on a folder and choosing Git GUI here. There are also many third-party GUI applications for using Git. Two of the most popular are SourceTree and TortoiseGit, but there are many more. Also, there is a Git interface built right into VS Code.
Additional Resources:
- Git (official): Getting Started – About Version Control
- Atlassian Tutorial: Why Git
- Atlassian: Getting Git Right
- Atlassian: Making a Pull Request
- Github
- Atlassian’s guide to Git Bash for Windows
- How To Contribute to Open Source
- Homebrew
- Launch an OS X Terminal Window from a Specific Folder
- Git basics
- Git the simple guide
- Git cheatsheet
- Git Integration in Visual Studio Code
- Introduction to Git Concepts (contains a helpful explanation of Local vs Remote Repositories)
- Understanding git for real by exploring the .git directory (a friendly yet in-depth article)
- List of Git GUIs
- Git Integration with VS Code Tutorial
- Git support in VS Code (official VS Code documentation)